


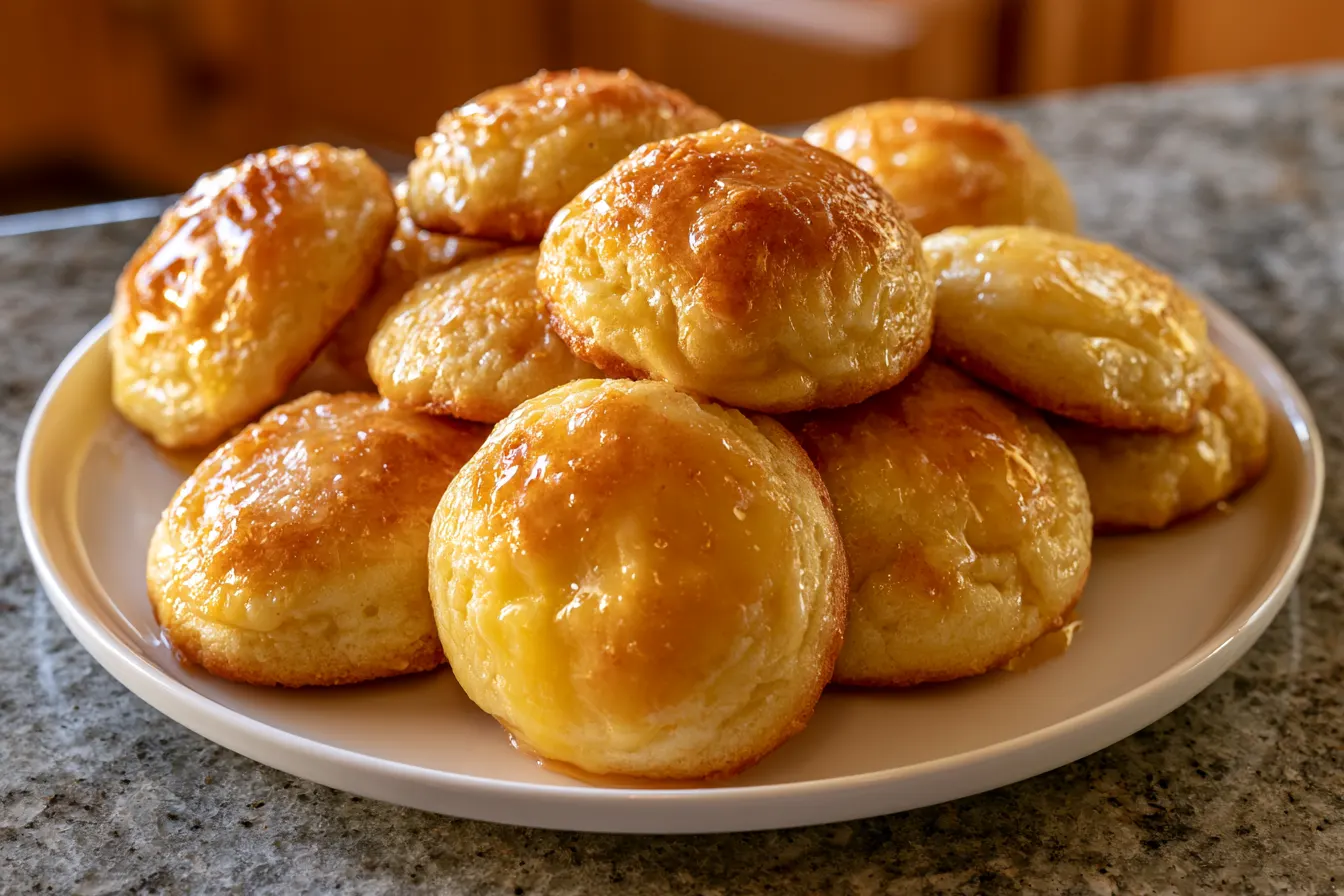
My grandmother always said the secret to a good cake was butter, and lots of it. There’s just something about that golden, rich flavor that brings a smile to your face. Today, we’re taking that beloved Southern comfort, the Kentucky Butter Cake, and shrinking it down into the most irresistible, buttery, bite-sized cookies you could ever imagine.
- The Heart of the South, in Cookie Form
- Gather Your Baking Arsenal: Ingredients for Buttery Bliss
- Prepping for Perfection: Before You Mix
- Baking Buttery Dreams: Step-by-Step Guide
- Common Cookie Conundrums & Their Solutions
- Serving & Storage Suggestions
- Frequently Asked Questions About These Buttery Delights

The Heart of the South, in Cookie Form
What is it about Kentucky Butter Cake that makes it so utterly beloved? It’s not just the butter, though that’s certainly a huge part of it. It’s that unique, slightly caramelized, utterly moist texture that comes from baking a tender vanilla cake and then, while it’s still warm, pouring a hot, sweet butter sauce right over the top. The cake soaks up all that goodness, becoming incredibly rich and tender. My mission, and I chose to accept it, was to translate that magic into a cookie. It took a few tries, but the result is a cookie that captures that essence perfectly – a melt-in-your-mouth experience with every bite.Why These Kentucky Butter Cake Cookies Reign Supreme
You might be thinking, “A cake cookie? How’s that different?” The key lies in the glaze. While many cookie recipes add butter to the dough, our secret weapon here is that warm butter glaze, applied *after* baking. This mimics the traditional cake method, allowing the cookies to absorb the rich, sweet butter, creating an unparalleled moistness and a distinct, almost gooey texture in the center, while keeping a slight chewiness around the edges. It’s a delightful contrast that truly sets these cookies apart from any other.Gather Your Baking Arsenal: Ingredients for Buttery Bliss
Before you even think about preheating your oven, let’s make sure your pantry is stocked. Good baking starts with good ingredients, and for these heavenly Kentucky butter cake cookies, quality butter is non-negotiable.For the Tender Cookie Dough
All-Purpose Flour: The structural foundation. Make sure it’s fresh! Baking Powder: Our leavening agent, giving the cookies a light lift. Salt: Balances the sweetness and enhances all the flavors. Unsalted Butter: Softened to room temperature. This is where most of the magic happens in the dough itself. Granulated Sugar: For sweetness and a tender crumb. Large Eggs: Room temperature, please! They emulsify and add richness. Vanilla Extract: Don’t skimp on good quality vanilla; it really shines here.For the Signature Butter Glaze
Unsalted Butter: Again, the star! This will be melted. Granulated Sugar: For the sweetness of the glaze. Water: To help dissolve the sugar and create the right consistency. Vanilla Extract: A touch more vanilla to echo the cookie’s flavor.
Prepping for Perfection: Before You Mix
A little mise en place goes a long way in baking. It makes the whole process smoother and more enjoyable. 1. Butter Up: Make sure your unsalted butter for the cookie dough is perfectly softened. Not melted, not hard. If you press it, your finger should leave a slight indentation. 2. Egg-cellent Prep: Take your eggs out of the fridge about 30 minutes before you start. Room temperature eggs incorporate better into the batter, leading to a smoother, more uniform dough. 3. Line ‘Em Up: Get your baking sheets ready. Lining them with parchment paper or silicone mats will prevent sticking and make cleanup a breeze. 4. Preheat & Measure: Go ahead and preheat your oven. Then, measure out all your dry ingredients into one bowl and your wet into another (except for the butter and sugar, which will cream together). This keeps things organized.Baking Buttery Dreams: Step-by-Step Guide
This is where the transformation happens! Follow these steps carefully for the best buttery treats.Whipping Up the Cookie Dough
1. Whisk the Dry: In a medium bowl, whisk together the all-purpose flour, baking powder, and salt. Set this aside for a moment. 2. Cream the Butter & Sugar: In a large mixing bowl, using an electric mixer (either stand or hand-held), beat the softened unsalted butter and granulated sugar together on medium speed until the mixture is light and fluffy. This usually takes about 2-3 minutes. Scrape down the sides of the bowl as needed. 3. Add Eggs & Vanilla: Beat in the large eggs one at a time, mixing well after each addition. Once combined, stir in the vanilla extract. The mixture might look a little curdled, but don’t worry, it will come together. 4. Combine Wet & Dry: Gradually add the dry ingredients to the wet ingredients, mixing on low speed until just combined. Be careful not to overmix! Overmixing develops gluten, which can lead to tough cookies. 5. Chill Time (Crucial!): Cover the dough with plastic wrap and refrigerate for at least 30 minutes, or up to an hour. This chilling step helps the flavors meld and prevents the cookies from spreading too much during baking.
Shaping and Baking the Cookies
1. Preheat Oven & Prep Sheets: Preheat your oven to 350°F (175°C). Line two baking sheets with parchment paper or silicone baking mats. 2. Scoop the Dough: Use a small cookie scoop (about 1.5 tablespoons) or roll tablespoon-sized balls of dough. Place them about 2 inches apart on the prepared baking sheets. 3. Bake Until Golden: Bake for 10-12 minutes, or until the edges are lightly golden and the centers are just set. They might look slightly underdone in the middle, but they’ll firm up as they cool. Tip: For perfectly round cookies, use a large round cookie cutter or the rim of a glass to gently scoot around each cookie immediately after they come out of the oven. This helps reshape them if they spread unevenly. 4. Cool Slightly: Let the cookies cool on the baking sheets for 2-3 minutes before transferring them to a wire rack. This allows them to set up enough to handle.The Glorious Butter Glaze
1. Melt & Mix: While the cookies are cooling slightly, prepare the glaze. In a small saucepan, combine the unsalted butter, granulated sugar, and water. Cook over medium heat, stirring constantly, until the butter is melted and the sugar is completely dissolved. Bring it to a gentle simmer, then remove from heat. 2. Add Vanilla: Stir in the vanilla extract. 3. Glaze While Warm: Place the wire rack with the still-warm cookies over a sheet of parchment paper or foil (to catch drips). Carefully brush the warm butter glaze generously over the tops of each cookie. You can also briefly dip the tops of the cookies into the glaze. Let the glaze soak in and set for about 10-15 minutes before serving.Common Cookie Conundrums & Their Solutions
Even seasoned bakers run into snags. Here are a few common issues you might encounter with these Kentucky butter cake cookies and how to fix them.Why Are My Cookies Spreading Too Much?
This is often due to butter that’s too warm, or not chilling the dough enough. Make sure your butter is softened, not melted, and always give the dough its full chill time.My Cookies Are Dry – What Happened?
Overmixing the flour or overbaking are the usual culprits. Mix the flour in until *just* combined, and keep a close eye on the oven. These cookies are meant to be tender, so pull them when the edges are lightly golden and the centers are just set.The Glaze Isn’t Soaking In
The key is to glaze the cookies while they are still warm, but not piping hot straight from the oven. A few minutes of cooling on the sheet pan, then transferring to the rack, is usually the sweet spot. If the cookies are too cool, the glaze won’t absorb as well.Can I Make the Dough Ahead of Time?
Absolutely! The dough can be made a day or two in advance and stored, tightly wrapped, in the refrigerator. Just remember to let it soften slightly at room temperature for about 15-20 minutes before scooping and baking.Serving & Storage Suggestions
These Kentucky butter cake cookies are best enjoyed fresh, still slightly warm from their glaze bath. They pair wonderfully with a hot cup of coffee, a glass of cold milk, or even a scoop of vanilla bean ice cream for an extra decadent treat. Store any leftover cookies in an airtight container at room temperature for up to 3-4 days. While they’re still delicious, the texture will be best on the first day or two. Freezing isn’t ideal for the glazed cookies, as the glaze texture can change upon thawing. However, you can freeze the unbaked cookie dough balls for up to 3 months. Just bake from frozen, adding a minute or two to the baking time.Frequently Asked Questions About These Buttery Delights
Got questions? I’ve got answers! Here are some common queries about making the best Kentucky butter cake cookies.Can I use salted butter instead of unsalted?
While you *can* in a pinch, I strongly recommend unsalted butter for both the dough and the glaze. This gives you complete control over the saltiness. If you must use salted, omit the added salt in the cookie dough.What if I don’t have vanilla extract?
Vanilla is pretty crucial for the classic Kentucky butter cake flavor. If you’re out, you could try a tiny pinch of almond extract, but the flavor profile will be noticeably different. It’s worth a trip to the store for good vanilla!Can I make these cookies gluten-free?
I haven’t tested this specific recipe with gluten-free flour. However, a good 1:1 gluten-free baking flour blend (one that includes xanthan gum) might work. Results may vary in terms of texture.How do I know when the glaze is ready?
The glaze is ready when the butter is fully melted and the sugar has completely dissolved, and it reaches a gentle simmer. It shouldn’t be thick like a syrup, but rather a thin, buttery liquid.Can I add nuts to these cookies?
You absolutely could! Chopped pecans or walnuts would be a fantastic addition, especially if you like a bit of crunch. Fold about 1/2 cup into the dough along with the dry ingredients.
Kentucky Butter Cake Cookies with Glaze
These Kentucky Butter Cake Cookies boast a rich buttery taste and tender crumb, drenched in a sweet butter glaze for irresistible flavor.
📝 Ingredients
👩🍳 Instructions
- 1In a medium bowl, whisk together the all-purpose flour, baking powder, and salt. Set aside.
- 2In a large mixing bowl, using an electric mixer, cream together the softened unsalted butter and ¾ cup granulated sugar on medium speed until light and fluffy, about 2-3 minutes. Scrape down the sides of the bowl as needed.
- 3Beat in the eggs one at a time, mixing well after each addition. Stir in 1 teaspoon vanilla extract.
- 4Gradually add the dry ingredients to the wet ingredients, mixing on low speed until just combined. Be careful not to overmix. Cover the dough with plastic wrap and refrigerate for at least 30 minutes, or up to 1 hour.
- 5Preheat your oven to 350°F (175°C). Line two baking sheets with parchment paper or silicone baking mats.
- 6Scoop tablespoon-sized balls of dough (about 1.5 tablespoons each) and place them about 2 inches apart on the prepared baking sheets.
- 7Bake for 10-12 minutes, or until the edges are lightly golden and the centers are just set. They may look slightly underdone in the middle.
- 8Let the cookies cool on the baking sheets for 2-3 minutes before transferring them to a wire rack set over a sheet of parchment paper or foil (to catch glaze drips).
- 9While the cookies are cooling slightly, prepare the glaze: In a small saucepan, combine ½ cup unsalted butter, ½ cup granulated sugar, and ¼ cup water. Cook over medium heat, stirring constantly, until the butter is melted and the sugar is completely dissolved. Bring to a gentle simmer, then remove from heat.
- 10Stir in ½ teaspoon vanilla extract into the glaze.
- 11Carefully brush the warm butter glaze generously over the tops of each warm cookie. Let the glaze soak in and set for about 10-15 minutes before serving. Enjoy your heavenly Kentucky butter cake cookies!
💡 Notes
Ensure all dairy and eggs are at room temperature for best results in the cookie dough. For the glaze, applying it to warm (not hot) cookies allows for optimal absorption. Store leftover cookies in an airtight container at room temperature for up to 3-4 days. Freezing unbaked dough balls is an option for longer storage.



