


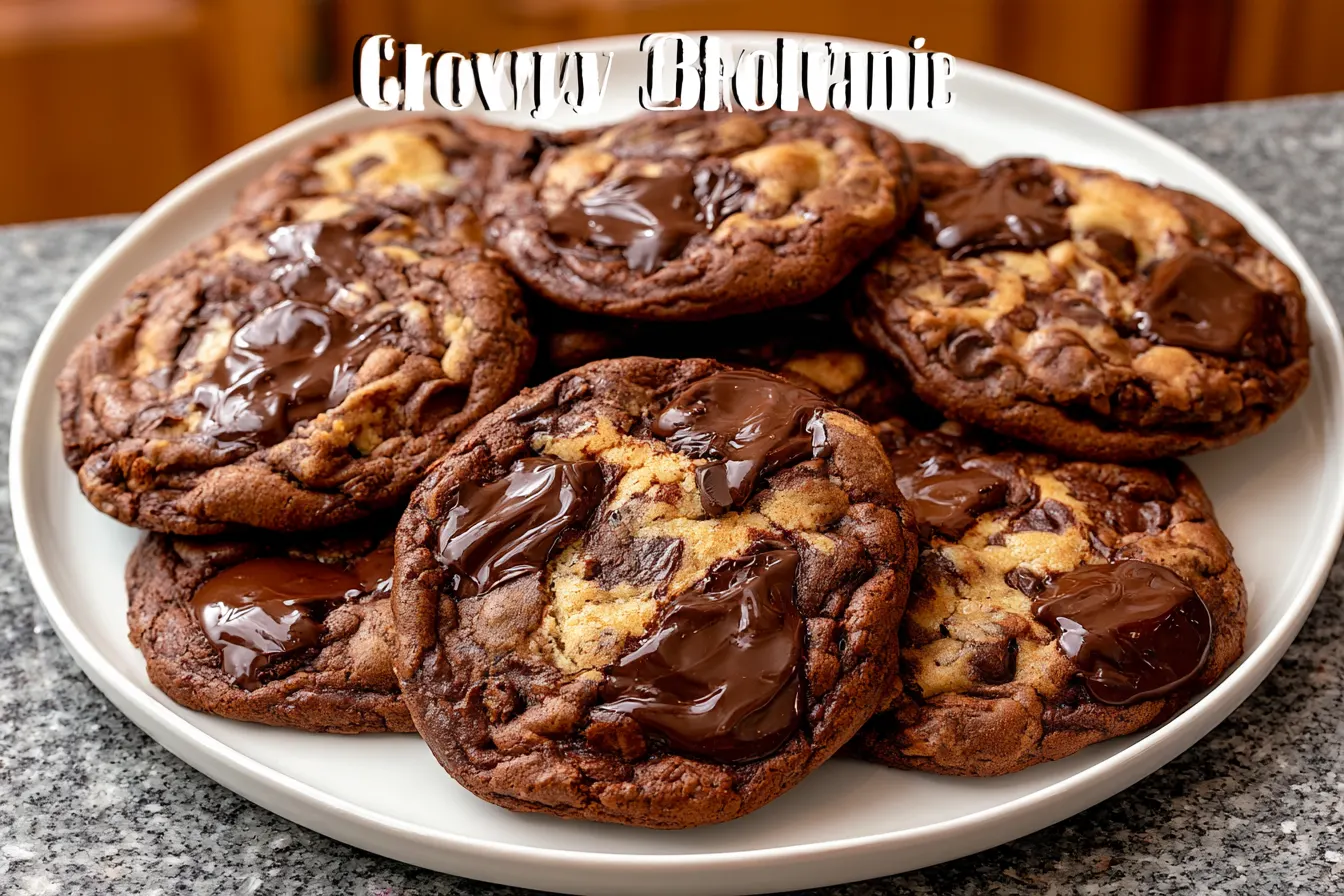
There’s a smell that just screams “home” to me, and it’s the warm, nutty aroma of browned butter mingling with melting chocolate. It’s a scent that promises comfort, a little indulgence, and something truly special baking in the oven. That very smell is what inspired these incredible brown butter dark chocolate chunk cookies, a recipe I’ve been perfecting for what feels like a lifetime.

Mastering the Brown Butter Magic: Why It Changes Everything
Let’s talk about the star player here: brown butter. If you’ve never browned butter before, prepare for a revelation. It’s a simple technique that transforms plain old butter into a nutty, golden, fragrant elixir that adds incredible depth to baked goods. Think of it as butter, but with an advanced degree in flavor. The process involves gently melting and cooking butter past its liquid state until the milk solids separate and toast, turning a beautiful amber color and emitting a deeply nutty aroma. This isn’t just about color; it’s about developing a complex, almost caramel-like flavor that elevates everything it touches. In these cookies, it provides an unparalleled richness that a standard melted butter simply can’t achieve. It’s what makes these cookies so much more than just “chocolate chip.”The Unrivaled Texture Blend
What truly sets these cookies apart is their extraordinary texture. We’re aiming for that sweet spot: a slight crispness around the edges, giving way to an incredibly soft, almost fudgy interior. This isn’t a thin, crisp cookie, nor is it a cakey one. It’s the perfect chewy, gooey balance that makes you close your eyes and savor each mouthful. The secret lies not only in the ratio of ingredients but also in the method of mixing and, crucially, the chilling time. The melty dark chocolate chunks also play a huge role here. As they bake and then cool slightly, they create these pockets of warm, yielding chocolate that perfectly complement the tender cookie dough. There’s nothing quite like biting into a cookie and getting that generous, stretchy pull of still-warm chocolate.What You’ll Need: Gathering Your Ingredients for Perfection
Every great recipe starts with great ingredients. For these chewy and gooey brownie butter chocolate chip cookies, quality really does shine through. Don’t skimp on the chocolate here; it makes a world of difference!Dry Goods & Leaveners
- All-Purpose Flour: The backbone of our cookie. Make sure it’s fresh!
- Baking Soda: Our primary leavening agent, giving us that lovely chew and spread.
- Salt: Essential for balancing sweetness and enhancing all the other flavors. Don’t skip it!
Sugars
- Granulated Sugar: For crispness at the edges and overall sweetness.
- Light Brown Sugar (packed): This is key for that signature chewiness and a hint of molasses flavor. Make sure it’s packed firmly into your measuring cup.
Fats & Flavor
- Unsalted Butter: The star of the show. We’ll be browning this to unlock incredible depth. Unsalted gives you control over the overall salt content.
- Large Egg + Egg Yolk: The extra yolk adds richness, chewiness, and helps bind everything together for that perfect texture.
- Pure Vanilla Extract: Use good quality vanilla! It complements the brown butter beautifully.
The Chocolate Factor
- Dark Chocolate Chunks or Bars (60-70% cacao): This is where you can truly elevate your cookies. I prefer chopping a good quality dark chocolate bar rather than using pre-packaged chips. The irregular shapes melt into glorious puddles, and the quality of the chocolate itself is usually far superior. Semi-sweet works too, but dark chocolate offers a lovely counterpoint to the sweetness of the cookie dough.

Crafting Your Cookies: Step-by-Step for the Best Bites
This recipe is straightforward, but a few key techniques will ensure your brown butter dark chocolate chunk cookies are absolutely perfect every single time. Take your time with the butter – it’s worth it!Step 1: Brown that Butter
In a light-colored saucepan, melt the unsalted butter over medium heat. Continue cooking, swirling occasionally, until the butter foams, then subsides. Watch for golden-brown bits to appear at the bottom and a nutty aroma to fill your kitchen. This usually takes about 5-7 minutes. Immediately pour the browned butter, including all the glorious brown bits, into a heatproof bowl to stop the cooking. Let it cool for about 10-15 minutes until it’s still warm but no longer sizzling hot.
Note: A light-colored pan helps you monitor the color of the milk solids, preventing them from burning. Don’t walk away during this step!
Step 2: Wet Ingredients Unite
Once your browned butter has cooled slightly, whisk in the granulated sugar and brown sugar until well combined. The mixture should be smooth and a bit glossy. Next, beat in the large egg and the extra egg yolk one at a time, mixing well after each addition until fully incorporated. Stir in the pure vanilla extract. The mixture should be thick and lightened in color.
Step 3: Introduce the Dry
In a separate medium bowl, whisk together the all-purpose flour, baking soda, and salt. Gradually add the dry ingredients to the wet ingredients, mixing on low speed or by hand until *just* combined. Be careful not to overmix; overmixing develops gluten, which can lead to tough cookies.
Step 4: Fold in the Chocolate Chunks
Gently fold in your dark chocolate chunks until evenly distributed throughout the dough. Resist the urge to eat too much raw dough at this stage, no matter how tempting! We need these for baking.
Step 5: Chill Out
Cover the bowl with plastic wrap and refrigerate the cookie dough for at least 30 minutes, or up to 24 hours. Chilling the dough allows the flavors to meld, prevents the cookies from spreading too much in the oven, and results in a chewier, more flavorful cookie. Trust me, this step is crucial for that perfect texture.

Step 6: Bake to Perfection
Preheat your oven to 375°F (190°C). Line a baking sheet with parchment paper or a silicone baking mat. Scoop about 2 tablespoons of dough per cookie, rolling them into balls. Place them about 2 inches apart on the prepared baking sheet. For extra pretty cookies, press a few extra chocolate chunks onto the top of each dough ball before baking.
Step 7: The Grand Finale
Bake for 9-12 minutes, or until the edges are golden brown and set, but the centers still look slightly underbaked and gooey. They will continue to set as they cool. Remove from the oven and immediately sprinkle with a pinch of flaky sea salt (optional, but highly recommended!). Let the cookies cool on the baking sheet for 5-10 minutes before transferring them to a wire rack to cool completely. This helps them firm up without losing their chewiness.
Tip: If you want truly picture-perfect cookies with those beautiful melty chocolate pools, right when they come out of the oven, use a round cookie cutter (slightly larger than your cookie) or the back of a spoon to gently scoot the edges of the warm cookies into a perfect circle. This “cookie scoot” technique works wonders!
Frequently Asked Cookie Conundrums
No baking journey is without its questions. Here are some common queries I get about brown butter chocolate chip cookies, and my best answers to ensure your success.Why do I need to brown the butter? What’s the big deal?
Browning the butter toasts the milk solids, creating a complex, nutty, and slightly caramel-like flavor that regular melted butter just can’t offer. It adds incredible depth and richness, transforming a good cookie into an extraordinary one. It’s the secret weapon for next-level flavor.
Can I use chocolate chips instead of chunks?
Absolutely, you can! However, I highly recommend using chopped dark chocolate bars. Chocolate chips often contain stabilizers that help them hold their shape, which means they don’t melt into those gorgeous, gooey puddles quite as well as chopped chocolate. For truly melty, irresistible pockets of chocolate, go for a good quality bar.
Is the chilling time really necessary? I’m impatient!
Yes, the chilling time is genuinely important for these cookies. It allows the flour to fully hydrate, the flavors to deepen, and prevents the cookies from spreading too much in the oven, ensuring a thicker, chewier cookie. Even 30 minutes makes a difference, but an hour or more is even better for optimal results. Think of it as developing character!
My cookies spread too much and are flat. What went wrong?
Several factors can cause flat cookies. Ensure your butter wasn’t too warm when you mixed it with the sugars, that your leavening agent (baking soda) is fresh, and that you didn’t overmix the dough. Most importantly, make sure you chilled the dough adequately. Also, your oven temperature might be slightly off; an oven thermometer can be a helpful tool.
Can I make these cookies ahead of time?
Definitely! You can prepare the cookie dough and refrigerate it for up to 3 days. Alternatively, scoop the dough balls onto a parchment-lined baking sheet, freeze until solid, then transfer to a freezer-safe bag. You can bake them directly from frozen, adding a few extra minutes to the baking time.
Serving Suggestions & The Perfect Pairing
These brown butter dark chocolate chunk cookies are absolutely divine on their own, still warm from the oven, with those gooey chocolate pockets. But if you’re feeling a little extra, here are a few ways to elevate the experience: Classic Milk: A tall, cold glass of milk is the quintessential pairing. The creaminess of the milk perfectly complements the rich sweetness of the cookie. Coffee or Espresso: For the grown-ups, a strong cup of coffee or a shot of espresso cuts through the richness beautifully, making for a sophisticated treat. Ice Cream Sandwich: Once completely cooled, these cookies make an incredible base for an ice cream sandwich. Vanilla bean, coffee, or even a salted caramel ice cream would be phenomenal. A Sprinkle of Sea Salt: A tiny sprinkle of flaky sea salt on top of the cookies right as they come out of the oven enhances the chocolate flavor and adds a delightful textural contrast. Don’t skip this! Warm Dessert: Serve a slightly warm cookie with a scoop of vanilla ice cream and a drizzle of caramel sauce for an instant dessert upgrade.Storing Your Cookie Treasures
If by some miracle you have any leftover cookies (a rare occurrence in my house!), proper storage will keep them fresh and delicious. Store the cooled cookies in an airtight container at room temperature for up to 3-4 days. To revive them slightly, pop them in the microwave for 10-15 seconds, or warm them in a low oven for a few minutes until the chocolate is just melty again. For longer storage, the baked cookies can be frozen for up to 3 months. Thaw at room temperature or warm gently in the oven. The dough balls, as mentioned earlier, can also be frozen and baked from frozen, which is perfect for fresh-baked cookies whenever a craving strikes!
Ultimate Brown Butter Dark Chocolate Chunk Cookies
Chewy, gooey brown butter dark chocolate chunk cookies with crispy edges and melty centers, elevated by nutty browned butter.
📝 Ingredients
👩🍳 Instructions
- 1Brown the Butter: In a light-colored saucepan, melt unsalted butter over medium heat. Continue cooking, swirling occasionally, until the butter foams, then subsides. Watch for golden-brown bits to appear at the bottom and a nutty aroma. Immediately pour into a heatproof bowl and let cool for 10-15 minutes.
- 2Combine Wet Ingredients: Add packed light brown sugar and granulated sugar to the cooled brown butter. Whisk until smooth. Beat in the large eggs and extra egg yolk, one at a time, until fully incorporated. Stir in the pure vanilla extract.
- 3Mix Dry Ingredients: In a separate bowl, whisk together all-purpose flour, baking soda, and salt. Gradually add the dry ingredients to the wet ingredients, mixing on low speed or by hand until *just* combined. Do not overmix.
- 4Fold in Chocolate: Gently fold in the dark chocolate chunks until evenly distributed throughout the dough.
- 5Chill the Dough: Cover the bowl with plastic wrap and refrigerate the cookie dough for at least 30 minutes, or up to 24 hours. This step is crucial for texture and flavor development.
- 6Preheat & Prepare: Preheat oven to 375°F (190°C). Line a baking sheet with parchment paper or a silicone baking mat.
- 7Scoop & Bake: Scoop about 2 tablespoons of dough per cookie, rolling them into balls. Place them 2 inches apart on the prepared baking sheet. Bake for 9-12 minutes, or until edges are golden brown and centers are still slightly soft. They will continue to set as they cool.
- 8Cool & Serve: Remove from oven, sprinkle with flaky sea salt (optional), and let cool on the baking sheet for 5-10 minutes before transferring to a wire rack to cool completely.
💡 Notes
For the best melty chocolate pools, use a high-quality dark chocolate bar and chop it yourself. Chilling the dough is essential for preventing spread and achieving a chewy texture. You can freeze scooped dough balls for later; bake from frozen, adding a few minutes to the bake time. Store cooled cookies in an airtight container at room temperature for up to 4 days.



