


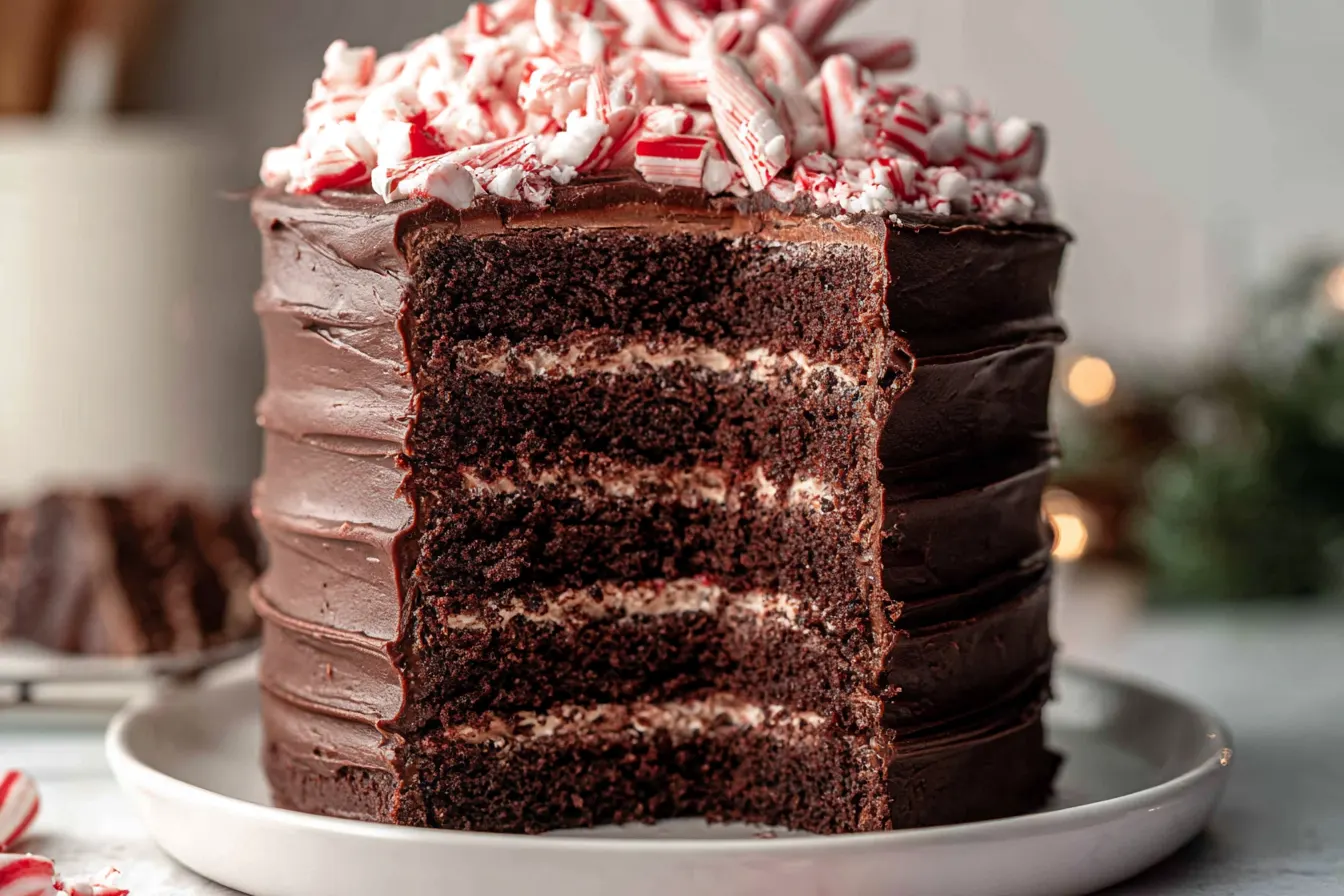
I vividly remember the first time I tasted a peppermint mocha. It was a chilly December morning, and I was bundled up, strolling through a festive market. The warmth from the cup, the invigorating mint, and the deep, comforting chocolate all swirled together in a symphony of flavors that felt like Christmas in a mug. That moment sparked an idea: why limit that magic to a drink? Why not transform it into a show-stopping dessert? And so, after much experimentation, this luxurious Peppermint Mocha Layer Cake was born, capturing every beloved note of that holiday classic in cake form.
- Crafting the Perfect Chocolate Peppermint Cake Base
- Decadent Dark Chocolate Peppermint Mocha Buttercream
- Assembling Your Masterpiece: A Layer Cake How-To
- Troubleshooting Common Cake Baking Snafus
- Frequently Asked Questions About Peppermint Mocha Cake
- Make-Ahead Tips for a Stress-Free Holiday Dessert
- Why This Peppermint Mocha Cake Stands Out

Crafting the Perfect Chocolate Peppermint Cake Base
Getting the cake layers just right is paramount. We’re aiming for a deep, rich chocolate flavor, a tender crumb, and enough structural integrity to hold up to a generous layer of frosting. The secret? A blend of cocoa powder and strong brewed coffee. The coffee doesn’t make the cake taste like coffee, per se, but rather amplifies the chocolate notes, making them sing. And of course, the peppermint extract needs a careful hand – too much and it tastes like toothpaste, too little and it disappears. It’s a delicate balance.The Dry Ingredients: A Foundation of Flavor
When you’re starting, the dry ingredients might seem straightforward, but their quality truly matters. Using a good quality unsweetened cocoa powder is non-negotiable here. It’s where most of our chocolate flavor comes from in the cake itself. Sifting is also important; it prevents lumps and ensures everything is evenly distributed, leading to that perfect, uniform crumb we’re after.Mixing Wet with Dry: The Science of Tenderness
The technique for combining wet and dry ingredients is crucial. You don’t want to overmix, as that develops too much gluten, leading to a tough cake. We’re looking for just combined, with a few streaks of flour still visible. The addition of hot coffee and buttermilk helps create that incredibly moist texture. The acidity in the buttermilk reacts with the baking soda, creating a tender crumb, while the hot coffee “blooms” the cocoa, intensifying its flavor.Decadent Dark Chocolate Peppermint Mocha Buttercream
Now, let’s talk about the star of the show: the frosting. This isn’t just any buttercream. This is a dark chocolate peppermint mocha buttercream – a mouthful to say, and an even more glorious mouthful to eat. It’s rich, creamy, and boasts that perfect trifecta of chocolate, coffee, and mint. Achieving the right consistency is key for both filling and frosting the cake beautifully.Butter, Sugar, and the Quest for Creaminess
Starting with softened butter is critical. If your butter is too cold, you’ll end up with lumps. If it’s too warm, your frosting will be greasy and runny. Aim for room temperature – soft enough to make an indentation with your finger, but still holding its shape. The powdered sugar should be sifted to avoid any grittiness. Whipping these two together until light and fluffy creates the base for our dreamy buttercream. This process incorporates air, making the frosting wonderfully smooth and spreadable.Infusing the Signature Peppermint Mocha Flavors
Once your butter and sugar are beautifully creamed, it’s time for the magic. Good quality melted dark chocolate, cooled slightly, adds that deep chocolate backbone. The strong brewed coffee, cooled, introduces the mocha element, and a touch of peppermint extract brings that refreshing, festive zing. Remember, when adding extracts, it’s always better to start with a little and add more if needed, rather than overdoing it from the start. Taste as you go!
Assembling Your Masterpiece: A Layer Cake How-To
Assembling a layer cake can seem daunting, but with a few simple tips, you’ll be stacking like a pro. The key is patience, level cake layers, and generous frosting. Don’t be afraid to get a little messy; that’s part of the fun!Preparing Your Cake Layers for Success
First things first: make sure your cake layers are completely cooled. Trying to frost warm cake is a recipe for a sliding, melting disaster. If your cakes domed significantly during baking, a serrated knife can be used to carefully level them. This creates a stable surface for stacking and ensures your cake looks neat and professional. A cake leveler tool also works wonders if you have one.The Art of Filling and Crumb Coating
Place your first cake layer on your serving platter or cake stand. Spread a generous amount of frosting evenly over the top. Repeat with the next layer. Once all layers are stacked, apply a thin layer of frosting all over the cake – this is your “crumb coat.” It traps any loose crumbs, ensuring your final layer of frosting is smooth and crumb-free. Chill the cake for 15-20 minutes after the crumb coat to set it. This step is a game-changer!
The Grand Finale: Final Frosting and Decoration
After the crumb coat has set, apply the remaining frosting to the top and sides of the cake. Use an offset spatula or a bench scraper to smooth out the sides and top. For a rustic look, you can create swirls with your spatula. For a sharper, more modern finish, use a bench scraper to gently smooth the sides as you rotate the cake. Decorate with chocolate shavings, crushed peppermint candies, or a dusting of cocoa powder for that extra festive touch.Troubleshooting Common Cake Baking Snafus
Even experienced bakers run into issues sometimes. Here are a few common problems you might encounter with this Peppermint Mocha Layer Cake and how to avoid them or fix them if they happen.Why did my cake layers sink in the middle?
This is often due to opening the oven door too early, inaccurate oven temperature, or over-mixing the batter. Ensure your oven is preheated fully and avoid opening the door until the last 10-15 minutes of baking. An oven thermometer can help verify your oven’s actual temperature. Over-mixing develops gluten, which can lead to a dense, sunken cake.My frosting is too runny/too stiff. What went wrong?
If your frosting is too runny, it might be that your butter was too warm, or you added too much liquid (coffee, extract). You can try adding a bit more sifted powdered sugar, a tablespoon at a time, until it reaches the desired consistency. If it’s too stiff, add a tiny splash of milk or cold coffee, a teaspoon at a time, until it loosens up. Tip: Always add liquids slowly to frosting; you can always add more, but you can’t easily take it out.How can I prevent my cake from sticking to the pans?
Always grease and flour your cake pans thoroughly. For chocolate cakes, I often grease the pans and then dust them with cocoa powder instead of flour – it prevents those white flour streaks on the finished cake. You can also line the bottom of the pans with parchment paper for extra insurance.Frequently Asked Questions About Peppermint Mocha Cake
Got questions? I’ve got answers. Here are some common inquiries about this festive layer cake.Can I make this cake gluten-free?
Yes, you absolutely can! Simply substitute the all-purpose flour with a good quality 1:1 gluten-free baking flour blend that contains xanthan gum. The rest of the ingredients and instructions should remain the same.What kind of coffee should I use for the cake and frosting?
For both the cake and the frosting, a strong brewed coffee works best. You can use espresso, a strong drip coffee, or even instant espresso powder dissolved in hot water. The stronger the coffee, the more it will enhance the chocolate flavor without making the cake taste overtly like coffee.How far in advance can I make this Peppermint Mocha Layer Cake?
The cake layers can be baked up to 2 days in advance, wrapped tightly in plastic wrap, and stored at room temperature. The buttercream can be made up to 3 days in advance and stored in an airtight container in the refrigerator; bring to room temperature and re-whip before using. The assembled cake is best enjoyed within 3-4 days when stored properly.Can I freeze slices of this cake?
Yes! This cake freezes beautifully. Once the cake is completely chilled and firm, wrap individual slices tightly in plastic wrap, then place them in an airtight freezer-safe container or bag. It can be frozen for up to 2-3 months. Thaw overnight in the refrigerator or at room temperature for a few hours before serving.I don’t like coffee. Can I omit it?
If you truly dislike the idea of coffee in your cake, you can substitute the strong brewed coffee in the cake batter with hot water or even hot milk. However, the coffee truly enhances the chocolate flavor without imparting a distinct coffee taste, so I encourage you to try it as written first! For the frosting, you can replace the cooled coffee with a bit of milk or cream, or simply add a touch more peppermint extract if you want the mint to be more prominent.Make-Ahead Tips for a Stress-Free Holiday Dessert
Let’s be honest, the holidays are busy. Anything we can do to reduce stress in the kitchen is a win. This Peppermint Mocha Layer Cake, while a bit of a project, can be broken down into manageable steps to make the assembly much smoother on the day you plan to serve it.Bake the Layers Ahead
The cake layers are perfect for making in advance. Once they’re completely cool, wrap each layer individually and tightly in plastic wrap. You can then store them at room temperature for up to two days. For longer storage, freeze the wrapped layers for up to a month. Just thaw them overnight in the refrigerator before you’re ready to frost. This single step eliminates a significant portion of the baking day’s work.Whip Up the Frosting Early
The dark chocolate peppermint mocha buttercream can also be prepared a day or two in advance. Store it in an airtight container in the refrigerator. When you’re ready to use it, let it come to room temperature for an hour or two, then give it a good whip with your electric mixer until it’s smooth and fluffy again. This refreshes its texture and makes it perfectly spreadable.Partial Assembly for Ease
If you’re really looking to get ahead, you can even do the crumb coat the day before. Assemble the layers, apply the thin crumb coat, and chill the cake as directed. Once firm, you can loosely cover the cake with plastic wrap and store it in the refrigerator overnight. The next day, all that’s left is the final layer of frosting and decoration. This is a fantastic strategy for holiday gatherings!Why This Peppermint Mocha Cake Stands Out
There are countless chocolate cakes out there, and even a good number of peppermint mocha variations. So what makes this recipe special? It’s the thoughtful balance of flavors and textures, ensuring every bite is an experience, not just a sweet treat.The Deep, Complex Chocolate
Many chocolate cakes can be one-note. Here, the combination of Dutch-processed cocoa and strong coffee creates a chocolate flavor that’s both intense and nuanced. It’s not just sweet; it has a beautiful depth and a slight bitterness that prevents it from being cloying. This complexity is crucial for pairing with the bright mint.The Perfect Peppermint Presence
Peppermint is a powerful flavor. Too much, and it’s overwhelming; too little, and it’s absent. This recipe uses just enough peppermint extract to give you that invigorating, cool sensation without feeling like you’ve just brushed your teeth. It brightens the chocolate and keeps the cake feeling festive and light, despite its richness.Moisture and Texture
The buttermilk and hot coffee in the cake batter work together to create an incredibly moist, tender crumb. This isn’t a dry, dense cake. It’s soft, almost plush, and it holds up beautifully to the rich buttercream. The frosting itself is light and airy, despite its decadent flavor, making each slice feel luxurious but not overly heavy. It’s a symphony of textures that truly sets this cake apart.
Peppermint Mocha Layer Cake
A decadent dark chocolate cake infused with coffee and peppermint, lavishly frosted with dark chocolate peppermint mocha buttercream.
📝 Ingredients
👩🍳 Instructions
- 1
- 2
- 3
💡 Notes
Ensure all cold ingredients (buttermilk, eggs) are at room temperature for a smoother batter and emulsion. When melting dark chocolate for the buttercream, use a double boiler or microwave in short bursts, stirring frequently, to avoid burning. Be careful with peppermint extract; it's potent, so add slowly and taste.



