


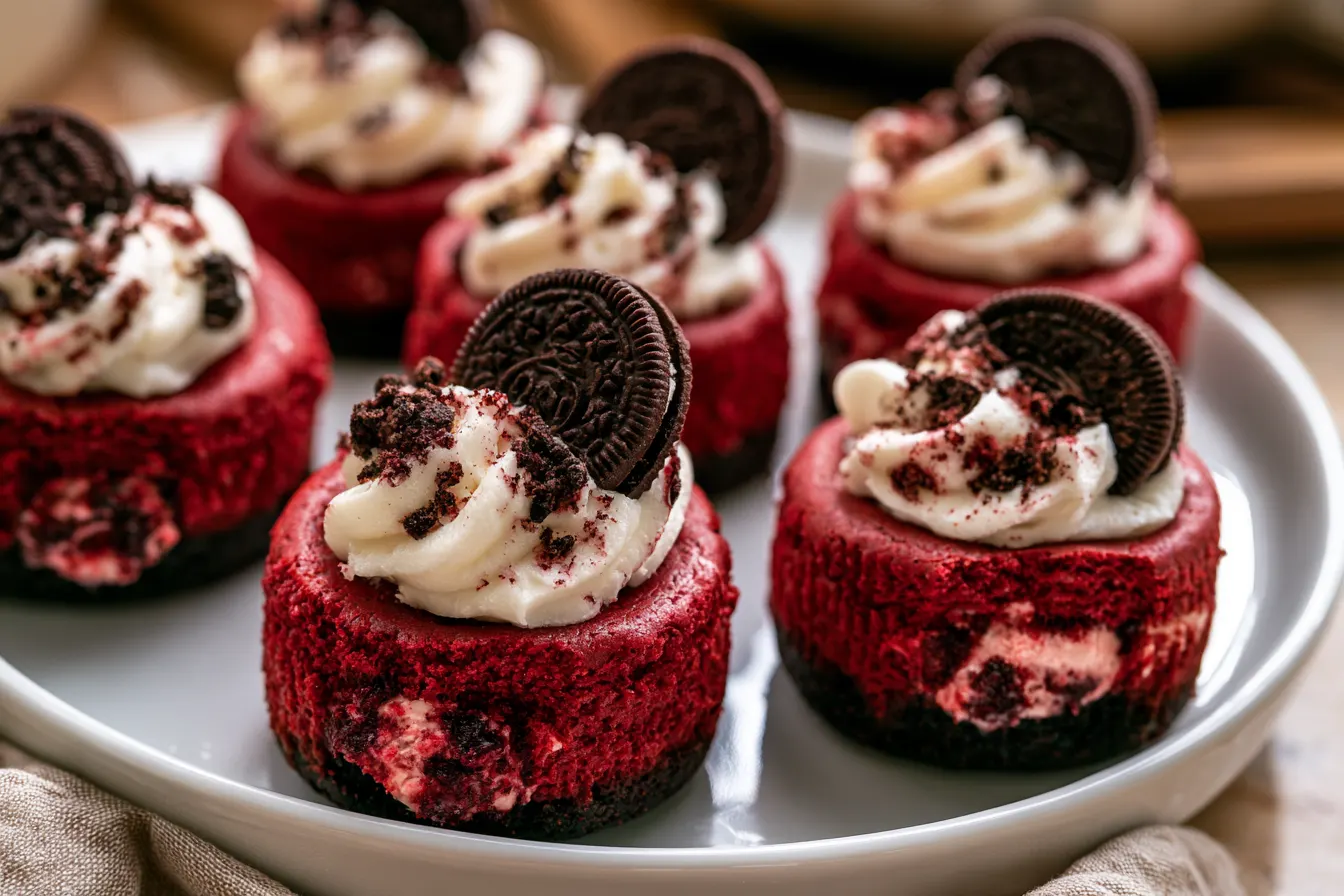
Have you ever wondered if it’s possible to cram all your favorite dessert elements into one glorious bite? The answer, friends, is a resounding yes! These mini Oreo stuffed red velvet brownie cheesecakes are proof that sometimes, more is indeed more. We’re talking rich, fudgy brownie, creamy tangy cheesecake, and a surprise cookie crunch, all wrapped up in a vibrant red hue.
- Crafting Layers of Indulgence
- What Makes This Combination So Irresistible?
- Getting Started: Your Essential Ingredients
- Step-by-Step Indulgence: Baking Your Mini Cheesecakes
- Common Questions About These Mini Cheesecakes
- Why You’ll Fall in Love with This Recipe
- Variations to Explore
- Make-Ahead Magic and Storage Tips
- A Sweet Conclusion

Crafting Layers of Indulgence
When you set out to make a dessert this ambitious, you want to make sure each component sings. For these mini cheesecakes, we’re not just throwing ingredients together; we’re building layers of flavor and texture that complement each other beautifully. It starts with a super fudgy brownie base, the kind that cracks on top and practically melts in your mouth. Then comes the creamy, dreamy red velvet cheesecake layer, vibrant and tangy. And the star of the show? That hidden Oreo, waiting to be discovered.The Fudgy Brownie Base
Every great cheesecake needs a solid foundation, and for these mini delights, we’re going with a brownie. Not just any brownie, mind you, but one that’s dense, chocolatey, and holds its own against the creamy cheesecake. The key here is using good quality cocoa powder and not overmixing the batter, which can lead to a tough brownie. We want fudgy perfection. You’ll start by melting butter with chocolate — a crucial step for that rich texture. Once that’s smooth, sugar gets whisked in, followed by eggs, which provide structure and moisture. Don’t forget a touch of vanilla extract to deepen the flavor profile. Then, gently fold in the dry ingredients: flour, cocoa, and a pinch of salt. That salt, by the way, is a secret weapon, enhancing all those chocolate notes.Velvety Red Cheesecake Filling
Now for the cheesecake. This isn’t your average vanilla cheesecake; it’s a red velvet rendition. The color comes from a touch of red food coloring (gel works best for intensity) and the flavor is subtly enhanced by cocoa powder, giving it that classic red velvet depth. Cream cheese, of course, is the star here, softened to perfection so it blends smoothly without any lumps. Eggs are essential for binding the cheesecake and giving it that signature creamy texture. A bit of sour cream or Greek yogurt adds a lovely tang, balancing out the sweetness and making the cheesecake feel lighter. Sugar, a splash of vanilla, and a tiny bit of flour complete the filling. The goal is a silky-smooth batter, so be sure to scrape down the bowl frequently while mixing.The Oreo Surprise
What makes these mini cheesecakes truly special is the hidden Oreo cookie. It adds an unexpected crunch and an extra layer of chocolatey goodness right in the middle. It’s a delightful discovery with every bite, elevating the dessert from simply delicious to truly memorable. You’ll place a whole Oreo directly on top of the par-baked brownie base before pouring the cheesecake filling over it. This ensures the cookie stays centered and creates that distinct layer. Don’t worry, the cookie holds up beautifully during baking, maintaining its satisfying crunch.
What Makes This Combination So Irresistible?
There’s something magical about pairing rich, dark chocolate with the tangy creaminess of cheesecake. The red velvet element brings a subtle cocoa flavor and that iconic vibrant color, making these treats visually stunning. The brownie provides a dense, chewy contrast to the smooth, airy cheesecake, while the Oreo adds a playful crunch that keeps every bite interesting. It’s a symphony of textures and flavors that just works. This isn’t just about throwing ingredients together; it’s about understanding how they interact. The slight acidity in the red velvet cheesecake cuts through the richness of the brownie, preventing the dessert from being overly heavy. The sweetness is balanced, and the textures are varied enough to keep your palate engaged from start to finish. It’s a carefully orchestrated indulgence!Getting Started: Your Essential Ingredients
Before you dive into baking these gorgeous treats, let’s gather everything you’ll need. Using room temperature ingredients for the cheesecake filling is absolutely crucial for a smooth, lump-free batter. Trust me, it makes all the difference!For the Fudgy Brownie Layer:
1/2 cup (113g) unsalted butter, melted 1/2 cup (100g) granulated sugar 1 large egg 1 teaspoon vanilla extract 1/4 cup (25g) unsweetened cocoa powder 1/4 cup (30g) all-purpose flour Pinch of salt 12 Oreo cookies, divided (6 for the filling, 6 for garnish)For the Red Velvet Cheesecake Layer:
8 oz (226g) cream cheese, softened 1/4 cup (50g) granulated sugar 1 large egg yolk 1 teaspoon vanilla extract 1 tablespoon unsweetened cocoa powder 1 tablespoon all-purpose flour 1/4 cup (60g) sour cream or Greek yogurt 1-2 teaspoons red gel food coloring (adjust for desired vibrancy)For the Garnish (Optional):
Remaining 6 Oreo cookies, coarsely chopped Whipped cream or cream cheese frostingStep-by-Step Indulgence: Baking Your Mini Cheesecakes
Baking these might seem like a multi-step process, but each part is straightforward, and the results are absolutely worth it. Get ready to impress!Step 1: Prep the Pan and Preheat
Preheat your oven to 325°F (160°C). Line a 12-cup standard muffin tin with paper liners. This recipe makes 12 mini cheesecakes, so make sure your pan is ready. Lightly spray the liners with non-stick spray for easy removal, especially if you plan to peel off the paper.Step 2: Mix Up the Brownie Batter
In a medium bowl, whisk together the melted butter and granulated sugar until well combined. Stir in the egg and vanilla extract until smooth. Gradually add the cocoa powder, flour, and salt, mixing until just combined. Be careful not to overmix! Divide the brownie batter evenly among the 12 prepared muffin cups, about 1 tablespoon per cup.Step 3: Par-Bake the Brownie Base
Bake the brownie bases for 8-10 minutes, just until they’re set. They won’t be fully cooked, and that’s exactly what we want. This par-baking helps create a distinct layer and prevents the brownie from becoming soggy once the cheesecake is added. While they’re still warm, gently press one Oreo cookie onto the center of each brownie base.Step 4: Craft the Red Velvet Cheesecake Filling
While the brownie bases are par-baking, prepare the cheesecake filling. In a large bowl, beat the softened cream cheese and granulated sugar together with an electric mixer until smooth and creamy. Add the egg yolk and vanilla extract, mixing until just incorporated. Next, sift in the cocoa powder and flour, mixing on low speed until combined. Stir in the sour cream and red gel food coloring until the mixture is a uniform, vibrant red. Scrape down the sides of the bowl to ensure everything is fully mixed and there are no streaks of uncolored batter.
Step 5: Assemble and Bake
Pour or spoon the red velvet cheesecake mixture evenly over the Oreo-topped brownie bases, filling each muffin cup almost to the top. Carefully transfer the muffin tin to the preheated oven. Bake for 18-22 minutes, or until the edges are set and slightly puffed, but the centers still have a slight jiggle when gently shaken. Tip: Avoid opening the oven door too frequently, as this can cause the cheesecakes to crack.Step 6: Cool and Chill
Once baked, remove the muffin tin from the oven and let the mini cheesecakes cool completely in the pan on a wire rack. This slow cooling helps prevent cracking. Once cooled to room temperature, transfer the muffin tin to the refrigerator and chill for at least 4 hours, or preferably overnight. Chilling is essential for the cheesecake to fully set and for the flavors to meld beautifully.Step 7: Garnish and Serve
Once thoroughly chilled, carefully remove the mini cheesecakes from the muffin tin. Peel off the paper liners. If desired, garnish each cheesecake with a dollop of whipped cream or cream cheese frosting and sprinkle with chopped Oreo cookies. Serve cold and enjoy!Common Questions About These Mini Cheesecakes
Got questions? I’ve got answers! These are some of the most common inquiries I get about baking mini cheesecakes.Can I use different cookies instead of Oreos?
Absolutely! While Oreos provide a classic chocolatey crunch, feel free to experiment. Graham cracker cookies, chocolate chip cookies, or even shortbread would make delicious alternatives. Just make sure they’re a similar size so they fit nicely in the muffin tin.How do I prevent my cheesecakes from cracking?
Cracked cheesecakes are often a result of sudden temperature changes or overbaking. To prevent this, make sure your cream cheese is at room temperature for a smooth batter, don’t overbake, and allow them to cool slowly in the muffin tin on a wire rack before chilling. The slower the temperature change, the less likely they are to crack.Can I make these ahead of time?
Yes, these mini cheesecakes are perfect for making ahead! In fact, they taste even better the next day once the flavors have had a chance to fully develop. You can prepare them up to 2-3 days in advance and store them, covered, in the refrigerator. Just add the garnish right before serving.What’s the best way to store leftovers?
Leftover mini cheesecakes should be stored in an airtight container in the refrigerator for up to 3-4 days. For longer storage, you can freeze them (without garnish) for up to 1 month. Thaw them in the refrigerator overnight before serving.Do I need to use gel food coloring, or can I use liquid?
Gel food coloring is highly recommended for these red velvet cheesecakes. It provides a much more concentrated and vibrant color without adding excess liquid to the batter, which can affect the texture. Liquid food coloring might require a lot more to achieve the desired red, potentially thinning out your cheesecake mixture.Why You’ll Fall in Love with This Recipe
Beyond the sheer deliciousness, there’s a lot to love about these mini Oreo stuffed red velvet brownie cheesecakes. For starters, their individual size makes them perfect for portion control (or, let’s be real, for having two without feeling too guilty!). They’re also incredibly versatile for entertaining; no need for slicing and serving, just grab and go. The visual appeal alone is enough to win anyone over. That striking red cheesecake, the dark brownie base, and the hint of an Oreo peaking through – they’re miniature works of art! Plus, the combination of textures – the chewy brownie, the creamy cheesecake, and the crunchy cookie – creates a truly dynamic eating experience. It’s a dessert that feels celebratory, yet is surprisingly easy enough for a regular weeknight treat.Variations to Explore
Feeling adventurous? While these cheesecakes are perfect as is, there are always ways to put your own spin on them.Different Cookie Fillings
Instead of classic Oreos, try Golden Oreos for a vanilla twist, or even peanut butter-filled sandwich cookies for an extra layer of flavor. You could also use thin mints for a mint chocolate variation, especially around the holidays.Flavorful Toppings
Beyond chopped Oreos, consider a drizzle of melted white chocolate, a sprinkle of chocolate shavings, or even some festive sprinkles for a special occasion. A raspberry coulis or fresh berries would also add a lovely fresh counterpoint to the richness.Spiced Red Velvet
For a slightly more complex red velvet flavor, add a tiny pinch of cinnamon or a dash of espresso powder to the cheesecake batter. These spices enhance the cocoa notes without overpowering the red velvet essence.Make-Ahead Magic and Storage Tips
One of the best things about cheesecakes, especially mini ones, is how well they hold up to being made in advance. This is a huge win for party planning or just having a ready-made dessert when a craving strikes.Chilling is Key
As mentioned, chilling these mini cheesecakes for at least 4 hours (and ideally overnight) is non-negotiable. This isn’t just about making them cold; it allows the cheesecake to firm up, develop its full flavor, and become stable enough to handle. Don’t rush this step!Freezing for Later
If you want to keep these longer, they freeze beautifully. Once fully chilled, remove them from the muffin liners and place them in a single layer on a baking sheet. Freeze until solid, then transfer them to an airtight, freezer-safe container or bag. They’ll keep for up to a month. Thaw them slowly in the refrigerator for the best texture. Avoid thawing at room temperature, as this can make the cheesecake watery.Serving Temperature
While some desserts are best at room temperature, cheesecakes truly shine when served cold. The flavors are brighter, and the texture is perfectly creamy and firm. Take them out of the fridge just before serving.A Sweet Conclusion
These mini Oreo stuffed red velvet brownie cheesecakes are more than just a dessert; they’re a celebration in every bite. They bring together beloved flavors and textures in a way that feels both familiar and exciting. Whether you’re a seasoned baker or just looking for a show-stopping recipe, you’ll find joy in making and sharing these little treasures. So, roll up your sleeves, gather your ingredients, and get ready to bake something truly special. Happy baking, friends!
Mini Oreo Stuffed Red Velvet Brownie Cheesecakes
Indulgent mini red velvet cheesecakes with a fudgy brownie crust, stuffed with an Oreo, and topped with chopped cookies.
📝 Ingredients
👩🍳 Instructions
- 1Preheat your oven to 325°F (160°C). Line a 12-cup standard muffin tin with paper liners. Lightly spray the liners with non-stick cooking spray.
- 2In a medium bowl, whisk together the melted butter and 1/2 cup (100g) granulated sugar until well combined. Stir in the whole egg and 1 teaspoon vanilla extract until smooth. Gradually add the 1/4 cup (25g) cocoa powder, 1/4 cup (30g) all-purpose flour, and pinch of salt, mixing until just combined. Divide the brownie batter evenly among the 12 prepared muffin cups, about 1 tablespoon per cup.
- 3Bake the brownie bases for 8-10 minutes, just until they are set. Remove from the oven. While still warm, gently press one Oreo cookie onto the center of each brownie base.
- 4While the brownie bases are par-baking, prepare the cheesecake filling. In a large bowl, beat the softened cream cheese and 1/4 cup (50g) granulated sugar together with an electric mixer until smooth and creamy. Add the egg yolk and 1 teaspoon vanilla extract, mixing until just incorporated.
- 5Sift in the 1 tablespoon cocoa powder and 1 tablespoon all-purpose flour, mixing on low speed until combined. Stir in the sour cream or Greek yogurt and red gel food coloring until the mixture is a uniform, vibrant red. Scrape down the sides of the bowl to ensure everything is fully mixed.
- 6Pour or spoon the red velvet cheesecake mixture evenly over the Oreo-topped brownie bases, filling each muffin cup almost to the top. Carefully transfer the muffin tin to the preheated oven.
- 7Bake for 18-22 minutes, or until the edges are set and slightly puffed, but the centers still have a slight jiggle when gently shaken. Do not overbake.
- 8Remove the muffin tin from the oven and let the mini cheesecakes cool completely in the pan on a wire rack. Once cooled to room temperature, transfer the muffin tin to the refrigerator and chill for at least 4 hours, or preferably overnight, until fully set.
- 9Once thoroughly chilled, carefully remove the mini cheesecakes from the muffin tin and peel off the paper liners. If desired, garnish each cheesecake with a dollop of whipped cream or cream cheese frosting and sprinkle with the remaining 6 coarsely chopped Oreo cookies. Serve cold.
💡 Notes
Ensure all dairy ingredients for the cheesecake are at room temperature for a smooth, lump-free batter. Gel food coloring provides a much more vibrant red than liquid. These cheesecakes can be made 2-3 days in advance and stored covered in the refrigerator. For longer storage, freeze without garnish for up to 1 month, thawing in the refrigerator overnight.



