


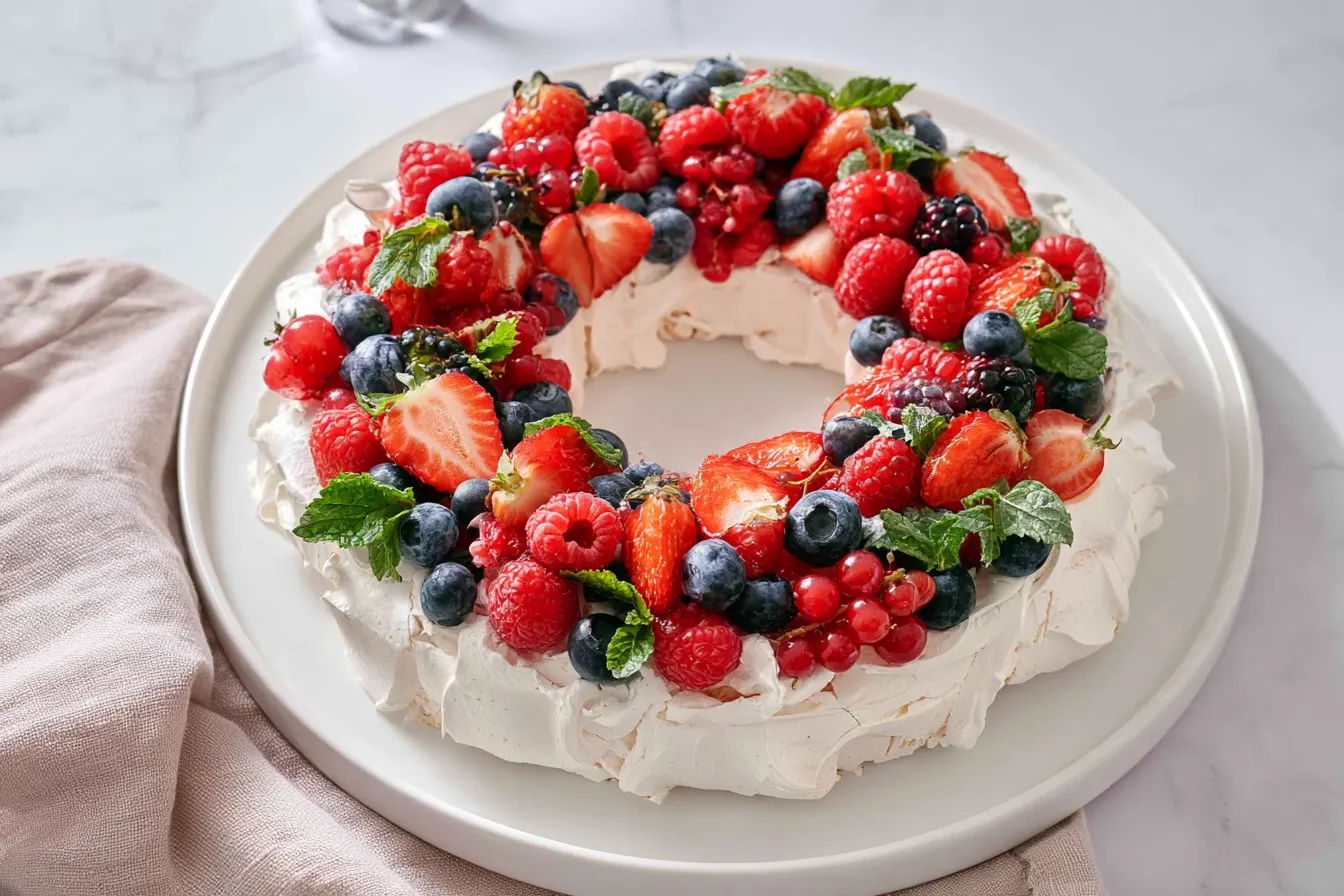
Have you ever stared at a beautiful dessert, truly *stared* at it, and wondered if it was actually edible, or just a work of art? That’s precisely the feeling I get every single time I make this stunning pavlova wreath. It looks impossibly delicate, almost too good to eat, yet it delivers a delightful crunch, a cloud-like creaminess, and a burst of fresh fruit that makes it utterly irresistible. And the best part? It’s far less intimidating to create than its elegant appearance suggests.

Why This Pavlova Wreath Will Be Your New Go-To Dessert
Let’s be honest, pavlova can sometimes get a bad rap for being finicky. We’ve all heard the horror stories of weeping meringue or a shell that collapses into a sad, sticky puddle. But I’m here to tell you that with a few simple tricks and the right technique, you can achieve pavlova perfection every single time. My method focuses on stability and flavor, ensuring a crisp exterior, a marshmallow-soft interior, and a structure that holds up beautifully under its creamy crown. This isn’t just about a pretty face; it’s about a symphony of textures. The shatteringly crisp meringue gives way to a chewy, almost melt-in-your-mouth center, perfectly contrasted by the silken, lightly sweetened whipped cream. Then, the fresh berries and fruit add that essential tartness and juicy pop, cutting through the richness and making each bite perfectly balanced. It’s a textural masterpiece!Gather Your Essentials: What You’ll Need
Creating this impressive dessert starts with a few basic, high-quality ingredients. Don’t skimp on fresh eggs, and make sure your cream is cold – these details truly make a difference in the final product.For the Meringue Wreath
- Large Egg Whites: Room temperature is crucial for maximum volume.
- Granulated Sugar: Fine sugar dissolves best, creating a stable meringue.
- Cornstarch: This is our secret weapon for that chewy, marshmallowy center.
- White Vinegar or Lemon Juice: An acid helps stabilize the egg whites, ensuring they whip up strong and glossy.
- Vanilla Extract: For a touch of warm, classic flavor.
For the Whipped Cream Topping
- Heavy Cream or Whipping Cream: Must be very cold for optimal whipping.
- Powdered Sugar: Also known as confectioners’ sugar; it dissolves beautifully and creates a smooth cream.
- Vanilla Extract: Enhances the richness of the cream.
For the Fresh Fruit Decoration
- Mixed Berries: Strawberries, raspberries, blueberries, and blackberries are classic choices.
- Kiwi Slices: Add a vibrant green pop.
- Pomegranate Arils: For a jewel-like sparkle and a tart burst.
- Fresh Mint Leaves: A garnish that adds a lovely color and subtle aroma.

Crafting Your Perfect Pavlova: Step-by-Step Guide
Don’t be intimidated by the multi-step process; each stage is quite straightforward. The key is patience and a gentle hand.Step 1: Prep Your Baking Surface
Preheat your oven to a moderate 250°F (120°C). Line a large baking sheet with parchment paper. On the parchment, draw a 9-inch circle and then a 4-inch circle in the center, creating an outline for your wreath. Flip the parchment over so the pencil marks are on the underside – this prevents lead from transferring to your meringue.
Step 2: Whisk the Egg Whites to Stiff Peaks
In a very clean, dry bowl of a stand mixer fitted with the whisk attachment (or using a hand mixer), begin beating the egg whites on medium speed. They’ll start to look frothy and bubbly. Gradually increase the speed to medium-high. Once soft peaks form (when you lift the whisk, the peaks flop over gently), slowly add the granulated sugar, one tablespoon at a time, continuing to beat until the mixture is glossy, thick, and holds stiff, upright peaks. You should be able to rub a tiny bit of meringue between your fingers and feel no grittiness from undissolved sugar. This step is crucial for a stable meringue.
Step 3: Fold in the Stabilizers and Flavor
Gently sprinkle the cornstarch over the meringue, then drizzle in the white vinegar (or lemon juice) and vanilla extract. Using a rubber spatula, carefully fold these ingredients into the meringue until just combined. Be careful not to deflate all that lovely air you’ve whipped in.
Step 4: Shape Your Wreath
Spoon the meringue mixture onto your prepared parchment paper, using the drawn circles as a guide. You can pipe it using a large star tip for a more decorative edge, or simply use a spoon to build up the sides slightly higher than the middle, creating a nest-like depression for the cream. Aim for a roughly 2-inch high wreath shape. Make sure the inner and outer edges are well-defined.

Step 5: The Slow Bake and Cool
Carefully transfer the baking sheet to your preheated oven. Bake for 1 hour and 15 minutes. After this time, turn off the oven, but leave the pavlova inside with the oven door ajar (you can prop it open with a wooden spoon) for at least 2-3 hours, or even overnight, until it’s completely cool and dry. This slow cooling prevents cracking and ensures a beautifully crisp shell. Tip: Resist the urge to open the oven door during baking, as sudden temperature changes can cause your meringue to crack or collapse.
Step 6: Whip the Cream
Once the pavlova shell is completely cool, make your whipped cream. In a chilled bowl with a chilled whisk attachment, beat the very cold heavy cream on medium-high speed until it begins to thicken. Gradually add the powdered sugar and vanilla extract, continuing to beat until soft to medium peaks form. Don’t overbeat, or it will become grainy.
Step 7: Assemble and Decorate
Gently transfer the cooled pavlova wreath to your serving platter. Spoon the whipped cream into the center of the wreath, spreading it evenly. Arrange your fresh fruit artfully over the cream. A mix of colors and textures always looks best! Finish with a few fresh mint leaves for garnish.
Step 8: Serve Immediately
Pavlova is best enjoyed shortly after assembly to maintain its crispness. Slice with a sharp, serrated knife and watch your guests marvel!
Common Pavlova Pitfalls (and How to Dodge Them)
Even seasoned bakers can run into trouble with meringue sometimes. Here are the most frequent issues and how to ensure your pavlova wreath turns out perfectly.My Meringue Wept or Leaked Syrup!
This usually happens if the sugar hasn’t fully dissolved into the egg whites. Ensure you beat the mixture long enough after adding sugar until it’s completely smooth and glossy, with no grittiness when rubbed between your fingers. Also, high humidity can contribute to weeping; try to make pavlova on a dry day if possible.
My Pavlova Cracked or Collapsed!
Sudden temperature changes are the main culprit here. Always let your pavlova cool very slowly inside the turned-off oven. Opening the oven door too early or removing it too soon can cause it to shock and crack. Overbeating egg whites can also make them fragile.
It’s Chewy All the Way Through, Not Crisp!
This might mean it didn’t bake long enough, or the oven temperature was too low. Ensure your oven is accurately calibrated. The cornstarch helps with the chewy interior, but the exterior should still be firm and dry.
The Whipped Cream is Soupy!
Your cream wasn’t cold enough, or you didn’t whip it sufficiently. Always start with very cold cream and a chilled bowl and whisk. Beat until it holds its shape, but stop before it becomes grainy or separates.
Elevate Your Wreath: Flavor Variations and Serving Suggestions
While the classic fruit and cream topping is divine, don’t be afraid to experiment!Tropical Twist
Swap out some of the berries for sliced mango, passion fruit pulp, and toasted coconut flakes. A drizzle of lime zest over the top would be fantastic.
Chocolate Lover’s Dream
Fold a tablespoon of cocoa powder into the meringue mixture for a subtle chocolate flavor. Top with chocolate shavings, raspberries, and a light dusting of cocoa. Or, drizzle with a homemade chocolate ganache.
Citrus Zest
Add a teaspoon of lemon or orange zest to both the meringue and the whipped cream for a bright, refreshing flavor profile. Top with candied citrus peel and blueberries.
Serving It Up
This pavlova wreath is a showstopper all on its own, perfect for holidays like Christmas, Easter, or any special occasion. It also makes a fantastic, lighter alternative to heavier cakes for birthdays or anniversaries. Pair it with a crisp sparkling wine or a light fruit tea for a truly elegant experience.
Frequently Asked Questions About Pavlova
Let’s demystify any lingering questions you might have about mastering this beautiful dessert.Can I make the pavlova shell ahead of time?
Absolutely! The meringue shell can be made 1-2 days in advance. Once completely cooled and dry, store it in an airtight container at room temperature. Avoid refrigerating it, as humidity can make it sticky. Only assemble with cream and fruit just before serving.
What’s the difference between pavlova and meringue?
While both are made from whipped egg whites and sugar, pavlova typically has a crisp exterior and a soft, marshmallow-like interior, often achieved with the addition of cornstarch and vinegar. Meringue can be crisp all the way through and is generally baked at a higher temperature for a shorter time, or very low for a long time to dry out completely.
Why is room temperature egg white important for meringue?
Room temperature egg whites have less surface tension than cold ones, allowing them to whip up to a larger volume more quickly and create a more stable foam. This translates to a higher, airier meringue.
Can I use a different type of sugar?
Granulated sugar is best because it dissolves well and provides structure. Superfine sugar (caster sugar) can also be used and will dissolve even faster. Avoid brown sugar or powdered sugar for the meringue itself, as they can affect the texture and stability.
How do I store leftover pavlova?
Once assembled, pavlova doesn’t store well for long. The meringue will absorb moisture from the cream and fruit, becoming soft. If you have leftovers, cover them loosely and refrigerate. They’ll still be tasty for a day or so, but won’t have the same crisp texture.

Festive Pavlova Wreath with Fresh Berries
An elegant, gluten-free pavlova wreath featuring a crisp meringue shell, fluffy whipped cream, and vibrant fresh fruit.
📝 Ingredients
👩🍳 Instructions
- 1Preheat oven to 250°F (120°C). Line a large baking sheet with parchment paper. Draw a 9-inch circle and a 4-inch inner circle on the parchment; flip paper over.
- 2In a stand mixer with whisk attachment (or using a hand mixer), beat egg whites on medium speed until frothy. Increase speed to medium-high and gradually add granulated sugar, 1 tablespoon at a time, beating until stiff, glossy peaks form and sugar is fully dissolved (test by rubbing a small amount between fingers – no grittiness).
- 3Gently fold in the cornstarch, white vinegar, and 1 tsp vanilla extract with a rubber spatula until just combined.
- 4Spoon the meringue onto the prepared parchment paper, using the circles as a guide to form a wreath shape. Build up the sides slightly to create a nest.
- 5Bake for 1 hour and 15 minutes. Turn off the oven, prop the door open slightly with a wooden spoon, and let the pavlova cool completely inside the oven for at least 2-3 hours, or overnight.
- 6Once the meringue is completely cool, prepare the topping. In a chilled bowl, beat the very cold heavy cream with powdered sugar and ½ tsp vanilla extract until soft to medium peaks form.
- 7Carefully transfer the cooled pavlova wreath to a serving platter. Spoon the whipped cream into the center of the wreath. Arrange mixed berries, kiwi slices, and pomegranate arils artfully on top of the cream. Garnish with fresh mint leaves.
- 8Serve immediately for best crispness. Store any leftovers loosely covered in the refrigerator for up to 1 day.
💡 Notes
Ensure all your equipment for whipping egg whites is impeccably clean and grease-free. Any trace of fat can prevent the whites from whipping properly. Adjust fruit toppings seasonally – sliced peaches, figs, or even roasted rhubarb can be delightful additions.



