


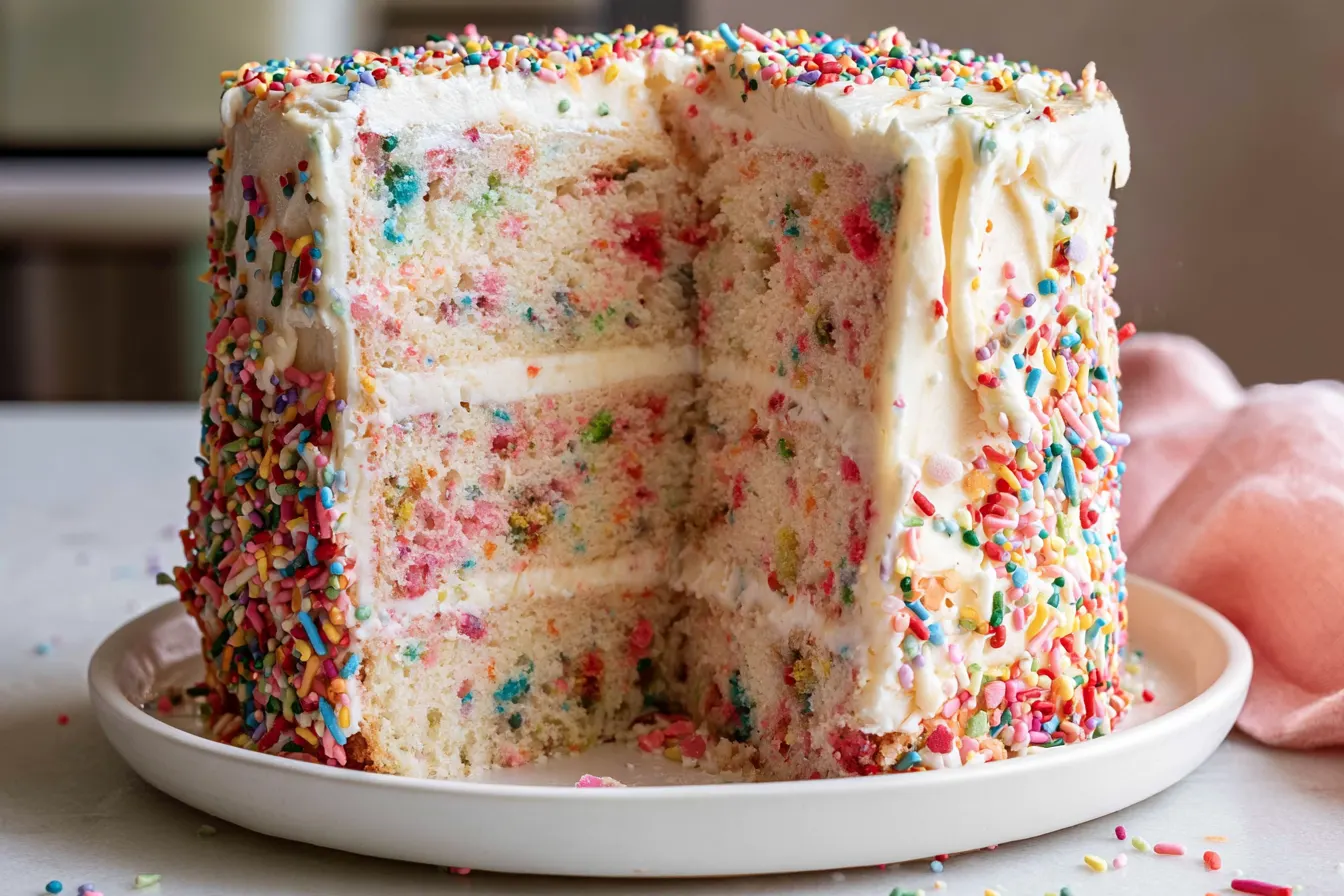
I was never a fan of store-bought cake mixes, even as a kid. The promise of those vibrant rainbow sprinkles in every slice always fell flat, tasting more of artificial coloring than actual joy. It wasn’t until a particularly memorable (and slightly disastrous) attempt at a homemade birthday cake for my best friend that I realized the potential for a truly spectacular homemade Funfetti Layer Cake. We’re talking moist, tender crumb, bursting with colorful confetti, and frosted with a buttercream so rich, you’ll want to eat it by the spoonful.
- Unlocking the Magic of the Perfect Funfetti
- Gather Your Ingredients: What You’ll Need
- Crafting Your Celebration Cake: Step-by-Step
- Whipping Up the White Chocolate Buttercream
- Assembling Your Funfetti Masterpiece
- Common Questions About Funfetti Cake
- Variations to Keep the Fun Going
- Serving and Storing Your Funfetti Delight
That day, armed with a box mix and youthful optimism, I managed to create something resembling a leaning tower of Pisa, but edible. The taste, however, was still… lacking. It sparked a quest, a deep dive into the world of white cakes and buttercream, determined to crack the code for a Funfetti cake that actually lives up to its playful name. What I discovered was a revelation: the secret isn’t just in the sprinkles, but in the balance of butter, vanilla, and a surprisingly simple technique for a velvety smooth crumb.
This recipe isn’t just a cake; it’s a celebration in every bite, a vibrant centerpiece for any occasion that demands a little extra sparkle. Forget everything you thought you knew about Funfetti; this version is going to blow those childhood memories out of the water in the best possible way. Get ready to sprinkle some magic into your kitchen!

Unlocking the Magic of the Perfect Funfetti
So, what makes this Funfetti Layer Cake stand head and shoulders above the rest? It’s all about intentional choices. We’re not just throwing sprinkles into a basic white cake. We’re building a foundation of flavor and texture that allows those colorful confetti bits to shine without overpowering the delicate vanilla notes. Think of it as a meticulously crafted canvas for a joyful explosion of color.
One of the biggest differences you’ll notice is the texture. Many Funfetti cakes can be dry or crumbly, but not this one. We employ a technique that ensures a remarkably moist and tender crumb, almost like a cross between a classic butter cake and a lighter, airier sponge. It’s rich enough to feel decadent, yet light enough that you’ll always want a second slice.
Then there’s the buttercream. Oh, the buttercream! We’re not settling for just any frosting. This recipe features a luxurious white chocolate buttercream that perfectly complements the cake’s sweetness without being overly sugary. The subtle creaminess of white chocolate adds a depth of flavor that elevates the entire dessert, making it feel truly special. It’s smooth, pipeable, and holds its shape beautifully, making decorating a breeze even for novice bakers.
Gather Your Ingredients: What You’ll Need
Before we dive into the mixing bowls, let’s make sure our pantry is stocked. Using quality ingredients truly makes a difference here, especially when it comes to the butter, vanilla, and white chocolate. Don’t skimp on these!
For the Funfetti Cake Layers:
- 3 cups (360g) all-purpose flour, sifted
- 1 ½ cups (300g) granulated sugar
- 1 tablespoon baking powder
- ½ teaspoon salt
- 1 cup (226g) unsalted butter, softened
- 4 large egg whites, at room temperature
- 1 cup (240ml) whole milk, at room temperature
- 2 teaspoons pure vanilla extract
- ½ cup (90g) good quality rainbow sprinkles (jimmie style work best, avoid nonpareils as they bleed color)
For the White Chocolate Buttercream:
- 1 ½ cups (340g) unsalted butter, softened
- 6 cups (720g) powdered sugar, sifted
- ½ cup (120ml) heavy cream, cold
- 1 teaspoon pure vanilla extract
- ¼ teaspoon salt
- 6 ounces (170g) good quality white chocolate, melted and cooled

Crafting Your Celebration Cake: Step-by-Step
Let’s get baking! This process is broken down into manageable steps, ensuring a smooth and enjoyable baking experience. Remember, baking is a science, but it’s also an art – have fun with it!
Preparing the Cake Pans
First things first, preheat your oven to 350°F (175°C). Grease and flour three 8-inch round cake pans. You can also line the bottoms with parchment paper for extra insurance against sticking. This step is crucial for easy removal later on.
Mixing the Dry Ingredients
In a large bowl, whisk together the sifted all-purpose flour, granulated sugar, baking powder, and salt. Make sure there are no lumps; a well-combined dry mix ensures even leavening throughout your cake. Give it a good whisk for about 30 seconds.
Creaming Butter and Sugar
In a separate large bowl, using an electric mixer on medium speed, beat the softened unsalted butter until creamy, about 2 minutes. Gradually add the sugar and beat for another 3-4 minutes until the mixture is light and fluffy. This creaming process incorporates air, which is vital for a tender cake crumb.
Adding the Wet Ingredients
Reduce the mixer speed to low. Gradually add the egg whites, one at a time, mixing well after each addition. Scrape down the sides of the bowl as needed. In a separate small bowl, combine the whole milk and vanilla extract. With the mixer still on low, alternate adding the dry ingredients and the milk mixture to the butter mixture, starting and ending with the dry ingredients. Mix until just combined; overmixing develops gluten, leading to a tough cake.
Folding in the Sprinkles
Gently fold in the rainbow sprinkles by hand with a spatula. Be careful not to overmix, as this can cause the colors to bleed. You want those vibrant pops of color to remain distinct. Tip: If you’re worried about color bleeding, you can lightly coat your sprinkles in a teaspoon of flour before folding them in. This creates a barrier that can help prevent premature bleeding.
Baking the Layers
Divide the batter evenly among the prepared cake pans. Bake for 25-30 minutes, or until a wooden skewer inserted into the center of a cake comes out clean. The tops should be lightly golden and spring back when gently pressed. Allow the cakes to cool in the pans for 10-15 minutes before inverting them onto a wire rack to cool completely. Cooling completely is essential before frosting!

Whipping Up the White Chocolate Buttercream
While your cake layers are cooling, let’s create that dreamy white chocolate buttercream. This frosting is incredibly versatile and delicious, making it perfect for this festive cake.
Melting the White Chocolate
Gently melt the white chocolate. You can do this in a microwave in 30-second intervals, stirring after each, or over a double boiler. Once melted, set it aside to cool to room temperature. It’s crucial that it’s cool, not warm, when added to the buttercream, or it will melt your butter.
Making the Buttercream Base
In a large bowl with an electric mixer, beat the softened unsalted butter on medium speed until creamy and pale, about 3-4 minutes. This aeration is key for light, fluffy frosting.
Adding Powdered Sugar and Cream
Gradually add the sifted powdered sugar, about 1 cup at a time, beating well after each addition. The mixture will be thick. Slowly drizzle in the cold heavy cream, vanilla extract, and salt. Increase mixer speed to medium-high and beat for another 3-5 minutes until the buttercream is light, fluffy, and smooth. Note: If your buttercream seems too stiff, add a teaspoon more heavy cream. If it’s too loose, add a tablespoon more powdered sugar, a little at a time.
Incorporating the White Chocolate
Finally, with the mixer on low speed, slowly pour in the cooled melted white chocolate. Beat until just combined and smooth. Do not overmix once the white chocolate is added. This buttercream is now ready for spreading and decorating!
Assembling Your Funfetti Masterpiece
Once your cake layers are completely cool and your buttercream is ready, it’s time for the fun part: assembly! A beautifully assembled cake makes all the difference.
Place one cake layer on your serving plate or cake stand. Spread about ¾ to 1 cup of white chocolate buttercream evenly over the top. Gently place the second cake layer on top, pressing down lightly. Repeat with another layer of buttercream, then add the third cake layer.
Apply a thin “crumb coat” of buttercream all over the top and sides of the cake. This traps any loose crumbs and creates a smooth base for your final frosting layer. Chill the cake in the refrigerator for 15-20 minutes to set the crumb coat. After chilling, apply the remaining buttercream, smoothing it out with an offset spatula or bench scraper. Decorate with extra sprinkles if desired. This Funfetti Layer Cake is truly a work of art!
Common Questions About Funfetti Cake
Baking can sometimes throw a few curveballs, especially with a multi-step recipe like a layer cake. Here are answers to some frequently asked questions that might pop up during your Funfetti adventure.
Why do my sprinkles bleed color?
Sprinkle bleeding usually happens if you use nonpareil sprinkles (the tiny, round, hard ones) or if you overmix the batter once the sprinkles are added. Jimmie-style sprinkles (the longer, cylindrical ones) tend to hold their color better. Also, ensure your batter isn’t too warm, as heat can cause colors to run. Folding them in gently and quickly is key.
Can I use regular whole eggs instead of egg whites?
Technically, yes, but your cake will not be a pure white color, and the texture will be slightly different. Using only egg whites contributes to the bright white color that allows the sprinkles to really pop, and also results in a lighter, more delicate crumb. If you use whole eggs, account for the fat from the yolks and consider slightly reducing the butter.
How far in advance can I make this cake?
You can bake the cake layers up to 2 days in advance, wrap them tightly in plastic wrap, and store them at room temperature or in the refrigerator. The buttercream can also be made 2-3 days ahead and stored in an airtight container in the fridge. Bring it to room temperature and re-whip it briefly before frosting. Once assembled, the cake is best eaten within 3-4 days.
What if my buttercream is too runny or too stiff?
Temperature is often the culprit! If it’s too runny, it might be too warm. Try chilling it in the fridge for 15-20 minutes, then re-whipping. If it’s too stiff, it might be too cold or need more liquid. Add heavy cream a teaspoon at a time while beating until it reaches the desired consistency. A well-made buttercream should be spreadable but hold its shape.
Can I freeze leftover Funfetti Layer Cake?
Absolutely! Leftover cake slices can be frozen. Wrap individual slices tightly in plastic wrap, then place them in an airtight freezer-safe container or freezer bag. They’ll keep for up to 1 month. Thaw them in the refrigerator overnight or at room temperature for a few hours before serving.
Variations to Keep the Fun Going
While this classic Funfetti Layer Cake is perfect as is, sometimes it’s fun to mix things up. Here are a couple of ideas to put your own spin on this festive dessert.
Citrus Zest Infusion
For a brighter, zestier cake, add the finely grated zest of one large lemon or orange to your cake batter along with the wet ingredients. The citrus notes will beautifully complement the vanilla and provide a refreshing counterpoint to the sweetness of the buttercream. You could even add a tiny bit of zest to the buttercream for a subtle zing.
Different Frosting Flavors
While the white chocolate buttercream is divine, feel free to experiment with other frosting flavors. A classic vanilla bean buttercream would be lovely, or for a bolder flavor, consider a cream cheese frosting (though it will mute the white color slightly). A strawberry or raspberry buttercream, made with freeze-dried fruit powder, could add a lovely fruity twist and another pop of color.
Mini Funfetti Cakes or Cupcakes
This recipe can easily be adapted for cupcakes or smaller, individual cakes. For cupcakes, bake for about 18-22 minutes. For mini cakes, adjust baking time as needed, keeping an eye on doneness. These are perfect for parties where individual servings are preferred, or for when you want to control portion sizes.
Serving and Storing Your Funfetti Delight
Once your Funfetti Layer Cake is assembled and looking gorgeous, it’s ready to be the star of the show. Serve it at room temperature for the best flavor and texture – the buttercream will be perfectly creamy, and the cake layers wonderfully moist. Pair it with a simple glass of milk, a cup of coffee, or even a sparkling rosé for a truly celebratory experience.
For storing, if you have any leftovers (which is a big “if” with this cake!), cover the cake with a cake dome or plastic wrap to prevent it from drying out. It will keep well at room temperature for up to 2 days. If your kitchen is particularly warm, or if you prefer a firmer buttercream, you can store it in the refrigerator for up to 4 days. Just be sure to let it come to room temperature for about an hour before serving for optimal taste and texture. The layers will soften and the flavors will truly blossom.
This Funfetti Layer Cake isn’t just a dessert; it’s an experience. It’s the kind of cake that brings smiles, evokes happy memories, and makes any occasion feel a little more special. So, gather your ingredients, turn on some celebratory tunes, and get ready to bake a truly unforgettable cake. Enjoy every sprinkle-filled bite!

Funfetti Layer Cake with White Chocolate Buttercream
A moist, tender Funfetti layer cake packed with rainbow sprinkles and frosted with decadent white chocolate buttercream.
📝 Ingredients
👩🍳 Instructions
- 1Preheat oven to 350°F (175°C). Grease and flour three 8-inch round cake pans. Line bottoms with parchment paper if desired.
- 2In a large bowl, whisk together the sifted flour, granulated sugar, baking powder, and ½ teaspoon salt.
- 3In a separate large bowl, using an electric mixer, beat 1 cup softened butter on medium speed until creamy, about 2 minutes.
- 4Gradually add the sugar to the butter and beat for 3-4 minutes until light and fluffy.
- 5Reduce mixer speed to low. Gradually add the egg whites, one at a time, mixing well after each. Scrape down bowl sides as needed.
- 6In a small bowl, combine whole milk and 2 teaspoons vanilla extract.
- 7With mixer on low, alternate adding dry ingredients and milk mixture to butter mixture, starting and ending with dry ingredients. Mix until just combined.
- 8Gently fold in the rainbow sprinkles by hand with a spatula until just incorporated, being careful not to overmix.
- 9Divide batter evenly among prepared cake pans. Bake for 25-30 minutes, or until a wooden skewer inserted into the center comes out clean.
- 10Cool cakes in pans for 10-15 minutes, then invert onto a wire rack to cool completely before frosting.
- 11For the buttercream: Gently melt white chocolate and set aside to cool to room temperature.
- 12In a large bowl with an electric mixer, beat 1 ½ cups softened butter on medium speed until creamy and pale, 3-4 minutes.
- 13Gradually add sifted powdered sugar, 1 cup at a time, beating well after each. Mixture will be thick.
- 14Slowly drizzle in cold heavy cream, 1 teaspoon vanilla extract, and ¼ teaspoon salt. Increase speed to medium-high and beat for 3-5 minutes until light and fluffy.
- 15With mixer on low, slowly pour in the cooled melted white chocolate. Beat until just combined and smooth.
- 16To assemble: Place one cake layer on a serving plate. Spread with about ¾ to 1 cup buttercream. Repeat with second layer. Top with third layer.
- 17Apply a thin crumb coat of buttercream over the entire cake. Chill for 15-20 minutes to set.
- 18Apply remaining buttercream, smoothing with an offset spatula. Decorate with extra sprinkles if desired. Serve at room temperature.
💡 Notes
Ensure all cold ingredients (eggs, milk) are at room temperature for best cake texture. Do not overmix batter once flour is added. Use jimmie-style sprinkles to prevent color bleeding. Store leftover cake at room temperature for up to 2 days, or in the refrigerator for up to 4 days. Bring refrigerated cake to room temperature before serving.



