👩🍳 Instructions
-
1
PREPARE THE CAKE LAYERS:
-
2
1. Preheat your oven to 350°F (175°C). Grease and flour three 8-inch round cake pans, or line with parchment paper circles. This is crucial for easy release.
-
3
2. In a large bowl, whisk together the flour, granulated sugar, baking powder, baking soda, and salt until well combined.
-
4
3. Add the cubed, softened butter to the dry ingredients. Beat on low speed with an electric mixer until the mixture resembles coarse sand and no large butter pieces remain. This step helps create a fine crumb.
-
5
4. In a separate medium bowl, whisk together the eggs, whole milk, and vanilla extract until fully combined.
-
6
5. With the mixer on low speed, gradually add about two-thirds of the wet mixture to the dry ingredients. Increase speed to medium and beat for 2 minutes, scraping down the sides of the bowl frequently. This develops the cake's structure.
-
7
6. Add the remaining wet mixture and beat on medium speed for another minute, or until just combined and smooth. Be careful not to overmix, as this can lead to a tough cake.
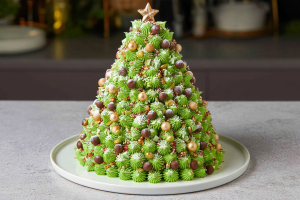
-
8
7. Divide the batter evenly among your prepared cake pans. Bake for 25-30 minutes, or until a wooden skewer inserted into the center of each cake comes out clean. Baking times may vary slightly by oven.
-
9
8. Let the cakes cool in their pans for 10-15 minutes before inverting them onto a wire rack to cool completely. The cakes must be fully cooled before you begin assembly.
-
-
11
1. In a large bowl with an electric mixer, beat the softened butter on medium-high speed for 3-5 minutes until it’s light and fluffy. This incorporates air and makes for a smoother frosting.
-
12
2. Gradually add the sifted powdered sugar, one cup at a time, beating well after each addition. Start on low speed to avoid a sugar cloud, then increase to medium.
-
13
3. Pour in the heavy cream (or milk), vanilla extract, and a pinch of salt. Beat on medium-high speed for another 3-5 minutes until the buttercream is light, fluffy, and smooth. If it's too thick, add more cream a teaspoon at a time; if too thin, add more powdered sugar.
-
14
4. Add green gel food coloring a small drop at a time, mixing well after each addition, until you achieve your desired evergreen shade. Remember, a little gel goes a long way!
-
15
ASSEMBLE THE CHRISTMAS TREE CAKE:
-
16
1. Level the cooled cake layers using a serrated knife or cake leveler, ensuring flat tops for stable stacking.
-
17
2. Place one leveled cake layer (your largest, usually 8-inch) on your serving platter or cake board. Spread a thin, even layer of green buttercream over the top.
-
18
3. Using a smaller cake board or a template (e.g., a 6-inch circle), cut a smaller circle from another cake layer. Place this on top of the first layer, centered, and frost. Repeat this process, creating progressively smaller cake circles (e.g., 4-inch, 2-inch) and stacking them with buttercream between each, forming a tiered, conical shape. You may need to trim the edges slightly to make them perfectly round.
-
19
4. Apply a very thin layer of buttercream over the entire stacked cake. This is your crumb coat, which traps any loose crumbs. Chill the cake in the refrigerator for at least 30 minutes until the crumb coat is firm to the touch.
-
20
5. Once chilled, use a serrated knife to carefully carve the stacked cake into a more defined conical (Christmas tree) shape. Take your time, removing small amounts of cake at a time and rotating the cake for evenness. Don't worry about perfection; the frosting will cover minor flaws.
-
21
6. Apply a second thin layer of buttercream over the carved cake, smoothing out any rough spots. Chill again for at least 30 minutes.
-
22
7. DECORATE THE TREE: Fit a piping bag with a star tip (such as Wilton 1M or 21) and fill it with the remaining green buttercream. Starting at the bottom of the cake, pipe small stars or rosettes close together, working your way up the cake. Overlap them slightly to create a full, textured, evergreen look. Varying the pressure can create slightly different sized stars.
-
23
8. Once the entire cake is covered in piped stars, decorate your Christmas tree with sprinkles, small candies, edible glitter, or any other festive decorations you choose. A dusting of powdered sugar can simulate snow.
-
24
9. For the star topper, you can pipe a large star with yellow buttercream or use a pre-made edible star decoration. Serve your magnificent Christmas tree cake and enjoy the applause!
-
25
Note: For extra stability, especially if making a very tall tree, you can insert a few wooden dowels or thick straws into the lower layers before adding the top tiers. Trim them to be flush with the top of each layer.
💡 Notes
This cake is best enjoyed at room temperature for optimal flavor and texture. Store any leftovers in an airtight container at room temperature for up to 2 days, or in the refrigerator for up to 4 days. If refrigerated, let it come to room temperature for about an hour before serving again.
🥗 Nutrition (per serving)
Calories
480 kcal
Protein
6g
Total Fat
28g
Saturated Fat
17g
Carbs
54g
Fiber
1g
Sugar
42g
Sodium
320mg
Cholesterol
95mg