


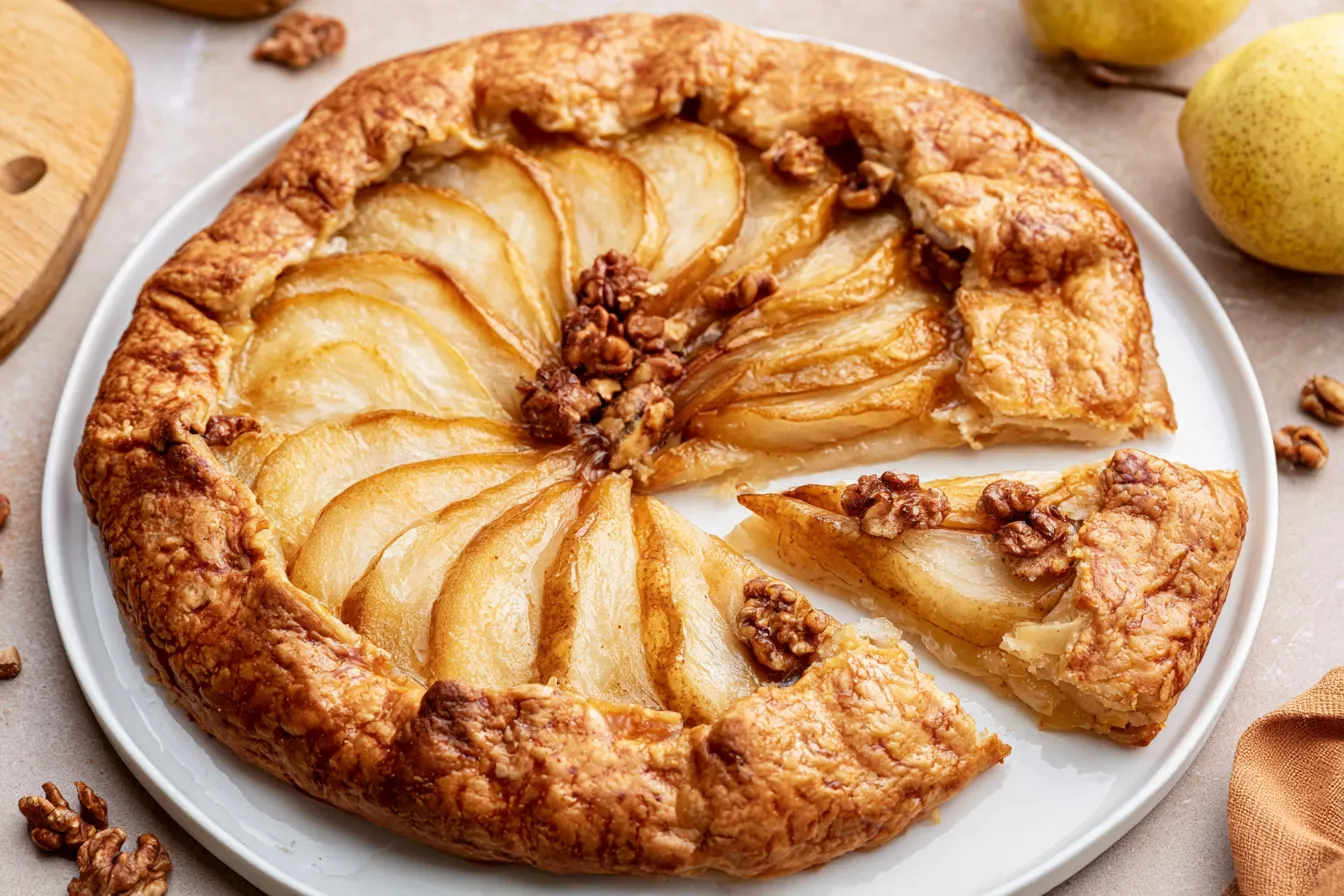
There’s something about the first crisp breath of autumn air that just screams for warm, spiced fruit desserts, isn’t there? Forget the fuss of a double-crust pie; this incredibly delicious Pear Galette delivers all the comfort with half the effort, making it the perfect dessert to welcome the colder weather without spending hours in the kitchen.

Why This Rustic Pear Tart Will Become Your Go-To
I’ve made my share of fruit desserts over the years, and while I adore a classic pie, sometimes life calls for something a little less… structured. That’s where the galette shines. It’s essentially a free-form tart, celebrating imperfection and natural beauty. What makes this particular pear galette so special? First, we’re using ripe, sweet pears that practically melt in your mouth, enhanced by a hint of spice and a touch of brown sugar. Then, there’s the crust. I’ve opted for a foolproof, buttery dough that bakes up flaky and golden, providing the perfect contrast to the soft fruit. It’s sturdy enough to hold its shape but tender when you bite into it. The secret really lies in the simplicity. By letting the ingredients speak for themselves, you get a dessert that’s genuinely comforting and deeply satisfying. It’s the kind of treat that makes you want to curl up by a fire with a good book.Gathering Your Galette Essentials
You won’t need a long list of obscure ingredients for this beauty. Everything here is pretty standard, easily found at any grocery store. Quality ingredients, especially your fruit, will really shine through.For the Flaky Crust
- All-purpose flour: The backbone of our dough. Make sure it’s unbleached for the best texture.
- Granulated sugar: Just a touch to sweeten the crust slightly.
- Salt: Essential for balancing flavors. Don’t skip it!
- Unsalted butter: Crucial for flakiness. Keep it very cold and cut into small cubes. This is non-negotiable for a tender crust.
- Ice water: The key to bringing the dough together without overworking it.
For the Luscious Pear Filling
- Ripe, firm pears: Bosc or Anjou pears work wonderfully here. They hold their shape well when baked and offer a lovely sweetness. You want them ripe but not mushy.
- Light brown sugar: Adds a beautiful caramel-like sweetness and depth.
- Cornstarch: Our thickening agent. It prevents the filling from becoming too watery.
- Ground cinnamon: The quintessential fall spice. A little goes a long way to enhance the pears.
- Fresh lemon juice: A splash brightens the flavors and keeps the pears from oxidizing.
- Vanilla extract: Adds a warm, aromatic note that complements the pears and cinnamon.
- Optional: Egg wash (1 egg yolk + 1 tbsp water): For a golden, shiny crust.
- Optional: Turbinado sugar: A sprinkle on the crust before baking adds a lovely crunch and sparkle.

Crafting Your Rustic Pear Masterpiece
Don’t be intimidated by making pie dough from scratch; it’s much simpler than you think, especially for a galette where perfection isn’t the goal. Embrace the rustic charm!Step 1: Get That Dough Chilling
In a large bowl, whisk together your flour, granulated sugar, and salt. Add the very cold, cubed butter. Using your fingertips or a pastry blender, cut the butter into the flour mixture until it resembles coarse meal with some pea-sized pieces of butter remaining. This is important for flakiness! Gradually add the ice water, a tablespoon at a time, mixing gently until the dough just comes together. Don’t overmix! Form the dough into a disc, wrap it tightly in plastic wrap, and refrigerate for at least 30 minutes, or up to 2 days. Chilling the dough is crucial for an easy-to-roll and tender crust.
Step 2: Prep Those Pears
While your dough chills, prepare the filling. Peel, core, and thinly slice your pears. Aim for slices about 1/4-inch thick. In a large bowl, gently toss the pear slices with the brown sugar, cornstarch, cinnamon, lemon juice, and vanilla extract. Make sure all the pear slices are evenly coated. Set aside.
Step 3: Roll It Out
Preheat your oven to 400°F (200°C). Line a baking sheet with parchment paper. On a lightly floured surface, roll out your chilled dough into a rough 12-14 inch circle, about 1/8-inch thick. Don’t worry if it’s not a perfect circle; that’s part of the galette’s charm! Carefully transfer the dough to your prepared baking sheet.
Step 4: Arrange the Filling
Arrange the pear slices in the center of the dough, leaving a 2-inch border around the edges. You can overlap them slightly in a concentric pattern or just pile them artfully. Tip: Try to keep the filling somewhat mounded in the center; this helps prevent a soggy bottom and ensures even baking.

Step 5: Fold and Finish
Carefully fold the edges of the dough over the pears, pleating it as you go. It doesn’t need to be neat; rustic is the goal! If using, whisk together the egg yolk and water for the egg wash. Brush the folded crust with the egg wash and, if desired, sprinkle with turbinado sugar for extra sparkle and crunch.
Step 6: Bake to Golden Perfection
Bake for 35-45 minutes, or until the crust is golden brown and the pear filling is bubbly and tender. If the crust starts to brown too quickly, you can loosely tent it with aluminum foil. Once baked, remove from the oven and let it cool on the baking sheet for at least 15-20 minutes before slicing. This allows the filling to set up properly.
Serving Suggestions for Your Pear Galette
This pear galette is absolutely delightful on its own, but a few additions can elevate it to pure dessert heaven. My personal favorite way to serve it is still slightly warm, with a generous scoop of vanilla bean ice cream. The cold, creamy ice cream melting into the warm, spiced pears is simply divine. A dollop of freshly whipped cream, lightly sweetened and perhaps with a hint of vanilla or a dash of bourbon, also makes a fantastic accompaniment. For something a little different, consider a drizzle of homemade caramel sauce. The rich, buttery notes of caramel pair beautifully with the sweetness of the pears and the warmth of the cinnamon. It’s also wonderful with a cup of hot coffee or a spiced chai latte on a chilly afternoon.Common Galette Questions Answered
Got a few lingering questions about making the perfect pear galette? I’ve got you covered!Can I use other types of pears?
Absolutely! While Bosc and Anjou are excellent choices for their firm texture and sweet flavor, you can also use Bartlett pears (just ensure they’re not overly ripe as they can become mushy). Comice pears are also a good option if you prefer a very tender, juicy filling. The key is to use pears that are ripe but still firm enough to hold their shape during baking.
How do I prevent a soggy bottom crust?
Several tricks here! First, make sure your dough is well-chilled. Second, don’t overload the galette with too much filling; ensure you have that 2-inch border. Third, the cornstarch in the filling is crucial for absorbing excess moisture from the pears. Finally, baking it at a slightly higher temperature initially can help the crust set quickly.
Can I make the dough ahead of time?
Yes, and I highly recommend it! You can prepare the dough up to 2 days in advance. Keep it tightly wrapped in plastic in the refrigerator. If you’re short on time, you can even freeze the dough for up to a month. Just thaw it in the refrigerator overnight before rolling.
What if I don’t have cornstarch?
You can substitute cornstarch with an equal amount of all-purpose flour or tapioca starch. The cornstarch gives a slightly clearer, glossier finish to the fruit juices, but flour or tapioca will work just fine as a thickener.
How do I store leftover pear galette?
Leftover galette can be stored at room temperature, loosely covered, for up to 1 day. If you live in a warm climate or want to keep it longer, store it in an airtight container in the refrigerator for up to 3 days. Reheat individual slices gently in the microwave or a toaster oven for a few minutes until warmed through.
Variations to Keep Things Exciting
While this classic pear galette is perfect as is, there are always ways to tweak it and make it your own!Spice It Up
Beyond cinnamon, consider adding a pinch of ground ginger, nutmeg, or even a tiny dash of cardamom to your pear filling for a more complex spice profile. A touch of freshly grated lemon zest can also add a brighter, more aromatic note to the filling.
A Touch of Nutty Goodness
Before arranging the pears, you could sprinkle a thin layer of finely ground almonds or almond flour on the base of the dough. This adds a lovely nutty flavor and also acts as a barrier to absorb any excess moisture, further preventing a soggy crust.
Cheese Please?
For a sophisticated savory-sweet twist, consider adding a few thin slices of Gruyere or even a crumbled blue cheese to the top of the pears before folding the crust. The salty, savory cheese pairs surprisingly well with the sweet pears.
Glaze It
Once the galette has cooled slightly, you could brush it with a simple apricot glaze (apricot jam warmed and strained) for a beautiful shine and a subtle fruity tang. Or, a simple drizzle of a powdered sugar glaze (powdered sugar mixed with a tiny bit of milk or lemon juice) can also be lovely.
Add Some Crunch
Before folding the crust, you could sprinkle a handful of chopped walnuts, pecans, or almonds over the pears for added texture and flavor. This adds another layer of interest to each bite.
This pear galette really is a celebration of fall’s bounty, simple to make, and utterly delightful to eat. It’s the kind of dessert that feels special without being fussy, making it perfect for a weeknight treat or a casual gathering. Give it a try, and I bet it’ll become a staple in your autumn baking repertoire!
Rustic Fall Pear Galette
An incredibly delicious, easy-to-make pear galette with a flaky crust and spiced fruit filling, perfect for fall.
📝 Ingredients
👩🍳 Instructions
- 1For the Crust: In a large bowl, whisk together flour, granulated sugar, and salt. Add cold cubed butter and cut it into the flour using your fingertips or a pastry blender until the mixture resembles coarse meal with some pea-sized butter pieces. Gradually add ice water, 1 tablespoon at a time, mixing until the dough just comes together. Form into a disc, wrap tightly, and refrigerate for at least 30 minutes.
- 2For the Filling: While the dough chills, prepare the pears. In a large bowl, gently toss the sliced pears with brown sugar, cornstarch, cinnamon, lemon juice, and vanilla extract. Set aside.
- 3Assemble the Galette: Preheat oven to 400°F (200°C). Line a baking sheet with parchment paper. On a lightly floured surface, roll out the chilled dough into a rough 12-14 inch circle, about 1/8-inch thick. Carefully transfer the dough to the prepared baking sheet.
- 4Arrange Pears: Arrange the pear slices in the center of the dough, leaving a 2-inch border around the edges.
- 5Fold and Finish: Carefully fold the edges of the dough over the pears, pleating as you go. Brush the folded crust with egg wash (if using) and sprinkle with turbinado sugar (if using).
- 6Bake: Bake for 35-45 minutes, or until the crust is golden brown and the filling is bubbly and tender. If the crust browns too quickly, loosely tent with foil. Let cool on the baking sheet for at least 15-20 minutes before slicing and serving.
💡 Notes
Best served warm with a scoop of vanilla ice cream or a dollop of whipped cream. Store leftovers at room temperature for 1 day, or refrigerated for up to 3 days. Reheat gently in a toaster oven for best results.



