


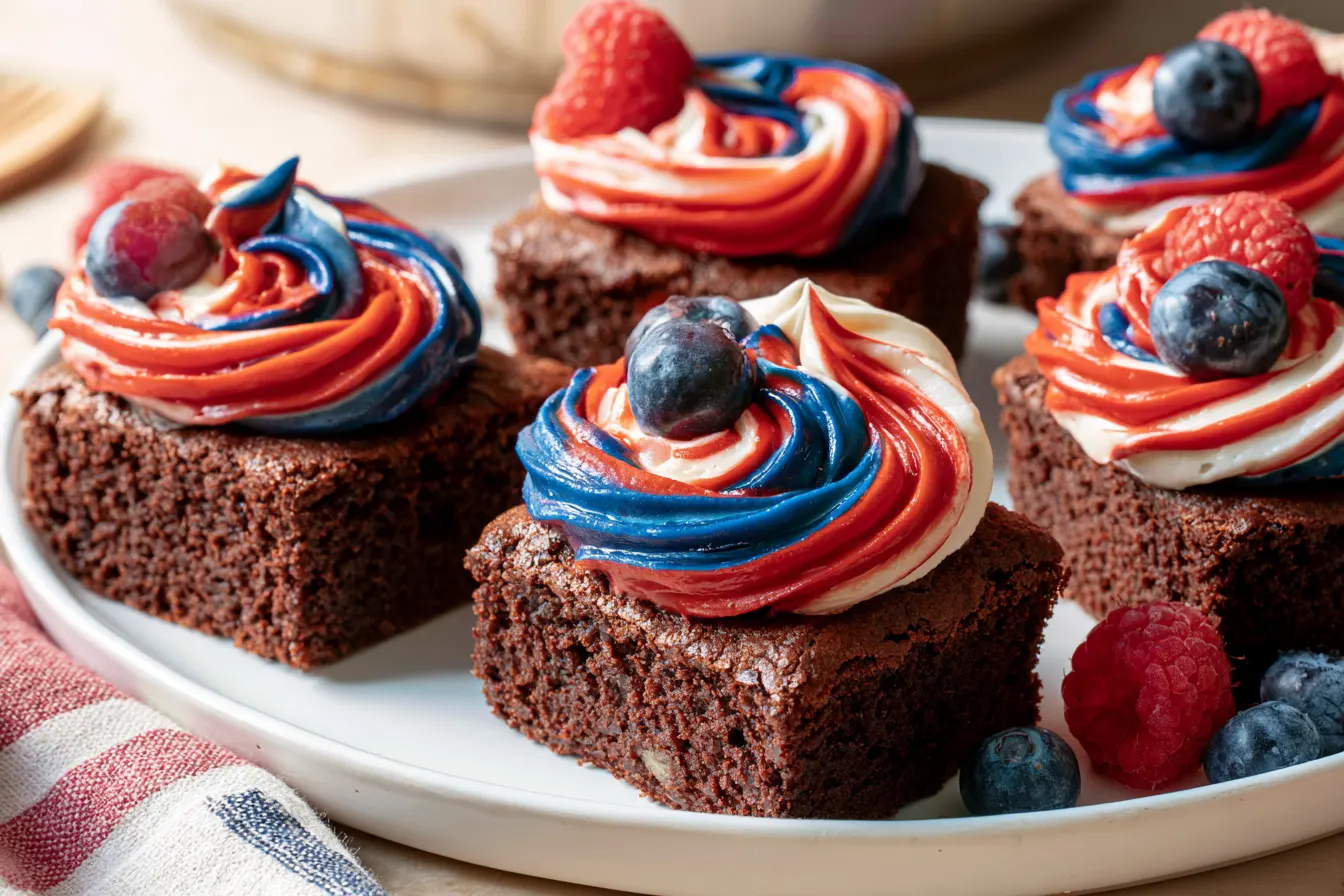
I still remember the year I accidentally left a batch of brownies in the oven too long during our annual Fourth of July BBQ. The smoke detector went off, the neighbors peered over the fence, and my perfectly planned dessert was, well, charcoal. But every culinary mishap is a lesson, right? That year taught me the importance of a reliable, perfectly timed brownie recipe, especially when you want to impress with something as festive as these patriotic 4th of July Brownies.
There’s something uniquely satisfying about bringing a dessert to a potluck that not only tastes incredible but also looks the part. These aren’t just any brownies; they’re a celebration in every bite, topped with vibrant red, white, and blue frosting that screams Independence Day. You’ll find they strike that ideal balance between fudgy and chewy, making them an instant crowd-pleaser.
Forget dry, crumbly squares or overly sweet frosting. We’re going for rich chocolate goodness under a fluffy, patriotic swirl. Whether you’re hosting a backyard bash or bringing a dish to a friend’s gathering, these brownies are sure to be the star of the dessert table.

Why These Brownies Will Be Your Go-To for the Fourth
Let’s be honest, there are a million brownie recipes out there. So, what makes these 4th of July brownies stand out from the pack? It’s a combination of factors that I’ve refined over many baking seasons. First, the brownie base itself is a true winner: deeply chocolatey, perfectly fudgy in the center, and with just the right amount of chewiness around the edges. It’s the kind of brownie that holds its own, even without the fancy frosting.
Then comes the frosting. Instead of a heavy, overly sugary buttercream, we’re using a lighter, whipped vanilla frosting. This provides a beautiful contrast to the rich brownie and acts as the perfect canvas for our red and blue food coloring. The subtle vanilla note complements the chocolate without overpowering it, ensuring each bite is balanced and delightful.
The visual appeal is undeniable. Layering the colored frosting creates a striking effect that instantly makes these feel special and holiday-appropriate. It’s an easy technique that yields impressive results, making you look like a baking superstar without a ton of extra effort. Plus, they travel well, making them ideal for any summer gathering.
Gather Your Goodies: What You’ll Need
Before we get our hands delightfully messy, let’s ensure we have all our ingredients measured and ready. A little mise en place goes a long way in making the baking process smooth and enjoyable.
For the Fudgy Brownie Base:
- Unsalted Butter: Good quality butter makes a difference in richness.
- Granulated Sugar: For sweetness and that signature crackly top.
- Light Brown Sugar: Adds moisture and a hint of caramel flavor.
- Large Eggs: The binder that makes them fudgy.
- Vanilla Extract: A classic flavor enhancer.
- All-Purpose Flour: Don’t overmix!
- Unsweetened Cocoa Powder: Dutch-processed is great for a darker, less bitter chocolate flavor.
- Salt: Balances the sweetness.
- Baking Powder: Just a touch for a slight lift.
For the Patriotic Frosting:
- Unsalted Butter (softened): Creamy base for our frosting.
- Powdered Sugar: For a smooth, lump-free frosting.
- Vanilla Extract: Again, for that lovely classic flavor.
- Milk (or heavy cream): Helps achieve the right consistency.
- Red Food Coloring: Gel food coloring gives the best vibrant results.
- Blue Food Coloring: Same goes for blue – gel is king here.

Crafting Your Celebration Squares: Step-by-Step Guide
Ready to bake? Follow these instructions closely, and you’ll have a batch of show-stopping 4th of July brownies in no time. Remember, baking is as much about precision as it is about love!
Step 1: Get the Oven Ready & Pan Prepped
Preheat your oven to 350°F (175°C). Line a 9×13 inch baking pan with parchment paper, leaving an overhang on the sides. This will make it incredibly easy to lift the cooled brownies out later. Lightly grease the parchment paper for extra insurance.
Step 2: Melt the Butter & Sugars
In a large microwave-safe bowl, melt the unsalted butter. You can also do this on the stovetop over low heat. Once melted, stir in both the granulated sugar and light brown sugar until well combined. The mixture should be glossy and smooth. This step is crucial for that desirable crackly top.
Step 3: Whisk in Wet Ingredients
Add the eggs one at a time, whisking vigorously after each addition until fully incorporated. Then, stir in the vanilla extract. Keep whisking for about a minute; this incorporates air and helps create that wonderful fudgy texture. Tip: Don’t rush this step! Properly incorporating the eggs is key to a good brownie structure.
Step 4: Combine Dry Ingredients
In a separate medium bowl, whisk together the all-purpose flour, unsweetened cocoa powder, salt, and baking powder. Ensure there are no lumps of cocoa powder.
Step 5: Fold It All Together
Gradually add the dry ingredient mixture to the wet ingredients. Fold gently with a spatula until just combined. Be careful not to overmix, as this can develop the gluten in the flour too much, leading to tough brownies. A few streaks of flour are fine; they’ll disappear during baking.
Step 6: Bake to Perfection
Pour the brownie batter into your prepared baking pan and spread it evenly with a spatula. Bake for 25-30 minutes, or until a toothpick inserted into the center comes out with moist crumbs, but not wet batter. The edges should look set. Overbaking will lead to dry brownies, so keep an eye on them!
Step 7: Cool Completely
This is arguably the hardest step: letting them cool! Allow the brownies to cool completely in the pan on a wire rack before attempting to frost them. Warm brownies will melt your beautiful frosting into a patriotic mess.

Step 8: Prepare the Frosting
While the brownies cool, make your frosting. In a large bowl, beat the softened butter with an electric mixer until light and fluffy. Gradually add the powdered sugar, one cup at a time, beating well after each addition. Pour in the vanilla extract and 2 tablespoons of milk, beating until smooth. If the frosting is too thick, add more milk, one teaspoon at a time, until you reach a spreadable consistency.
Step 9: Color Your World
Divide the frosting into three equal portions in separate bowls. Leave one portion white. Tint one portion with red food coloring and the other with blue food coloring. Mix each thoroughly until you achieve vibrant, even colors. Remember, gel food coloring provides the most intense shades.
Step 10: Frost with Flair
Once the brownies are completely cool, lift them out of the pan using the parchment paper overhang and place them on a cutting board or serving platter. Spread the white frosting evenly over the entire surface of the brownies. Then, dollop spoonfuls of the red and blue frosting randomly over the white layer. Using an offset spatula or the back of a spoon, gently swirl the colors together. Don’t overmix, or the colors will blend into purple and pink! You want distinct streaks of red, white, and blue. Cut into squares and serve!
Common Questions About These Patriotic Treats
Can I use a different size baking pan?
While a 9×13 inch pan is ideal for this recipe, you could use an 8×8 inch pan for thicker brownies. If you do, you’ll need to increase the baking time by about 5-10 minutes. Just keep an eye on them and test for doneness with a toothpick. For a larger pan, like 11×17, you might need to increase the recipe by 1.5x.
What’s the best way to get neat frosting swirls?
The key to neat swirls is not overworking the frosting. After spreading your white base, gently dollop the red and blue. Then, use a small offset spatula or even a butter knife to make broad, sweeping S-shapes or figure-eights across the top. Go slow and stop when you like the pattern. Less is often more for a beautiful marbled effect.
How can I make these brownies extra fudgy?
For even more fudginess, slightly underbake them! When the toothpick comes out with moist crumbs, but not completely clean, that’s your sweet spot. Also, using a good quality cocoa powder and ensuring your butter and sugars are well combined in the beginning stages contribute significantly to that rich, fudgy texture. Some bakers also like to add a touch of instant espresso powder to the batter to deepen the chocolate flavor without making it taste like coffee.
Can I make the frosting ahead of time?
Absolutely! You can prepare the frosting a day or two in advance. Store it in an airtight container in the refrigerator. When you’re ready to use it, let it come to room temperature and then give it a good whip with your electric mixer to restore its fluffy texture. You might need to add a tiny splash of milk if it’s too stiff.
How should I store leftover 4th of July brownies?
Store these brownies in an airtight container at room temperature for up to 3-4 days. If your kitchen is particularly warm, or if you want them to last longer, you can keep them in the refrigerator for up to a week. Just bring them back to room temperature before serving for the best texture and flavor. They also freeze wonderfully for up to 2-3 months without the frosting. If frosted, they’ll still freeze but the frosting texture might be slightly different upon thawing.
Serving Suggestions & Fun Variations
These 4th of July brownies are fantastic on their own, but if you’re looking to elevate the experience or mix things up, here are a few ideas.
Add a Scoop of Ice Cream
Nothing says summer like a warm brownie with a scoop of vanilla bean ice cream. The cold, creamy ice cream perfectly complements the rich, dense brownie. A drizzle of chocolate syrup wouldn’t hurt either!
Berry Goodness
For an even more patriotic touch, scatter fresh blueberries and sliced strawberries over the frosted brownies just before serving. The fresh fruit adds a lovely tartness and juicy burst that cuts through the sweetness.
Sprinkle it Up!
While the colored frosting already provides a festive look, a sprinkle of red, white, and blue patriotic sprinkles on top of the swirled frosting before it sets would add an extra layer of fun, especially if you have kids helping out in the kitchen.
Chocolate Chip Swirl
Want to add another layer of chocolate? Fold a cup of semi-sweet chocolate chips into the brownie batter before baking. This makes the brownies even more intensely chocolatey and adds textural interest.
Nutty Crunch
For those who love a bit of crunch, stir in about half a cup of chopped walnuts or pecans into the brownie batter. The nuts provide a great textural contrast to the fudgy base.
Why the Cooling Time Matters So Much
I know, I know. Waiting for brownies to cool completely feels like an eternity, especially when that warm, chocolatey aroma is filling your kitchen. But trust me on this one: patience is a virtue when it comes to brownies, particularly when frosting is involved. There are a few key reasons why cooling is non-negotiable.
First, warm brownies are delicate. Trying to lift them out of the pan or cut them while still warm often results in crumbly edges and misshapen squares. As they cool, the fats and sugars firm up, giving the brownies their structure and allowing for clean cuts.
Second, and perhaps most importantly for these 4th of July brownies, warm brownies will melt your frosting. All that effort to create those beautiful red, white, and blue swirls will turn into a runny, muddy mess if the brownies aren’t completely chilled. The butter in the frosting will liquefy, and your festive design will be lost.
Finally, the texture of a cooled brownie is superior. The fudginess develops as it cools and sets. A warm brownie is delicious, no doubt, but a fully cooled brownie allows all those flavors to meld and the texture to become perfectly dense and chewy. So, resist the urge, let them chill, and you’ll be rewarded with perfect patriotic treats.

Festive 4th of July Brownies
Celebrate Independence Day with these rich, fudgy 4th of July brownies topped with vibrant red, white, and blue vanilla frosting.
📝 Ingredients
👩🍳 Instructions
- 1Preheat your oven to 350°F (175°C). Line a 9x13 inch baking pan with parchment paper, leaving an overhang on the sides. Lightly grease the parchment paper.
- 2In a large bowl, combine the melted butter, granulated sugar, and light brown sugar. Whisk until smooth and glossy.
- 3Add the eggs one at a time, whisking vigorously after each addition until fully incorporated. Stir in the vanilla extract. Continue whisking for about 1 minute to incorporate air.
- 4In a separate medium bowl, whisk together the all-purpose flour, cocoa powder, salt, and baking powder.
- 5Gradually add the dry ingredients to the wet ingredients, folding gently with a spatula until just combined. Be careful not to overmix.
- 6Pour the brownie batter into the prepared baking pan and spread evenly. Bake for 25-30 minutes, or until a toothpick inserted into the center comes out with moist crumbs (not wet batter).
- 7Let the brownies cool completely in the pan on a wire rack for at least 2 hours. This is crucial before frosting.
- 8Once brownies are cool, prepare the frosting: In a large bowl, beat the softened butter with an electric mixer until light and fluffy. Gradually add the powdered sugar, beating well after each addition. Stir in the vanilla extract and 2 tablespoons of milk. Beat until smooth, adding more milk one teaspoon at a time if needed, until desired spreadable consistency is reached.
- 9Divide the frosting into three equal portions. Leave one portion white. Tint one portion with red food coloring and the other with blue food coloring, mixing until vibrant and even colors are achieved.
- 10Lift the cooled brownies out of the pan using the parchment paper. Spread the white frosting evenly over the entire surface. Dollop spoonfuls of red and blue frosting randomly over the white layer. Using an offset spatula or knife, gently swirl the colors together for a marbled effect. Avoid overmixing.
- 11Cut into squares and serve immediately, or store for later enjoyment.
💡 Notes
For extra fudginess, slightly underbake the brownies. Store leftover brownies in an airtight container at room temperature for up to 3-4 days, or in the refrigerator for up to a week. For a richer chocolate flavor, add 1/2 teaspoon of instant espresso powder to the dry ingredients.



