


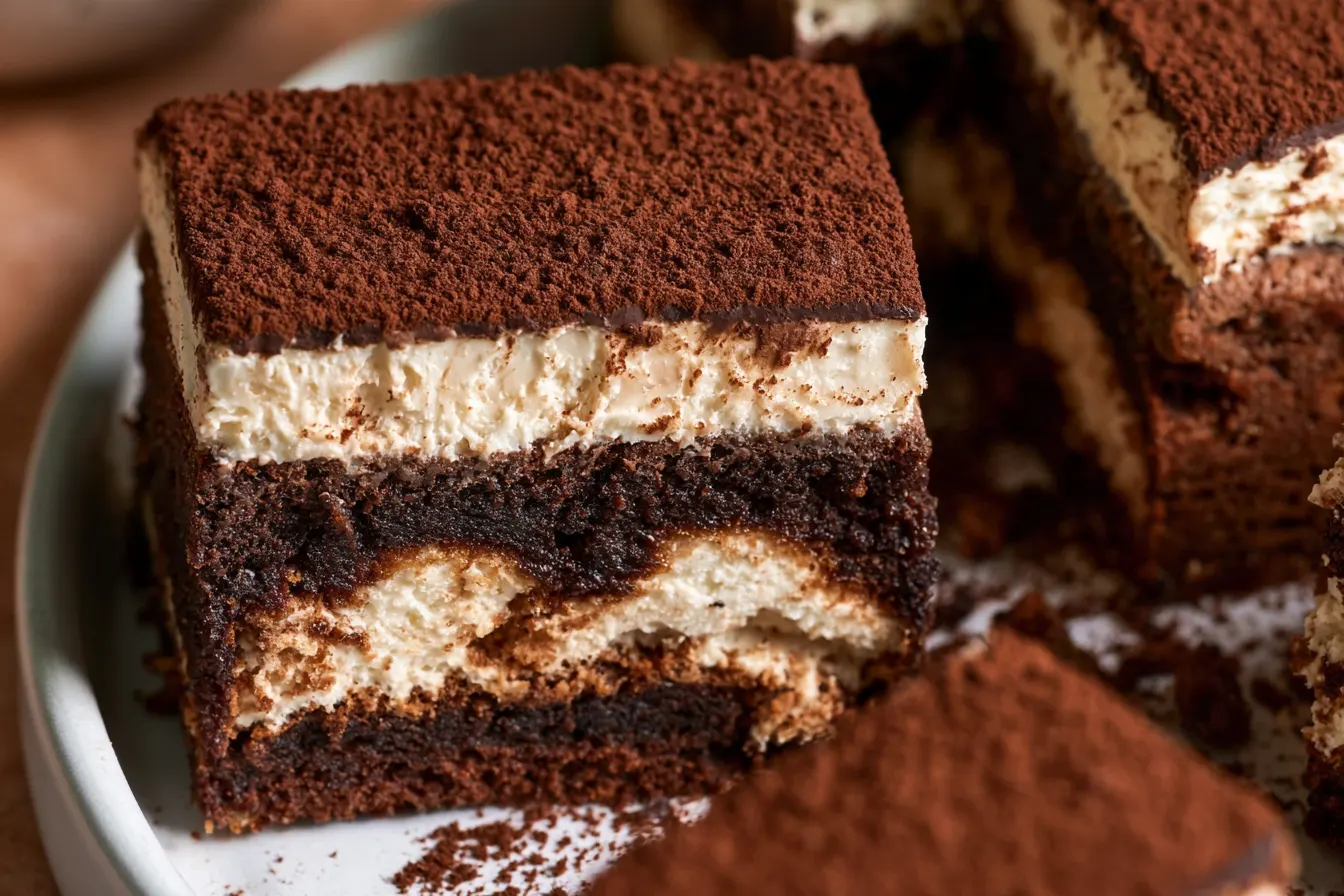
I once tried to make a “healthier” tiramisu with Greek yogurt instead of mascarpone. It was a disaster. A watery, sad, slightly sour disaster that taught me a valuable lesson: some things are perfect as they are. Tiramisu is one of those things. But what if you could take the essence of that perfection – the rich coffee, the creamy mascarpone, the decadent cocoa – and combine it with the ultimate comfort food? Enter these incredible fudgy espresso tiramisu brownies, a mashup that truly delivers.

What Makes These Brownies Irresistible?
There are brownies, and then there are *brownies*. These aren’t your average bake sale squares. We’re talking serious fudge factor here, achieved through a careful balance of melted butter, cocoa powder, and just the right amount of flour. The espresso isn’t just a background note; it’s a star player, intensifying the chocolate and providing that signature tiramisu depth. The magic truly happens with the layering. Each element – the dense, chocolatey brownie, the tender coffee-kissed ladyfingers, and the ethereal mascarpone cream – contributes to a symphony of taste and texture. It’s a dessert that feels sophisticated yet utterly comforting, perfect for a dinner party or a quiet evening treat.Assembling Your Tiramisu Brownie Dream
Let’s break down the components that make these fudgy espresso tiramisu brownies sing. Each part is simple on its own, but together, they create something truly special. Don’t be intimidated by the layers; they come together more easily than you might think.The Fudgy Espresso Brownie Base
This is the foundation, and it needs to be robust enough to hold up to the other layers while still being melt-in-your-mouth tender. We’re going for a rich, dense brownie here, not a cakey one. Unsalted Butter: Essential for that luscious, fudgy texture. Granulated Sugar & Brown Sugar: A combination provides sweetness, moisture, and a slight caramel note. Large Eggs: Bring everything together and contribute to the richness. Vanilla Extract: Always a must for balancing chocolate flavors. All-Purpose Flour: Just enough to bind without making them tough. Unsweetened Cocoa Powder: Use a good quality cocoa here; it makes a huge difference in flavor intensity. Dutch-processed works beautifully for a darker, less acidic chocolate flavor. Instant Espresso Powder: This is key! It deepens the chocolate flavor without making the brownies taste overtly like coffee. Salt: Balances the sweetness and enhances all the other flavors.The Espresso-Soaked Ladyfingers
These delicate cookies are the traditional heart of tiramisu, and they provide a lovely textural contrast here. Ladyfingers (Savoiardi): Look for the dry, crisp kind, not the soft, cake-like ones. They absorb the coffee better. Brewed Espresso or Strong Coffee: Chilled is best. Make sure it’s strong; you want that robust coffee flavor to shine through. Coffee Liqueur (Optional): A splash of Kahlúa or a similar coffee liqueur adds an extra layer of flavor and a touch of warmth. Completely optional, but highly recommended if you enjoy it.The Silky Mascarpone Cream
This is the light, airy, and creamy topping that truly defines “tiramisu.” Mascarpone Cheese: This Italian cream cheese is richer and less tangy than American cream cheese. It’s crucial for the authentic flavor and texture. Ensure it’s cold. Heavy Cream: Whipped until stiff, it provides the necessary lightness and volume. Powdered Sugar: Sweetens the cream and helps stabilize it. Vanilla Extract: A touch of vanilla complements the mascarpone beautifully.For the Finishing Touch
Unsweetened Cocoa Powder: For dusting, giving it that classic tiramisu look and a hint of bitterness.
Crafting Your Fudgy Espresso Tiramisu Brownies: Step-by-Step
Let’s get baking! This recipe is broken down into three main stages, making it easy to follow and assemble.Step 1: Get Your Brownie On
Preheat your oven to 350°F (175°C). Line a 9×13-inch baking pan with parchment paper, leaving an overhang on the sides to easily lift the brownies out later. Lightly grease the parchment. In a large microwave-safe bowl, combine your butter, granulated sugar, and brown sugar. Microwave in 30-second intervals, stirring well after each, until the butter is mostly melted and the sugars are dissolved. Alternatively, you can do this over a double boiler. You want it warm but not boiling hot. Whisk in the eggs one at a time until fully incorporated and the mixture is glossy. Stir in the vanilla extract. In a separate bowl, whisk together the flour, cocoa powder, instant espresso powder, and salt. Gradually add the dry ingredients to the wet ingredients, mixing just until no streaks of flour remain. Be careful not to overmix; overmixing develops gluten and can lead to tougher brownies. Pour the batter into your prepared pan and spread evenly. Bake for 25-30 minutes, or until a toothpick inserted into the center comes out with moist crumbs, not wet batter. Let the brownie cool completely in the pan on a wire rack. This is crucial for fudginess and for the layers to set properly.Step 2: Espresso-Soak Those Ladyfingers
While the brownies cool, prepare your espresso mixture. Brew strong espresso or coffee and let it cool completely. If using, stir in the coffee liqueur. Once the brownie base is completely cool, take your ladyfingers. Briefly dip each ladyfinger into the cooled espresso mixture, one at a time, for just a second or two. You don’t want them soggy, just moistened. Arrange the dipped ladyfingers in a single layer over the cooled brownie base, trimming them as needed to fit snugly across the entire surface. If you have a few gaps, it’s okay, but try to cover as much as possible.Step 3: Whip Up the Mascarpone Magic
In a large, chilled mixing bowl, combine the cold mascarpone cheese, heavy cream, powdered sugar, and vanilla extract. Using an electric mixer (stand mixer with whisk attachment or hand mixer), beat on medium-high speed until the mixture is light, fluffy, and holds stiff peaks. Be careful not to overbeat, or the mascarpone can curdle. Gently spread the mascarpone cream evenly over the layer of espresso-soaked ladyfingers. Smooth the top with an offset spatula or the back of a spoon. Tip: For the fluffiest mascarpone cream, make sure both your heavy cream and mascarpone are very cold before whipping. A chilled bowl and whisk attachment also help immensely!Step 4: The Grand Finale & Chill
Cover the pan loosely with plastic wrap and refrigerate for at least 4 hours, or preferably overnight. This chilling time is essential for the layers to set and for the flavors to meld beautifully. Just before serving, generously dust the top with unsweetened cocoa powder using a fine-mesh sieve. Slice into squares and serve immediately.
Common Pitfalls and How to Avoid Them
Even the most straightforward recipes can have their tricky spots. Here’s how to ensure your fudgy espresso tiramisu brownies turn out perfectly every time.Overmixing the Brownie Batter
This is the cardinal sin of brownie baking. Overmixing develops gluten, which leads to tough, cakey brownies instead of the dense, fudgy texture we crave. Mix just until the flour streaks disappear, then stop.Over-Soaking the Ladyfingers
A quick dip is all you need. If you leave the ladyfingers in the espresso mixture for too long, they’ll become mushy and won’t hold their shape in the finished dessert. A second or two per side is usually sufficient.Warm Ingredients for Mascarpone Cream
Mascarpone and heavy cream need to be *cold* to whip properly. If they’re at room temperature, your cream might struggle to thicken or could even curdle. Keep everything chilled until you’re ready to beat it.Not Chilling Long Enough
Patience is a virtue, especially with layered desserts. The chilling time allows all the flavors to meld and, more importantly, lets the mascarpone cream and brownie layers set properly. Trying to slice them too soon will result in a messy, unappealing dessert.Variations for Your Tiramisu Brownie Experience
While this recipe is perfect as is, there’s always room for a little creative flair.Add a Chocolate Drizzle
Before dusting with cocoa, melt some dark chocolate chips with a touch of coconut oil and drizzle it artfully over the mascarpone layer for an extra touch of decadence.Nutty Crunch
Fold finely chopped toasted pecans or walnuts into the brownie batter for a textural contrast. The earthy notes would play well with the coffee and chocolate.Boozy Boost
If you’re a fan of a stronger kick, consider adding a tablespoon of rum or brandy to the espresso mixture along with the coffee liqueur. Just be mindful of the alcohol content if serving to children.White Chocolate Swirl
Melt white chocolate and swirl it through the mascarpone cream before spreading it over the ladyfingers for a beautiful visual and an extra layer of sweetness.Storage and Enjoyment Tips
These brownies are best enjoyed chilled. Store any leftovers in an airtight container in the refrigerator for up to 3-4 days. For the best flavor and texture, take them out of the fridge about 15-20 minutes before serving to allow them to come to a slightly less-cold temperature, which really lets the nuances of the flavors shine. They don’t freeze particularly well due to the delicate mascarpone cream, so plan to enjoy them fresh!Frequently Asked Questions About Tiramisu Brownies
Got questions? I’ve got answers to help you master this delightful dessert.Can I use instant coffee instead of espresso powder?
Yes, you can. Just make sure it’s a good quality, strong instant coffee. You might need to use a slightly larger quantity than espresso powder to achieve the same intensity of flavor, especially in the brownie base. For the ladyfinger soak, definitely make it strong!My mascarpone cream isn’t thickening. What went wrong?
This is almost always due to the ingredients not being cold enough, or the cream being overbeaten past stiff peaks into a curdled mess. Ensure your mascarpone and heavy cream are straight from the fridge, and stop beating as soon as stiff peaks form. If it curdles, unfortunately, there’s not much you can do to save it for whipping. You might be able to incorporate it into another recipe, but it won’t work for this light topping.Can I make these brownies ahead of time?
Absolutely! In fact, these fudgy espresso tiramisu brownies benefit greatly from an overnight chill. Making them the day before allows all the flavors to meld beautifully and ensures the layers are perfectly set for clean slicing. Just dust with cocoa powder right before serving.I can’t find ladyfingers. What’s a good substitute?
While ladyfingers are traditional, if you can’t find them, you could try using slices of plain sponge cake or even slightly stale pound cake, cut into thin strips. Just be careful not to over-soak them, as they might absorb liquids differently. The texture won’t be identical, but it will still be delicious.Is there a way to make these brownies gluten-free?
You can absolutely adapt this recipe to be gluten-free! For the brownie base, use a good quality gluten-free all-purpose flour blend (one that contains xanthan gum). For the ladyfingers, you’ll need to source gluten-free ladyfingers or use a gluten-free sponge cake substitute. The rest of the ingredients are naturally gluten-free.
Fudgy Espresso Tiramisu Brownies
Rich, fudgy brownies layered with espresso-soaked ladyfingers and a silky mascarpone cream, dusted with cocoa.
📝 Ingredients
👩🍳 Instructions
- 1Preheat oven to 350°F (175°C). Line a 9x13-inch baking pan with parchment paper, leaving an overhang, and lightly grease.
- 2In a large bowl, combine melted butter, granulated sugar, and brown sugar. Whisk until smooth and glossy. Beat in eggs one at a time, then stir in 2 tsp vanilla extract.
- 3In a separate bowl, whisk together flour, 3/4 cup cocoa powder, 2 tbsp espresso powder, and salt. Gradually add dry ingredients to wet, mixing just until no flour streaks remain. Do not overmix.
- 4Pour brownie batter into the prepared pan and spread evenly. Bake for 25-30 minutes, or until a toothpick inserted into the center comes out with moist crumbs. Cool completely on a wire rack.
- 5While brownies cool, prepare the espresso soak: In a shallow dish, combine 2 cups chilled espresso/coffee and coffee liqueur (if using).
- 6Once brownies are fully cooled, quickly dip each ladyfinger into the espresso mixture (1-2 seconds per side). Arrange a single layer of soaked ladyfingers over the cooled brownie base, trimming to fit.
- 7For the mascarpone cream: In a large, chilled bowl, combine cold mascarpone, heavy cream, powdered sugar, and 1 tsp vanilla extract. Beat with an electric mixer on medium-high speed until light, fluffy, and stiff peaks form. Be careful not to overbeat.
- 8Gently spread the mascarpone cream evenly over the ladyfinger layer. Smooth the top with an offset spatula.
- 9Cover the pan loosely with plastic wrap and refrigerate for at least 4 hours, or preferably overnight, for best setting and flavor development.
- 10Before serving, generously dust the top with unsweetened cocoa powder using a fine-mesh sieve. Slice into squares and serve chilled.
💡 Notes
Ensure all ingredients for the mascarpone cream are very cold for optimal whipping. For an extra kick, a splash of rum or brandy can be added to the espresso soak. These brownies store well in the refrigerator for up to 3-4 days.



