


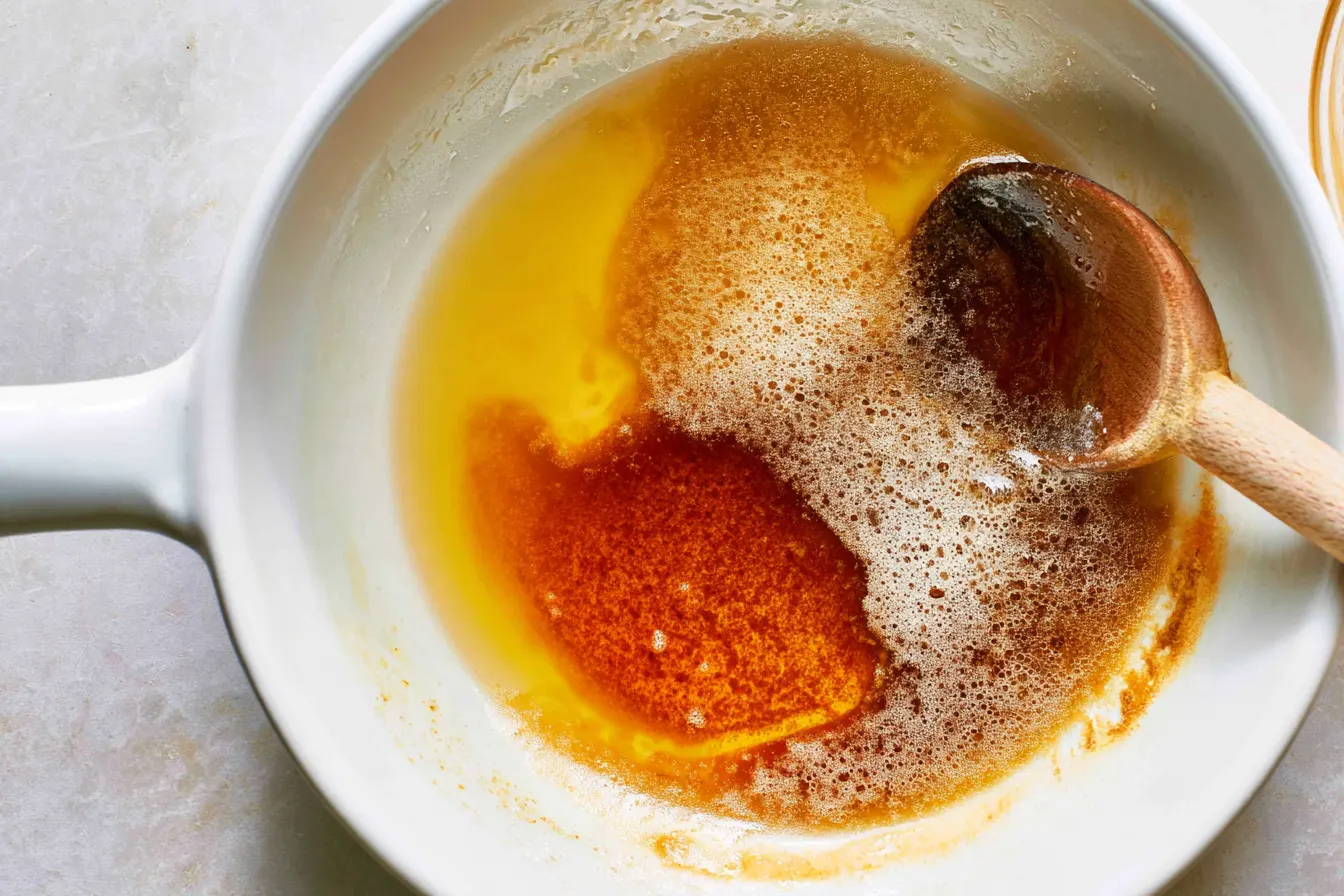
Have you ever wondered what makes a cookie taste profoundly richer, a cake feel more complex, or a simple glaze utterly irresistible? The answer, my friend, often lies in one deceptively simple technique: learning how to brown butter. It’s a culinary magic trick that transforms an everyday dairy staple into a nutty, fragrant elixir capable of elevating almost any dish.
Contents

What Exactly *Is* Brown Butter?
Before we get into the “how,” let’s quickly chat about the “what.” Butter is an emulsion of butterfat, milk solids, and water. When you melt butter, the water evaporates first. As it continues to heat, the milk solids separate and begin to toast. This toasting process, called the Maillard reaction, is what creates those incredible deep, nutty, and caramel-like flavors. You’re essentially caramelizing the proteins in the butter. The color changes from pale yellow to golden, then amber, and finally a beautiful, deep brown, often with little toasted bits at the bottom. These tiny brown flecks are flavor bombs, so don’t discard them!Why Bother Browning Butter? The Flavor Payoff
You might be thinking, “It’s just butter, how much difference can it make?” Trust me, it makes all the difference. Regular melted butter provides a pleasant richness, but brown butter adds an entirely new dimension. It’s warm, nutty, slightly sweet, and incredibly aromatic. Imagine your favorite chocolate chip cookie. Now imagine it with a subtle, sophisticated caramel note woven through every bite, thanks to brown butter. Or picture a simple glaze over a pound cake, suddenly tasting like something from a high-end patisserie. This technique adds depth and complexity without introducing any new ingredients, simply by enhancing what’s already there. It’s truly a secret weapon in the kitchen.The Only Ingredient You Need
This is the simplest ingredient list you’ll ever see for such a powerful technique!Just Butter!
Unsalted Butter: This is generally preferred for browning because it gives you more control over the final salt content of your recipe. However, if you only have salted butter, you can still brown it; just be mindful of reducing any added salt in your final dish. Quality Matters: While any butter will work, a higher quality butter with good fat content will often yield a more intensely flavorful brown butter. European-style butters, for instance, tend to be richer. That’s it! No special oils, no fancy additions. Just pure, unadulterated butter ready for its transformation.
My Simple Steps to Perfectly Browned Butter
Browning butter is more about observation than strict timing. Keep your eyes on the pan and trust your nose!1. Choose the Right Pan and Heat
A Light-Colored Pan is Best: Use a stainless steel or light-colored saucepan. This allows you to easily monitor the color changes of the butter solids, which is crucial for preventing burning. A dark pan can obscure these visual cues. Medium Heat is Key: Place your butter in the saucepan over medium heat. Don’t go too high, or the butter will brown unevenly and could burn quickly.2. Melt and Watch for the Foam
Melt Completely: Let the butter melt completely, stirring occasionally with a heat-proof spatula or whisk. As it melts, it will begin to sizzle and foam. Evaporation Stage: The sizzling indicates that the water content in the butter is evaporating. The foam on top is normal; try to stir it gently or push it aside slightly to see what’s happening underneath.3. The Magic Begins: Color Change
Golden Speckles: After the sizzling subsides and the foam begins to reduce, you’ll start to see tiny golden-brown flecks forming at the bottom of the pan. This is where the Maillard reaction is starting to kick in. Stir Constantly: From this point on, stir the butter frequently. This ensures even browning and prevents the milk solids at the bottom from burning while the rest of the butter is still transforming.
4. Reaching Peak Nutty Perfection
Amber to Brown: Continue to cook, stirring, until the butter turns a beautiful amber color and the solids at the bottom are a deep golden brown. You’ll notice a distinct nutty, toasty aroma filling your kitchen—this is your signal! It will smell like toasted hazelnuts or caramel. Tip: Don’t wait until the very last second, as the butter will continue to cook from residual heat even after it’s removed from the stove.5. Stop the Cooking Immediately
Transfer Quickly: As soon as it reaches your desired color and aroma, immediately remove the pan from the heat. Pour the browned butter, including all those delicious browned bits, into a heat-proof bowl or container. Cooling Down: If you leave it in the hot pan, it will continue to cook and can easily burn, turning bitter. A quick transfer is essential.Troubleshooting Common Brown Butter Problems
Even though it’s simple, a few things can go awry. Here’s how to avoid them!“My butter burned!”
Problem: The butter went from brown to black, and smells bitter. Solution: This usually happens when the heat is too high or you didn’t transfer it quickly enough. Use medium heat and keep a close eye. If it burns, sadly, there’s no saving it. Start fresh. A light-colored pan really helps here.“It’s just melted butter, not browning.”
Problem: The butter is melted, but no color change or nutty smell is happening. Solution: The heat might be too low. Increase it slightly to medium-low or medium. Be patient; the water needs to evaporate first before the solids can toast.“I can’t see the color change because of the foam.”
Problem: A thick layer of foam is obscuring the view of the browning solids. Solution: Gently stir or skim some of the foam away with your spatula. You don’t have to remove it all, just enough to peek underneath. Some butter produces more foam than others.“Do I really need to use unsalted butter?”
Problem: You only have salted butter and wonder if it’s okay. Solution: Yes, you can use salted butter, but be aware that it might taste saltier. If your recipe calls for added salt, you might want to reduce it slightly to compensate for the salt in the butter. Unsalted gives you more control, but it’s not a deal-breaker.Frequently Asked Questions About Browning Butter
Got more questions? I’ve got answers!Does brown butter taste like nuts if I’m allergic?
While brown butter develops a nutty *flavor*, it does not contain actual nuts or nut proteins. The “nutty” descriptor refers to the aromatic compounds created during the Maillard reaction of the milk solids, which mimic the smell and taste profile of toasted nuts. If you have a severe nut allergy, always consult with a medical professional, but generally, brown butter is considered safe as it’s purely a dairy product.Can I brown a large batch of butter at once?
Yes, you absolutely can! If you’re planning to use brown butter in multiple recipes or want to have some on hand, browning a larger quantity (e.g., 1-2 pounds) is perfectly fine. Just make sure to use a larger saucepan to accommodate the volume and allow for even heat distribution. It might take a little longer to brown, but the process is the same.How do I store brown butter?
Once your butter is browned and has cooled slightly, transfer it to an airtight container. You can store it in the refrigerator for up to 2 weeks. It will solidify and look like regular butter, but with a deeper, amber hue and those wonderful browned flecks at the bottom. When you’re ready to use it, you can gently re-melt it or use it in its solid state if the recipe permits.Can I use brown butter in any recipe that calls for melted butter?
For the most part, yes! Brown butter can be a fantastic substitute for melted butter in many recipes, especially in baked goods like cookies, brownies, cakes, and even pie crusts. It adds a sophisticated depth of flavor. For savory applications, it’s amazing over pasta, vegetables, or even fish. However, for recipes where a very delicate, neutral butter flavor is desired, or where the aesthetic requires pure yellow butter (like some frostings), you might stick to regular melted butter.What’s the difference between brown butter and ghee?
While both processes involve heating butter, they have different goals. Ghee (clarified butter) is cooked until the milk solids separate and sink, but *before* they brown. The solids are then strained out, leaving behind pure butterfat with a very high smoke point. Brown butter, on the other hand, *embraces* those browned milk solids, which are crucial for its distinctive flavor and are usually kept in the final product.Recipes That Shine with Brown Butter
Once you master this technique, you’ll be looking for any excuse to use it! Here are just a few ideas where brown butter truly transforms a dish: Cookies: Chocolate chip cookies, snickerdoodles, sugar cookies – brown butter makes them next-level. The nutty notes complement chocolate beautifully. Brownies: It adds a richness and depth that makes even a simple brownie feel gourmet. Cakes & Muffins: Try it in a banana bread, apple cake, or pumpkin muffin recipe. The warm, toasted flavor pairs wonderfully with spices and fruits. Glazes & Frostings: A simple brown butter glaze over a bundt cake or cinnamon rolls is simply divine. Savory Dishes: Drizzle it over roasted vegetables, pasta with sage, scrambled eggs, or even popcorn for an unexpected gourmet twist. It’s fantastic with seafood too, like scallops or salmon. Pies & Crumbles: Use it in your pie crust for a richer, more complex flavor, or drizzle it over a fruit crumble topping. The possibilities are truly endless. Once you get a whiff of that incredible aroma, you’ll understand why this humble technique is such a beloved secret among bakers and chefs alike. It’s a simple step that yields monumental flavor rewards. Happy browning!
How to Make Brown Butter
Learn the simple technique of browning butter to unlock a rich, nutty, and caramel-like flavor that elevates any recipe.
📝 Ingredients
👩🍳 Instructions
- 1Place the unsalted butter in a light-colored saucepan over medium heat. A light-colored pan allows you to easily monitor the color changes.
- 2Allow the butter to melt completely, stirring occasionally with a heat-proof spatula or whisk. It will begin to bubble and sizzle as the water content evaporates.
- 3Continue to cook the butter. The foam will subside slightly, and you'll start to see tiny golden-brown flecks forming at the bottom of the pan. This indicates the milk solids are beginning to toast.
- 4Stir the butter frequently from this point forward to ensure even browning and prevent the solids from burning. The butter will turn from golden to an amber color, and the solids at the bottom will deepen to a rich brown.
- 5As soon as the butter reaches a beautiful amber hue and you smell a distinct nutty, toasted, caramel-like aroma, immediately remove the pan from the heat. Don't wait too long, as it can go from perfect to burnt very quickly.
- 6Pour the browned butter, including all the delicious toasted brown bits, into a heat-proof bowl or container to stop the cooking process. Allow it to cool slightly before using in your recipe, or chill to solidify for later use.
💡 Notes
Always use unsalted butter for best control over flavor. If using salted, reduce any added salt in your recipe. If your butter burns, it will smell bitter and needs to be discarded. A watchful eye and quick action are key!
🥗 Nutrition (per serving)
Calories 203 kcal
Protein 0.2g
Total Fat 23g
Saturated Fat 14g
Carbs 0g
Fiber 0g
Sugar 0g
Sodium 2mg
Cholesterol 61mg
Rate This Recipe
☆ ☆ ☆ ☆ ☆



