


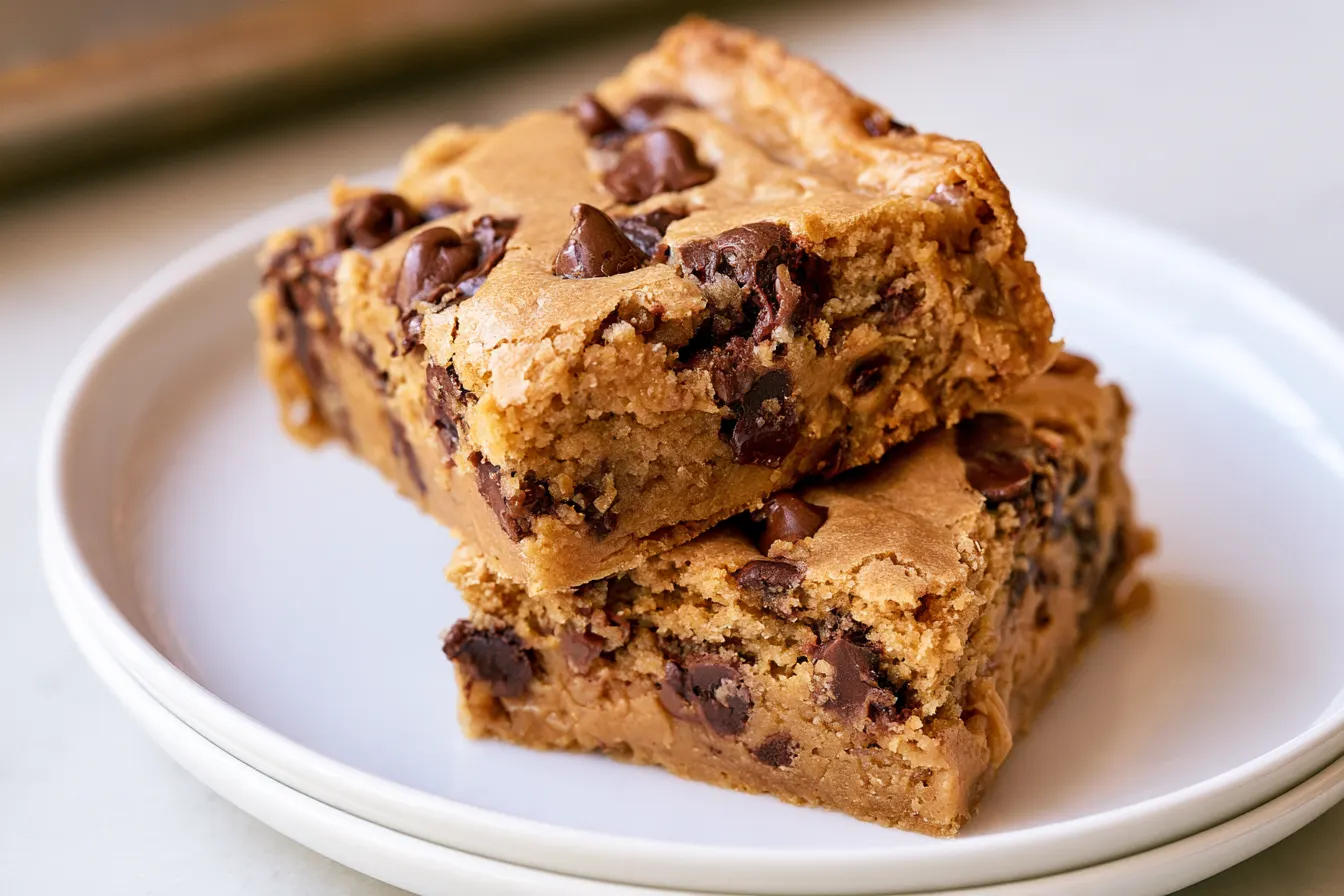
The scent of toasted sugar and warm vanilla wafts through my kitchen, a familiar comfort that always signals something delicious is baking. But this time, it’s not just any cookie; it’s the irresistible aroma of something even better: a batch of chocolate chip cookie butter bars. These aren’t just cookies, folks, they’re an experience.

Why This Recipe Just Works
I’ve tinkered with a lot of bar recipes over the years. Some end up too dry, some too crumbly, and some just lack that certain *oomph*. The beauty of these particular cookie butter bars lies in their simplicity and the method. We’re essentially making a slightly thicker, more robust chocolate chip cookie dough that can stand up to the luscious filling. The result is a bar that’s soft and chewy through and through, with a satisfying heft.The Magic of Cookie Butter
For those who haven’t yet fallen down the rabbit hole of cookie butter, let me introduce you to your new favorite obsession. It’s a spread made from pulverized spiced shortbread cookies (like Biscoff or Speculoos). Think peanut butter, but with cookies instead of peanuts, and a warm, gingery, cinnamon-spiced flavor profile. It’s truly spectacular, and it melts beautifully into a creamy layer when baked, adding moisture and an incredible depth of flavor.Gather Your Ingredients for Bar Perfection
Making these bars is straightforward, but having everything measured out and ready makes the process even smoother. You’ll find most of these staples already lurking in your pantry.For the Irresistible Cookie Dough
- 2 ½ cups (300g) all-purpose flour
- 1 teaspoon baking soda
- ¾ teaspoon salt
- 1 cup (226g) unsalted butter, softened
- ½ cup (100g) granulated sugar
- 1 ½ cups (300g) packed light brown sugar
- 2 large eggs
- 2 teaspoons vanilla extract
- 1 ½ cups (255g) semi-sweet chocolate chips (good quality makes a difference!)
For the Glorious Cookie Butter Filling
- 1 (14-ounce) jar cookie butter (like Biscoff or Speculoos spread)
Assembling Your Delectable Cookie Butter Bars
Let’s get down to business! This recipe is divided into easy-to-follow steps, ensuring a perfect batch every time.Prep Your Pan and Oven
First things first, preheat your oven to 350°F (175°C). Grab a 9×13-inch baking pan. Line it with parchment paper, leaving an overhang on the sides. This creates “handles” later, making it super easy to lift the entire batch out for cutting. A little non-stick spray on the parchment doesn’t hurt either!
Whip Up the Dry Ingredients
In a medium bowl, whisk together the all-purpose flour, baking soda, and salt. Give it a good whisk to ensure everything is evenly distributed. Set this aside for a moment.
Cream the Butter and Sugars
In a large bowl, using an electric mixer (stand mixer or hand mixer works great), beat the softened unsalted butter with both the granulated sugar and light brown sugar until the mixture is light and fluffy. This usually takes about 2-3 minutes. Scrape down the sides of the bowl as needed to ensure everything is incorporated.
Add the Wet Ingredients
Beat in the eggs, one at a time, mixing well after each addition. Then, stir in the vanilla extract. The mixture should look smooth and creamy.
Combine Wet and Dry
Gradually add the dry ingredients to the wet ingredients, mixing on low speed until just combined. Be careful not to overmix here; overmixing can lead to tough bars. Stop as soon as you no longer see streaks of flour.
Fold in the Chocolate Chips
Gently fold in the semi-sweet chocolate chips. You want them distributed throughout the dough, ready to create those pools of molten chocolate.

Build the Bar Layers
Take about two-thirds of the cookie dough and press it evenly into the bottom of your prepared 9×13-inch pan. Use the back of a spoon or your fingers to make sure it’s a solid, even layer.
Spread the Cookie Butter
Now for the star! Carefully spread the entire jar of cookie butter over the first layer of cookie dough. It might be a little stiff, so if it’s too hard to spread, you can microwave it for about 15-20 seconds to soften it slightly. Spread it almost to the edges, leaving a small border.
Top with More Dough
Crumble the remaining one-third of the cookie dough over the cookie butter layer. Don’t worry about making it perfectly even; the “crumble” effect adds a lovely texture to the top. It will bake together beautifully.

Bake to Golden Perfection
Pop the pan into your preheated oven and bake for 30-35 minutes. You’re looking for a beautiful golden brown on top, and the edges should be set. The center might look slightly soft, but it will firm up as it cools.
Tip: If the top starts to brown too quickly, you can loosely tent the pan with aluminum foil for the last 10 minutes of baking.Cool and Cut
This is the hardest part: letting them cool! Allow the bars to cool completely in the pan on a wire rack before attempting to lift them out. This can take a couple of hours, but it’s crucial for clean cuts and preventing a crumbly mess. Once cool, use the parchment paper handles to lift the entire slab out of the pan. Place it on a cutting board and slice into squares.
FAQ: All Your Cookie Butter Bar Quandaries Answered
Got questions? I’ve got answers. Here are some common things people wonder about these delightful bars.Can I use homemade cookie butter?
Absolutely! If you have a trusted homemade cookie butter recipe, it would be fantastic in these bars. Just ensure it’s the right consistency—thick enough to spread but not overly runny.
What if I don’t have a 9×13-inch pan?
A 9×9-inch pan would result in much thicker bars and would likely require a longer baking time, possibly up to 40-45 minutes. Keep an eye on them! A smaller pan will also yield fewer servings.
How do I store leftover cookie butter bars?
Store any leftover bars in an airtight container at room temperature for up to 3-4 days. For longer storage, you can refrigerate them for up to a week, though they might become a bit firmer.
Can I freeze these bars?
Yes, these bars freeze beautifully! Once completely cooled, cut them into individual squares and wrap each tightly in plastic wrap, then place them in a freezer-safe bag or container. They’ll keep in the freezer for up to 2-3 months. Thaw at room temperature before serving.
What kind of chocolate chips work best?
I prefer semi-sweet chocolate chips as they offer a nice balance, but milk chocolate chips would make them even sweeter, and dark chocolate chips would add a lovely bitter contrast. Feel free to use your favorite! Chocolate chunks would also be excellent.
Variations to Keep Things Exciting
Once you’ve mastered the basic recipe, feel free to get creative!- Nutty Twist: Add a layer of chopped pecans or walnuts to the bottom cookie dough layer for extra crunch.
- White Chocolate Dream: Swap out half of the semi-sweet chocolate chips for white chocolate chips in the dough.
- Drizzle It: After the bars have cooled, melt a bit of extra cookie butter or some white chocolate and drizzle it over the top for an extra flourish.
- Salted Caramel Swirl: A thin swirl of salted caramel sauce (homemade or store-bought) over the cookie butter layer before topping with the remaining dough would be divine.

Decadent Chocolate Chip Cookie Butter Bars
Chewy chocolate chip cookie bars with a luscious, spiced cookie butter filling, perfect for a sweet and satisfying treat.
📝 Ingredients
👩🍳 Instructions
- 1Preheat your oven to 350°F (175°C). Line a 9x13-inch baking pan with parchment paper, leaving an overhang on the sides for easy removal.
- 2In a medium bowl, whisk together the flour, baking soda, and salt. Set aside.
- 3In a large bowl, using an electric mixer, cream together the softened butter, granulated sugar, and light brown sugar until light and fluffy (about 2-3 minutes).
- 4Beat in the eggs, one at a time, mixing well after each addition. Stir in the vanilla extract.
- 5Gradually add the dry ingredients to the wet ingredients, mixing on low speed until just combined. Do not overmix.
- 6Fold in the semi-sweet chocolate chips.
- 7Press about two-thirds of the cookie dough evenly into the bottom of the prepared baking pan.
- 8Carefully spread the entire jar of cookie butter over the dough layer, almost to the edges. If the cookie butter is too stiff, microwave for 15-20 seconds to soften.
- 9Crumble the remaining one-third of the cookie dough evenly over the cookie butter layer.
- 10Bake for 30-35 minutes, or until the top is golden brown and the edges are set. The center might still look slightly soft.
- 11Allow the bars to cool completely in the pan on a wire rack (at least 2 hours) before lifting them out using the parchment paper handles. Cut into squares and serve.
💡 Notes
Ensure the bars are fully cooled before cutting to prevent crumbling. Store leftovers in an airtight container at room temperature for up to 4 days, or freeze individual squares for longer storage.



