


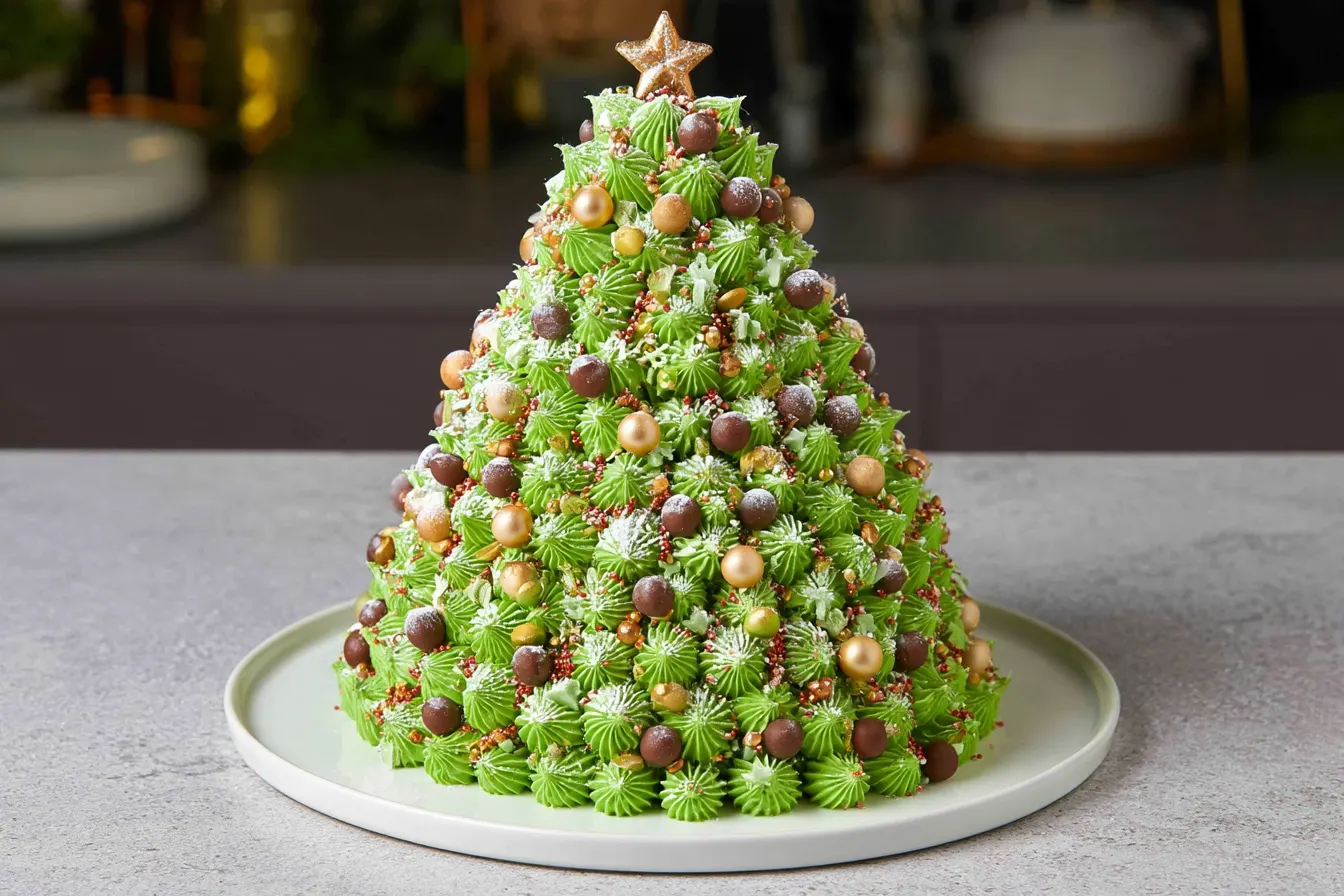
Do you ever look at those elaborate holiday desserts in magazines or on social media and think, “There’s no way I could ever make that”? I used to feel the exact same way. Especially when it came to a showstopper like an ultimate Christmas tree cake. But what if I told you that creating this festive, towering dessert is not only achievable but genuinely fun? It’s true!

Crafting the Perfect Cake Foundation
Every great sculpture needs a solid base, and our Christmas tree cake is no different. We’re going for a vanilla cake that’s sturdy enough to hold its shape but still deliciously moist and tender. This isn’t the time for a super delicate crumb; we need something with a little backbone. The key here is not to overmix, keeping the batter light and airy, and ensuring your baking pans are properly prepared.Gathering Your Cake Essentials
For the perfect vanilla cake layers, here’s what you’ll need to have on hand. Quality ingredients really do make a difference, especially with something like vanilla extract – splurge on the good stuff here; you won’t regret it! All-Purpose Flour: Measured correctly! Too much flour makes a dry cake. Granulated Sugar: For sweetness and moisture. Baking Powder & Baking Soda: Our leavening agents for that lovely rise. Salt: Balances the sweetness and enhances flavor. Unsalted Butter: Room temperature is crucial for proper creaming. Large Eggs: Also at room temperature, they emulsify better. Whole Milk: Adds richness and moisture. Pure Vanilla Extract: The star flavor! Buttermilk (optional): For an extra tender crumb. You can substitute with milk + lemon juice if you don’t have it.
Mixing Up the Magic
The method for this cake is a bit different from your standard cream-the-butter-and-sugar first. We’re using a reverse creaming method which helps create a finer, tighter crumb, perfect for a structural cake like our Christmas tree. 1. Preheat & Prep: Get your oven heating to 350°F (175°C). Grease and flour three 8-inch round cake pans or line them with parchment circles. This prevents sticking and ensures easy release. 2. Dry Mix: In a large bowl, whisk together the flour, sugar, baking powder, baking soda, and salt. Make sure everything is well combined. 3. Add Butter: Cut your room temperature butter into small cubes and add them to the dry ingredients. Beat on low speed with an electric mixer until the mixture resembles coarse sand, with no large pieces of butter remaining. This coats the flour particles, inhibiting gluten development, which leads to a tender cake. 4. Wet Mix (Part 1): In a separate bowl, whisk together the eggs, milk, and vanilla extract. 5. Combine Gradually: With the mixer on low, slowly add about two-thirds of the wet mixture to the dry ingredients. Beat on medium speed for 2 minutes, scraping down the sides of the bowl often. This step develops the cake’s structure. 6. Wet Mix (Part 2): Add the remaining wet mixture and beat for another minute until just combined. Be careful not to overmix at this stage; overmixing develops too much gluten, resulting in a tough cake. 7. Divide & Bake: Divide the batter evenly among your prepared cake pans. Bake for 25-30 minutes, or until a wooden skewer inserted into the center comes out clean. 8. Cool: Let the cakes cool in the pans for 10-15 minutes before inverting them onto a wire rack to cool completely. They must be completely cool before frosting and assembling!Building Your Edible Evergreen
This is where the fun really begins! Transforming simple round cake layers into a majestic Christmas tree cake is all about strategic trimming and stacking. Don’t be intimidated by the carving; it’s much more forgiving than you might think. We’ll use a template approach to guide our cuts, ensuring a symmetrical and stable tree.What You’ll Need for Assembly
Fully cooled cake layers (at least three, preferably four for a taller tree) Batch of green buttercream frosting (tinted with gel food coloring) Large serrated knife or a cake leveling tool Small offset spatula or butter knife Turntable (optional, but helpful) Piping bags with star tips (Wilton 1M or 21 are great) Cardboard cake circles or cake boards (one large for the base, smaller ones for stability between tiers) Wooden dowels or thick straws (for support) Holiday sprinkles, candies, or edible glitter for decorationShaping the Tree
1. Level the Cakes: Use a serrated knife or cake leveler to level the tops of your cooled cake layers. This creates a flat surface for stacking and helps prevent a lopsided tree. 2. Cut the Circles: Place your largest cake layer on your main serving platter or cake board. Using a smaller cake board as a guide, cut out concentric circles from your remaining cake layers. For example, if you have four 8-inch cakes, you might use an 8-inch board for the bottom, a 6-inch for the next, a 4-inch for the third, and a 2-inch for the very top. You’ll essentially create a tiered cake where each tier is smaller than the one below it. Don’t worry about perfect circles yet; we’ll refine them. 3. Crumb Coat: Stack your cake layers, spreading a thin layer of buttercream between each one. Once stacked, apply a very thin layer of buttercream over the entire cake. This is your “crumb coat,” which traps any loose crumbs, giving you a clean surface for your final frosting. Chill the cake in the fridge for at least 30 minutes until the crumb coat is firm. 4. Start Carving: Once chilled, use your serrated knife to carefully carve the cake into a cone shape, tapering from the widest base up to the narrowest top. Take your time, removing small amounts of cake at a time. Rotate the cake as you cut to ensure evenness. Don’t strive for perfection here; the frosting will cover a lot! 5. Second Crumb Coat: Apply another thin layer of buttercream to your carved cake, filling in any gaps or uneven spots. Chill again for 30 minutes.
Bringing the Tree to Life with Frosting
This is where the Christmas tree really takes shape! We’ll use a simple star tip to create that classic evergreen texture. 1. Prepare Piping Bags: Fit a piping bag with a star tip (like a Wilton 1M or 21). Fill the bag with your green buttercream. 2. Pipe the “Needles”: Starting at the bottom of the cake, pipe small stars or rosettes close together, working your way up the cake. Overlap them slightly to create a full, textured look. You can vary the pressure to make some stars larger or smaller, adding to the natural look of the tree. 3. Add Branches (Optional): For a more defined look, you can pipe a few rows of stars, then let them slightly extend outwards, mimicking branches. 4. Top it Off: Once the entire cake is covered, pipe a final star or small swirl at the very top for a finished look.Decorating Your Winter Wonderland
Now for the best part – making your Christmas tree sparkle! This is where you can let your creativity run wild. Think of your cake as a blank canvas waiting for its festive decorations.Sparkle and Shine
Edible Glitter: A dusting of edible glitter (gold, silver, or iridescent) can instantly make your tree magical, catching the light beautifully. Sprinkles: Red, green, and white sprinkles can look like tiny ornaments. Nonpareils or jimmies work wonderfully. Candy Ornaments: Small round candies (like M&Ms or Sixlets), gumdrops, or even mini chocolate truffles can be gently pressed onto the frosted tree to resemble ornaments. Fondant Stars/Shapes: Cut out small stars or other festive shapes from rolled fondant using mini cookie cutters. You can even dust them with edible gold dust. Powdered Sugar “Snow”: Just before serving, a light dusting of powdered sugar over the entire cake gives the illusion of freshly fallen snow. Pretzel Trunk: For an edible trunk, gently press a few pretzel sticks into the base of the cake, arranging them to look like a tree trunk. Edible Star Topper: You can make a larger star out of fondant, gum paste, or even just pipe a large star with yellow buttercream right on top. Tip: For very delicate decorations like small candy canes, consider adding them right before serving to prevent them from becoming soggy or falling off.Common Questions About This Festive Creation
Creating a cake of this magnitude can spark a few questions. Here are some of the most frequent ones I get about making a Christmas tree cake.Can I make the cake layers ahead of time?
Absolutely! The cake layers can be baked up to 2-3 days in advance. Once completely cooled, wrap each layer tightly in plastic wrap and store them at room temperature. For longer storage, you can freeze them for up to a month. Thaw them in the refrigerator overnight before assembling.What if my tree isn’t perfectly symmetrical after carving?
Don’t stress! The beauty of the buttercream “needles” is that they are incredibly forgiving. Any minor imperfections in your carving will be completely hidden by the piping. Focus on getting a general conical shape, and let the frosting do the rest.How do I get the green color just right for the frosting?
I highly recommend using gel food coloring over liquid dyes. Gel colors are much more concentrated, so you need less to achieve a vibrant hue, which helps prevent thinning your frosting. Start with a small amount and gradually add more, mixing thoroughly until you reach your desired shade of green. A mix of leaf green and a tiny touch of brown or yellow can create a more natural evergreen color.Can I use a different cake flavor?
Of course! While vanilla is a classic, a chocolate fudge cake or even a gingerbread spice cake would be absolutely delicious and seasonally appropriate. Just ensure the chosen cake recipe is sturdy enough to hold its shape for carving and stacking. The assembly instructions remain the same regardless of flavor.How do I store the finished Christmas tree cake?
Once decorated, the cake can be stored at room temperature in an airtight cake dome or box for up to 2 days. If your kitchen is particularly warm, or if you’ve used a cream cheese-based frosting, it’s best to store it in the refrigerator. Just be sure to bring it to room temperature for about an hour before serving for the best flavor and texture.Making a Grand Entrance: Serving Suggestions
Presenting your ultimate Christmas tree cake is almost as important as making it! This cake is a showstopper, and you want to ensure it gets the spotlight it deserves. When it comes to serving, a simple, uncluttered display works best. Place your tree cake on a beautiful cake stand or a festive platter. You can surround the base with a few sprigs of fresh rosemary or cranberries for a natural, wintry touch, just be sure they don’t touch the cake directly if they’re not food-safe. Consider pairing individual slices with a dollop of freshly whipped cream or a scoop of vanilla bean ice cream. A light dusting of powdered sugar over the plates adds to the snowy aesthetic. This cake is rich and satisfying on its own, so keep accompaniments simple to let the tree shine. This isn’t just a dessert; it’s a statement. It’s the kind of treat that brings gasps of delight and becomes the talking point of your holiday gathering. So, go ahead, embrace your inner cake architect, and create a truly memorable Christmas tree cake this year. You’ve got this!
Ultimate Christmas Tree Cake
Create a stunning 3D Christmas tree cake that's surprisingly easy to make, perfect for a showstopping holiday dessert.
📝 Ingredients
👩🍳 Instructions
- 1PREPARE THE CAKE LAYERS:
- 21. Preheat your oven to 350°F (175°C). Grease and flour three 8-inch round cake pans, or line with parchment paper circles. This is crucial for easy release.
- 32. In a large bowl, whisk together the flour, granulated sugar, baking powder, baking soda, and salt until well combined.
- 43. Add the cubed, softened butter to the dry ingredients. Beat on low speed with an electric mixer until the mixture resembles coarse sand and no large butter pieces remain. This step helps create a fine crumb.
- 54. In a separate medium bowl, whisk together the eggs, whole milk, and vanilla extract until fully combined.
- 65. With the mixer on low speed, gradually add about two-thirds of the wet mixture to the dry ingredients. Increase speed to medium and beat for 2 minutes, scraping down the sides of the bowl frequently. This develops the cake's structure.
- 76. Add the remaining wet mixture and beat on medium speed for another minute, or until just combined and smooth. Be careful not to overmix, as this can lead to a tough cake.
- 87. Divide the batter evenly among your prepared cake pans. Bake for 25-30 minutes, or until a wooden skewer inserted into the center of each cake comes out clean. Baking times may vary slightly by oven.
- 98. Let the cakes cool in their pans for 10-15 minutes before inverting them onto a wire rack to cool completely. The cakes must be fully cooled before you begin assembly.
- 10MAKE THE BUTTERCREAM:
- 111. In a large bowl with an electric mixer, beat the softened butter on medium-high speed for 3-5 minutes until it’s light and fluffy. This incorporates air and makes for a smoother frosting.
- 122. Gradually add the sifted powdered sugar, one cup at a time, beating well after each addition. Start on low speed to avoid a sugar cloud, then increase to medium.
- 133. Pour in the heavy cream (or milk), vanilla extract, and a pinch of salt. Beat on medium-high speed for another 3-5 minutes until the buttercream is light, fluffy, and smooth. If it's too thick, add more cream a teaspoon at a time; if too thin, add more powdered sugar.
- 144. Add green gel food coloring a small drop at a time, mixing well after each addition, until you achieve your desired evergreen shade. Remember, a little gel goes a long way!
- 15ASSEMBLE THE CHRISTMAS TREE CAKE:
- 161. Level the cooled cake layers using a serrated knife or cake leveler, ensuring flat tops for stable stacking.
- 172. Place one leveled cake layer (your largest, usually 8-inch) on your serving platter or cake board. Spread a thin, even layer of green buttercream over the top.
- 183. Using a smaller cake board or a template (e.g., a 6-inch circle), cut a smaller circle from another cake layer. Place this on top of the first layer, centered, and frost. Repeat this process, creating progressively smaller cake circles (e.g., 4-inch, 2-inch) and stacking them with buttercream between each, forming a tiered, conical shape. You may need to trim the edges slightly to make them perfectly round.
- 194. Apply a very thin layer of buttercream over the entire stacked cake. This is your crumb coat, which traps any loose crumbs. Chill the cake in the refrigerator for at least 30 minutes until the crumb coat is firm to the touch.
- 205. Once chilled, use a serrated knife to carefully carve the stacked cake into a more defined conical (Christmas tree) shape. Take your time, removing small amounts of cake at a time and rotating the cake for evenness. Don't worry about perfection; the frosting will cover minor flaws.
- 216. Apply a second thin layer of buttercream over the carved cake, smoothing out any rough spots. Chill again for at least 30 minutes.
- 227. DECORATE THE TREE: Fit a piping bag with a star tip (such as Wilton 1M or 21) and fill it with the remaining green buttercream. Starting at the bottom of the cake, pipe small stars or rosettes close together, working your way up the cake. Overlap them slightly to create a full, textured, evergreen look. Varying the pressure can create slightly different sized stars.
- 238. Once the entire cake is covered in piped stars, decorate your Christmas tree with sprinkles, small candies, edible glitter, or any other festive decorations you choose. A dusting of powdered sugar can simulate snow.
- 249. For the star topper, you can pipe a large star with yellow buttercream or use a pre-made edible star decoration. Serve your magnificent Christmas tree cake and enjoy the applause!
- 25Note: For extra stability, especially if making a very tall tree, you can insert a few wooden dowels or thick straws into the lower layers before adding the top tiers. Trim them to be flush with the top of each layer.
💡 Notes
This cake is best enjoyed at room temperature for optimal flavor and texture. Store any leftovers in an airtight container at room temperature for up to 2 days, or in the refrigerator for up to 4 days. If refrigerated, let it come to room temperature for about an hour before serving again.



