


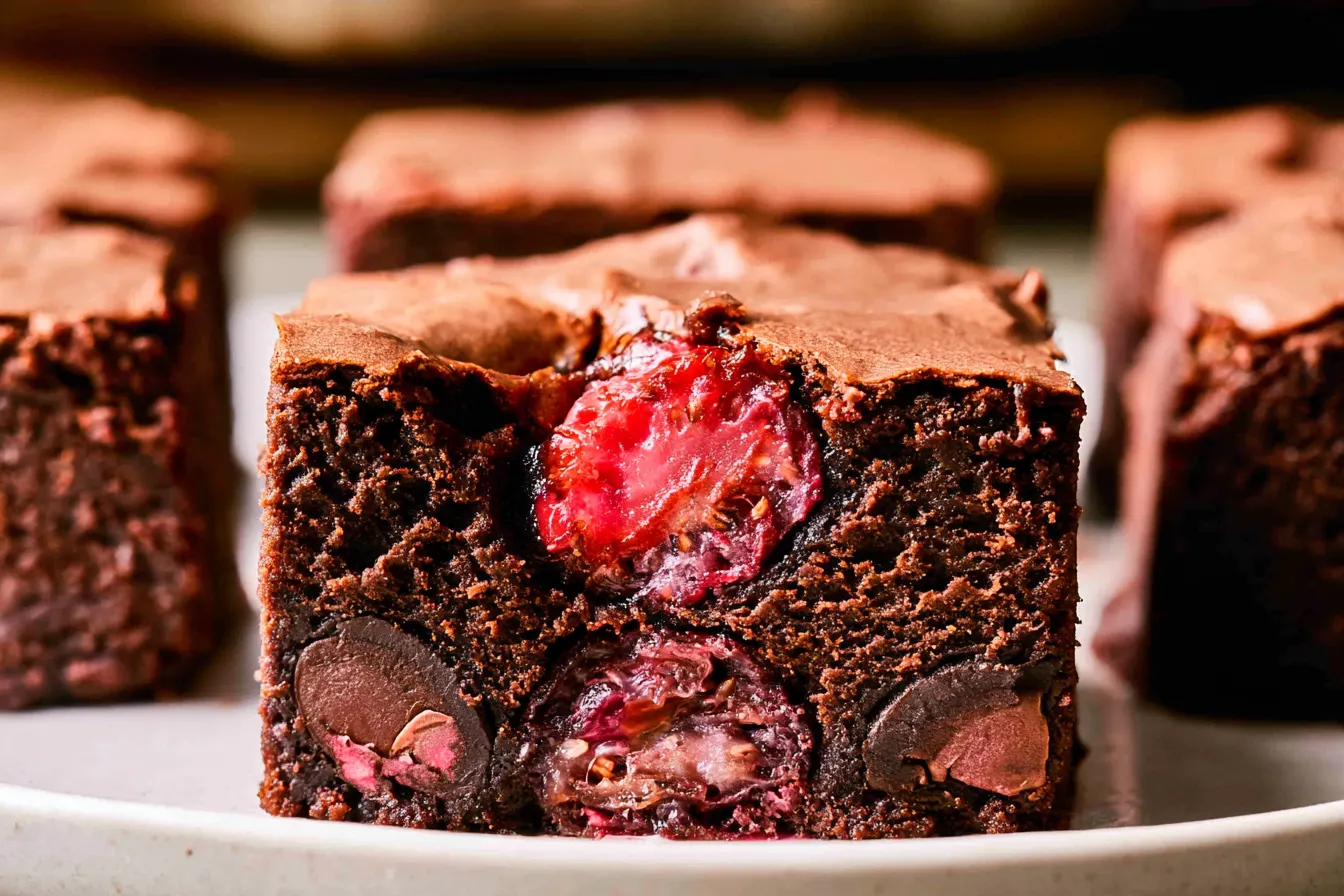
I once thought my grandmother’s fudge brownies were the pinnacle of chocolate desserts. Rich, dense, and unapologetically sweet, they were a childhood staple. Then, one dreary afternoon, I found a forgotten bag of frozen raspberries in the back of my freezer, and a wild idea sparked: what if I folded them into that classic brownie batter? The result was nothing short of revelatory – a dark chocolate raspberry brownie that wasn’t just good, but transcended every brownie I’d ever known.

Why These Raspberry Brownies Are a Cut Above
Let’s be honest, there are a million brownie recipes out there. So, what makes these dark chocolate raspberry brownies so extraordinary? It boils down to a few key elements that create an unparalleled depth of flavor and texture. We’re not just tossing a few berries into a standard mix; we’re building a brownie around their vibrant presence. First, the chocolate choice is paramount. We’re going for a high-quality dark chocolate, at least 70% cacao. This isn’t the time for milk chocolate. The bitterness of the dark chocolate is essential for balancing the sweetness of the sugar and providing a robust backdrop for the raspberries. It creates a complex base that allows the fruit to truly shine. Secondly, the texture. These brownies are designed to be fudgy, not cakey. That dense, almost chewy interior is what makes each bite so satisfying. We achieve this by carefully controlling the fat-to-flour ratio and avoiding overmixing. The slight moisture from the raspberries also contributes to that desirable gooeyness, ensuring they stay moist for days – if they last that long! Lastly, the raspberries themselves. Whether fresh or frozen, they introduce a much-needed counterpoint to the richness. That tangy pop brightens the entire dessert, preventing it from being overly heavy. It’s a classic pairing for a reason, and when executed properly, it elevates a simple brownie into something truly gourmet.Gather Your Essentials: What You’ll Need
Before you dive into the delicious process, let’s make sure your pantry is stocked. Using quality ingredients here really does make a difference, especially when it comes to chocolate.The Chocolatey Core
- Unsalted Butter: 1 cup (2 sticks), melted. Unsalted allows you to control the salt content precisely.
- Dark Chocolate: 8 ounces, high-quality, 70-72% cacao, chopped. Chocolate bars or discs are preferred over chips for better melting and texture.
- Granulated Sugar: 1 ½ cups. For sweetness and that signature crackly top.
- Light Brown Sugar: ½ cup, packed. Adds moisture and a subtle caramel note.
- Large Eggs: 4, at room temperature. Essential for binding and structure.
- Vanilla Extract: 2 teaspoons. Always use pure vanilla for the best flavor.
The Dry Goods & Flavor Boosters
- All-Purpose Flour: 1 cup. Don’t overmeasure; spoon it into your measuring cup and level it off.
- Unsweetened Cocoa Powder: ½ cup, Dutch-processed. This gives a deeper, richer chocolate flavor and a darker color.
- Salt: 1 teaspoon. Crucial for balancing sweetness and enhancing all the other flavors.
- Fresh or Frozen Raspberries: 1 ½ cups. If using frozen, don’t thaw them completely; a slight frostiness is fine.
- Optional: Chocolate Chunks or Chips: ½ cup, for an extra chocolatey swirl on top.

Crafting Your Decadent Dark Chocolate Raspberry Brownies
This recipe is straightforward, but a few key steps ensure that perfect fudgy texture and intense flavor. Don’t rush it; enjoy the process!Step 1: Prep Your Pan and Preheat
Position your oven rack to the middle and preheat your oven to 350°F (175°C). Line a 9×13-inch baking pan with parchment paper, leaving an overhang on the sides. This makes it incredibly easy to lift the brownies out once they’re cooled. Give the parchment a light spray with non-stick cooking spray for good measure.
Step 2: Melt the Chocolate and Butter
In a large microwave-safe bowl or a heatproof bowl set over a saucepan of simmering water (double-boiler method), combine the chopped dark chocolate and the melted unsalted butter. Heat, stirring occasionally, until completely smooth and melted. This should take about 1-2 minutes in the microwave on 30-second intervals, or 5-7 minutes over simmering water. Remove from heat and let it cool slightly for a few minutes.
Step 3: Whisk in Sugars and Eggs
To the slightly cooled chocolate mixture, add the granulated sugar and light brown sugar. Whisk vigorously until well combined and glossy. Then, one at a time, beat in the eggs, mixing well after each addition. The mixture will become thick and shiny. Stir in the vanilla extract. Tip: Don’t skip mixing well after each egg; this helps create that desirable crackly top crust.
Step 4: Fold in Dry Ingredients
In a separate medium bowl, whisk together the all-purpose flour, Dutch-processed cocoa powder, and salt. Gradually add the dry ingredients to the wet ingredients, folding gently with a spatula until just combined. Be careful not to overmix; overmixing develops gluten, which can lead to cakey brownies instead of fudgy ones.
Step 5: Introduce the Raspberries
Gently fold in the fresh or frozen raspberries. If using frozen, a light coating of flour (about a tablespoon from the measured flour) can help prevent them from sinking to the bottom, though with a thick batter like this, it’s often not strictly necessary. If you’re adding extra chocolate chunks, fold them in now as well. The goal is to distribute them evenly without crushing too many of the berries.
Step 6: Bake to Perfection
Pour the batter into your prepared 9×13-inch baking pan and spread it evenly with a spatula. If you like, sprinkle a few extra chocolate chips or a few whole raspberries on top for visual appeal. Bake for 30-35 minutes, or until a toothpick inserted into the center comes out with moist crumbs, but not wet batter. The edges should look set, and the center might still have a slight wobble. This indicates a perfect fudgy interior.

Step 7: Cool and Slice
Allow the brownies to cool completely in the pan on a wire rack before attempting to slice them. This is crucial! Warm brownies are delicious but messy to cut. Cooling allows them to firm up, making for clean, beautiful squares. Once completely cool, use the parchment paper overhang to lift them out of the pan and slice into squares. Enjoy!
Common Questions About Raspberry Brownies
Got questions? I’ve got answers to help you achieve brownie bliss every time.Can I use frozen raspberries instead of fresh?
Absolutely! Frozen raspberries work wonderfully in this recipe. There’s no need to thaw them completely; just toss them directly into the batter. They might release a little more moisture, but the brownies will still be incredibly fudgy and delicious.How do I prevent the raspberries from sinking to the bottom?
With this thick brownie batter, sinking isn’t usually a major issue. However, if you’re concerned, you can lightly toss your raspberries (especially frozen ones) in about a tablespoon of the measured flour before folding them into the batter. This slight coating helps them suspend more evenly.What’s the best way to store leftover brownies?
These brownies stay fresh and fudgy for several days. Store them in an airtight container at room temperature for up to 3-4 days. If you want to keep them longer, they can be stored in the refrigerator for up to a week, or individually wrapped and frozen for up to 3 months. Thaw frozen brownies at room temperature or warm briefly in the microwave.My brownies are cakey, not fudgy. What went wrong?
There are a few culprits for cakey brownies. The most common is overmixing the batter after adding the flour. Overmixing develops gluten, leading to a more bread-like texture. Another reason could be overbaking; pulling them out when the center still has a slight wobble is key for fudginess. Make sure your oven temperature is accurate!Can I use milk chocolate instead of dark chocolate?
While you *can* technically use milk chocolate, I strongly recommend sticking with dark chocolate for this recipe. The bitterness of dark chocolate provides a crucial balance to the sweetness and the tartness of the raspberries. Milk chocolate would make the brownies overly sweet and less complex in flavor.Serving Suggestions and Flavor Variations
These dark chocolate raspberry brownies are fantastic on their own, but a few simple additions can make them even more special. Imagine sinking your teeth into a warm square, the chocolate melting, the raspberry bursting… pure heaven. For a truly indulgent experience, serve them slightly warm with a scoop of good quality vanilla bean ice cream. The cold creaminess against the warm, rich brownie is a match made in dessert heaven. A dollop of freshly whipped cream also makes for a delightful pairing, offering a light contrast to the dense brownie. If you’re feeling fancy, a light dusting of powdered sugar or a drizzle of a simple raspberry coulis (just puréed and strained raspberries, perhaps with a touch of sugar) can elevate the presentation and add another layer of fruitiness. Consider a small sprig of fresh mint for a pop of color and a subtle aromatic lift. Want to play with flavors? A tiny pinch of cayenne pepper added to the dry ingredients can introduce a subtle, intriguing warmth that complements the chocolate beautifully without making it spicy. Or, for a hint of citrus, add a teaspoon of orange zest to the batter along with the vanilla. The orange and raspberry combination with dark chocolate is surprisingly harmonious.Make-Ahead and Freezing Tips
Life gets busy, but that doesn’t mean you can’t enjoy homemade treats. These dark chocolate raspberry brownies are excellent for making ahead, which means less stress when you need a dessert in a pinch. You can bake the entire batch a day or two in advance. Once completely cooled, store them in an airtight container at room temperature. They actually seem to get fudgier and more flavorful as they sit, allowing the flavors to meld beautifully. For longer storage, these brownies freeze exceptionally well. After they’ve cooled completely, cut them into individual squares. Wrap each square tightly in plastic wrap, then place them in a freezer-safe bag or container. They’ll keep wonderfully in the freezer for up to 3 months. When a craving strikes, simply pull out as many as you need. You can thaw them at room temperature for an hour or so, or gently warm them in the microwave for a few seconds for that fresh-baked feel. This makes them perfect for portion control or having a quick treat on hand whenever you desire.
Dark Chocolate Raspberry Brownies
Rich, fudgy dark chocolate brownies studded with tart raspberries for a perfectly balanced, decadent dessert.
📝 Ingredients
👩🍳 Instructions
- 1Preheat oven to 350°F (175°C). Line a 9x13-inch baking pan with parchment paper, leaving an overhang on the sides. Lightly spray with non-stick spray.
- 2In a large microwave-safe bowl, combine chopped dark chocolate and melted butter. Microwave in 30-second intervals, stirring after each, until smooth and melted (about 1-2 minutes). Alternatively, melt in a heatproof bowl over simmering water. Let cool slightly for 5 minutes.
- 3To the cooled chocolate mixture, add granulated sugar and brown sugar. Whisk vigorously until well combined and glossy. Beat in eggs one at a time, mixing well after each addition. Stir in vanilla extract.
- 4In a separate medium bowl, whisk together flour, cocoa powder, and salt. Gradually add dry ingredients to wet ingredients, folding gently with a spatula until just combined. Do not overmix.
- 5Gently fold in the raspberries. If using optional chocolate chunks, fold them in now.
- 6Pour batter into the prepared pan and spread evenly. If desired, sprinkle extra chocolate chips or whole raspberries on top.
- 7Bake for 30-35 minutes, or until a toothpick inserted into the center comes out with moist crumbs, not wet batter. The edges should be set, and the center may have a slight wobble.
- 8Let brownies cool completely in the pan on a wire rack before lifting out with parchment paper and slicing into squares.
💡 Notes
Using high-quality dark chocolate makes a significant difference in flavor. For best results, ensure eggs are at room temperature. Brownies are best stored in an airtight container at room temperature for up to 4 days, or frozen for longer storage. Do not overbake for fudgy results.



