


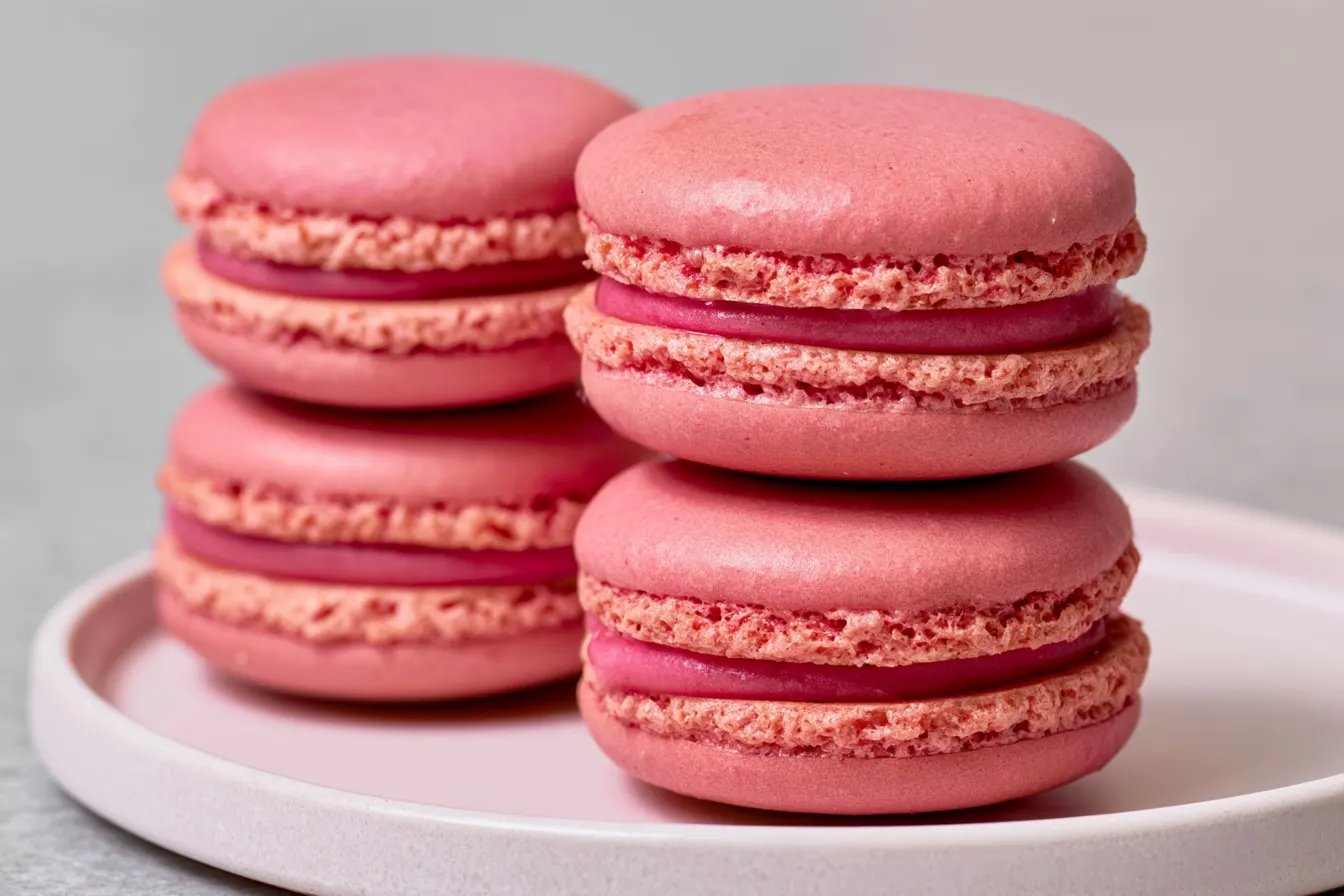
E ver since I first laid eyes on a perfectly formed, pastel-hued French macaron in a tiny Parisian patisserie, I’ve been utterly captivated. There’s something undeniably magical about these delicate, almond-meringue cookies – their crisp shell giving way to a chewy, melt-in-your-mouth interior, all held together by a luxurious filling. For years, I just admired them from afar, convinced they were the exclusive domain of professional pastry chefs. Turns out, I was both right and gloriously, stubbornly wrong.
- The Anatomy of a Perfect Macaron (And Why Yours Will Be Too)
- Gathering Your Tools: Essential Gear for Macaron Success
- Ingredients for Exquisite French Macarons
- Crafting Your Macarons: Step-by-Step Guide
- Common Macaron Mistakes & How to Dodge Them
- Flavor Twists and Creative Fillings
- Frequently Asked Macaron Questions
- Storage & Enjoyment

The Anatomy of a Perfect Macaron (And Why Yours Will Be Too)
Before we dive into the nitty-gritty of whisking and folding, let’s talk about what we’re aiming for. A truly great macaron has a few non-negotiable characteristics. First, those iconic “feet” – that ruffled edge at the base where the meringue has risen beautifully. Second, a smooth, uncracked top. Third, a delicate, crisp shell that gives way to a soft, slightly chewy interior. Lastly, the flavor, of course, which comes from both the shell and the filling. My version focuses on the French meringue method, which I find to be the most approachable for home bakers. It might require a little patience and attention to detail, but the results are incredibly rewarding. We’ll be using almond flour, confectioners’ sugar, and egg whites as our core ingredients, transforming them into something truly special. The magic really happens in the macaronage – that crucial step where you fold the dry ingredients into the meringue. It’s an art, but one you can master with a little practice and my guidance.Why This Approach to Macarons Works
I’ve tried all the methods – Swiss, Italian, even some hybrid approaches. But the French method, when done correctly, yields consistently excellent results without requiring a candy thermometer or a double boiler. It relies on whipping egg whites to stiff peaks, then gently folding in your dry ingredients. The key is understanding the texture you’re looking for at each stage, rather than just following steps blindly. I’ll walk you through recognizing these visual cues, which makes all the difference. This recipe also emphasizes proper drying time, which is paramount for those coveted feet.Gathering Your Tools: Essential Gear for Macaron Success
You don’t need a professional kitchen, but a few specific tools will make your macaron journey much smoother. Think of them as your allies in the quest for perfect little pastries.The Must-Haves:
- Digital Kitchen Scale: This is non-negotiable. Baking, especially macarons, is a science. Measuring by weight is far more accurate than volume, ensuring precise ratios of your ingredients.
- Stand Mixer with Whisk Attachment: While you can do this by hand, a stand mixer makes whipping egg whites to stiff peaks much easier and more consistent.
- Fine Mesh Sieve: Crucial for sifting your almond flour and confectioners’ sugar. This prevents lumps and ensures a smooth macaron shell.
- Piping Bag and Round Tip (Wilton 1A or Ateco 805): Essential for getting uniform circles. Don’t skimp on this; neat piping equals neat macarons.
- Baking Sheets: Sturdy, flat baking sheets are best. Avoid warped ones, as they can lead to uneven baking.
- Silicone Baking Mats (e.g., Silpat) or Parchment Paper: These prevent sticking and help with even heat distribution. I prefer silicone mats for their reusability and consistent results. You can even buy ones with macaron templates printed on them!
Good to Have (But Not Absolutely Necessary):
- Oven Thermometer: Ovens can be notoriously inaccurate. An external thermometer helps you ensure your oven is at the precise temperature needed for proper baking.
- Macaron Template: If your silicone mat doesn’t have one, you can print a template and slide it under parchment paper for perfectly sized circles.
- Rubber Spatula: A good, flexible spatula is key for the macaronage step.
Ingredients for Exquisite French Macarons
The beauty of macarons lies in their simplicity – just a few core ingredients, but quality and precision make all the difference. Always measure by weight for best results.
For the Macaron Shells:
- 120g (approx. 1 cup + 2 tbsp) Almond Flour: Use blanched, super-fine almond flour. Coarse almond meal won’t work here. The finer, the better for that smooth top.
- 120g (approx. 1 cup) Confectioners’ Sugar (Powdered Sugar): Also known as icing sugar. Make sure it’s fresh and doesn’t have hard lumps.
- 90g (approx. 3 large) Egg Whites: Aged egg whites are often recommended, but I’ve found fresh, room-temperature egg whites work perfectly fine if they’re handled correctly. Separate them carefully, ensuring no yolk gets in.
- 80g (approx. 6.5 tbsp) Granulated Sugar (Caster Sugar): This is for our meringue.
- 1/4 tsp Cream of Tartar (optional, but recommended): Helps stabilize the egg whites, giving you a stronger meringue.
- Pinch of Salt: Enhances flavor and aids in whipping the meringue.
- Gel Food Coloring (optional): For vibrant, beautiful shells. Avoid liquid food coloring, as it can affect the consistency.
For the Vanilla Bean Buttercream Filling:
While you can fill macarons with anything from ganache to jams, a classic buttercream is always a winner. This recipe uses a simple, luscious vanilla bean buttercream.
- 115g (1 stick) Unsalted Butter, softened: Room temperature butter is crucial for smooth buttercream.
- 240g (approx. 2 cups) Confectioners’ Sugar: Sifted to prevent lumps.
- 1-2 tbsp Heavy Cream or Milk: For desired consistency.
- 1/2 tsp Vanilla Extract or 1/4 tsp Vanilla Bean Paste: The paste gives those lovely flecks of vanilla bean.
- Pinch of Salt: Balances the sweetness.
Crafting Your Macarons: Step-by-Step Guide
This is where the magic happens. Take your time, read each step thoroughly, and trust the process. Precision is your friend here!Prepare Your Dry Ingredients
First things first, let’s get our dry components ready. This is a crucial step for achieving those smooth, lump-free macaron shells.
- Weigh out your almond flour and confectioners’ sugar.
- Sift both ingredients together through a fine-mesh sieve into a large bowl. This removes any large bits of almond and breaks up sugar clumps. If there are stubborn almond pieces, discard them.
- Repeat the sifting process once more for extra fineness. Set aside your perfectly airy dry mix.
Whip Up the Meringue
This is the heart of your macaron batter. A strong, stable meringue is non-negotiable for beautiful feet.
- In the clean, dry bowl of your stand mixer, add the egg whites, pinch of salt, and cream of tartar (if using). Begin whisking on medium-low speed until the whites become frothy, like dish soap bubbles.
- Gradually increase the speed to medium. Once soft peaks form (the meringue will hold its shape briefly but slump), start adding the granulated sugar, one tablespoon at a time, while the mixer is still running. This allows the sugar to dissolve properly.
- Increase the speed to medium-high and continue whipping. You’re looking for stiff, glossy peaks. When you lift the whisk, the meringue should stand straight up and hold its shape. It should also be thick and shiny. This usually takes about 8-10 minutes.
- Tip: If using gel food coloring, add a tiny amount during the last minute of whipping. Start with a toothpick amount; a little goes a long way.
The Macaronage: The Art of Folding
This is arguably the most critical step. Over-mixing or under-mixing here will lead to flat, hollow, or cracked shells. We’re looking for a specific consistency.
- Add about one-third of your sifted almond flour and confectioners’ sugar mix to the meringue. Using a rubber spatula, gently fold it in. Use a “cut and fold” motion: push the spatula down through the center of the bowl, scoop up the batter from the bottom, and fold it over the top. Rotate the bowl as you go.
- Add the remaining dry ingredients in two more additions, folding gently after each. Don’t be too aggressive; you want to preserve the air in the meringue.
- Continue folding until the batter reaches the “lava” or “ribbon” stage. When you lift your spatula, the batter should fall off slowly and continuously in a thick ribbon, and you should be able to draw a figure eight with the stream of batter without it breaking. It should also slowly reincorporate into the rest of the batter within 15-20 seconds. This stage is crucial – under-mixed batter will be too stiff and crack, over-mixed batter will be too runny and spread.

Piping the Macarons
Uniformity is key for even baking and beautiful presentation.
- Fit your piping bag with a round tip (like Wilton 1A). Carefully transfer all the macaron batter into the piping bag.
- Prepare your baking sheets with silicone mats or parchment paper. If using parchment, slide a macaron template underneath.
- Hold the piping bag vertically, about 1/2 inch above the baking mat. Apply even pressure and pipe circles of about 1.5 inches in diameter. Stop squeezing, then quickly flick your wrist to stop the flow of batter.
- Once all circles are piped on one sheet, firmly tap the baking sheet against your counter 3-4 times. This helps release air bubbles and flatten the tops. You might see some small bubbles rise to the surface; pop these with a toothpick or scribe.
The Drying (Resting) Phase
This step is essential for forming the “skin” that allows the feet to develop.
- Leave the piped macarons to rest at room temperature for 30-60 minutes, or even longer, depending on your humidity.
- The macarons are ready for baking when you can gently touch the top of a shell and it doesn’t stick to your finger. A slight “skin” should have formed.
Baking Your Macarons
Oven temperature and timing are critical. Get your oven preheated well in advance.
- Preheat your oven to 300°F (150°C). If you have an oven thermometer, use it!
- Bake one sheet at a time in the center rack for 12-15 minutes. The exact time will vary by oven.
- The macarons are done when they have developed their “feet” and don’t wobble when gently nudged. The shells should feel firm. If they’re still sticky or wobbly, bake for another 1-2 minutes.
- Remove from the oven and let the macarons cool completely on the baking sheet before attempting to remove them. They will be delicate when warm. If they stick, they likely needed to bake a minute or two longer.
Prepare the Vanilla Bean Buttercream
While the macaron shells are cooling, whip up your filling.
- In a mixing bowl, beat the softened butter on medium speed until light and fluffy, about 2-3 minutes.
- Gradually add the sifted confectioners’ sugar, beating until fully incorporated.
- Add the vanilla extract/paste, salt, and 1 tablespoon of heavy cream. Beat until smooth and creamy. If it’s too thick, add the second tablespoon of cream, a little at a time, until it reaches a spreadable consistency.
Assemble the Macarons
The final, satisfying step!
- Once the macaron shells are completely cool, gently peel them off the silicone mat or parchment paper.
- Match up similarly sized shells.
- Transfer the buttercream to a piping bag (with or without a tip, a simple snip off the end works fine). Pipe a dollop of buttercream onto the flat side of one shell.
- Gently sandwich it with a matching shell, twisting slightly to distribute the filling.
- Store assembled macarons in an airtight container in the refrigerator for at least 24 hours before serving. This “aging” period allows the filling to soften the shells, resulting in that perfect chewy texture.
Common Macaron Mistakes & How to Dodge Them
Macarons can be temperamental, but most issues stem from a few recurring culprits. Learning to identify and correct them will save you much frustration.Problem: Hollow Shells
This is a common one! It means the inside of your macaron is mostly air, rather than that delightful chewy texture.
- Cause: Often due to under-mixed meringue, over-whipped meringue, or incorrect oven temperature (too high).
- Fix: Ensure your meringue is just right – stiff, glossy peaks but not dry. Pay close attention to your macaronage; it should reach that “lava” consistency. Double-check your oven temperature with an external thermometer.
Problem: Cracked Shells
Those smooth, domed tops are essential. Cracks are a sign something went awry.
- Cause: Most frequently, insufficient drying time (no “skin” formed), under-mixed batter (too stiff), or oven too hot.
- Fix: Extend the drying time until a proper skin forms. Make sure your macaronage is flowing correctly. Verify oven temperature.
Problem: No “Feet” (No Ruffled Edge)
The feet are the signature of a macaron! Their absence is usually a clear indicator of a specific issue.
- Cause: Batter is too runny (over-mixed macaronage), insufficient drying time, or oven temperature is too low.
- Fix: Be careful not to over-mix during macaronage. Always let them rest until a skin forms. Ensure your oven is hot enough.
Problem: Uneven or Lopsided Macarons
When one side is higher than the other, or they spread irregularly.
- Cause: Uneven piping, warped baking sheets, or uneven heat distribution in your oven.
- Fix: Practice your piping technique for consistent circles. Invest in good quality, flat baking sheets. If your oven has hot spots, try rotating the tray halfway through baking.
Problem: Macarons Stick to the Mat
You’ve waited patiently, but they won’t budge without breaking.
- Cause: Not baked long enough.
- Fix: Bake them for another 1-2 minutes. They should release cleanly once fully cooled.
Flavor Twists and Creative Fillings
While classic vanilla bean is always a hit, the beauty of macarons is their versatility! Once you’ve mastered the basic shell, a whole world of flavor combinations opens up.Shell Flavors:
- Chocolate: Replace 10g of almond flour with unsweetened cocoa powder.
- Coffee: Add 1-2 tsp of instant espresso powder (dissolved in a tiny bit of vanilla extract if needed) to the meringue.
- Lemon/Orange Zest: Finely grate zest into the almond flour mix for a subtle citrusy aroma.
- Pistachio: Use finely ground pistachio flour (you might need to make your own) in place of some almond flour, or add a touch of pistachio extract.
Filling Ideas (Beyond Buttercream):
- Chocolate Ganache: A simple mix of melted chocolate and hot cream.
- Fruit Curds: Lemon, passion fruit, or raspberry curds add a bright, tangy contrast.
- Jams & Preserves: Especially delicious with a dollop of buttercream or ganache around the edge to create a barrier.
- Cream Cheese Frosting: Tangy and sweet, perfect for red velvet or carrot cake inspired macarons.
- Nutella: Straight from the jar, or mixed into a buttercream for a hazelnut delight.
- Salted Caramel: A gooey, decadent choice that pairs beautifully with chocolate or coffee shells.
Frequently Asked Macaron Questions
Got more questions bubbling up? Here are some of the most common queries I get about making French macarons.Why do my macaron shells have no feet?
The “feet” are formed when the skin on the macaron top sets, and the moisture in the batter forces steam out of the bottom, pushing up the meringue. If you don’t have feet, it’s usually because the shells didn’t dry long enough to form a proper skin, or your oven temperature was too low, preventing sufficient steam production and lift. Sometimes, over-mixing the batter can also lead to feet-less macarons as the air bubbles are knocked out.
How do I know when my meringue is stiff enough?
When you lift the whisk, the meringue should hold a peak that stands straight up without curling over. It should also look very glossy and smooth. If it’s dull or crumbly, it’s likely over-whipped. If it’s still too soft and collapses, it needs more whipping. The “stiff but not dry” stage is what you’re aiming for.
Can I use older egg whites for macarons?
Yes, many bakers swear by “aged” egg whites, meaning egg whites separated a day or two in advance and stored in the fridge. The idea is that it helps dry them out slightly, leading to a more stable meringue. However, I’ve had great success with fresh, room-temperature egg whites. The key is ensuring they are at room temperature before whipping, as cold whites won’t whip up as voluminous.
My macarons are hollow. What went wrong?
Hollow macarons are a common frustration! The main culprits are often an under-mixed meringue (not enough structure), over-whipped meringue (too much air incorporated), or an oven that’s too hot, causing the outside to set too quickly before the inside can fully rise. Ensuring your macaronage is perfect – the “lava” consistency – and your oven temperature is accurate are your best defenses against hollowness.
How long do assembled macarons last?
Once filled, macarons are best enjoyed after they’ve “matured” in the refrigerator for at least 12-24 hours. This allows the filling to soften the shell, creating that signature chewy texture. Stored in an airtight container in the fridge, they’ll stay fresh for 3-5 days. You can also freeze them for up to a month; just let them thaw in the fridge before serving.
Storage & Enjoyment
You’ve put in the work, now let’s make sure you enjoy your beautiful macarons to the fullest!The “Maturing” Period:
This is crucial. Resist the urge to eat them all right away! Once filled, place your macarons in an airtight container and refrigerate them for at least 12-24 hours. This allows the moisture from the filling to seep into the shell, creating that perfectly soft, chewy interior that macarons are famous for. This process is called “maturing” or “aging.”
Refrigeration:
Store your assembled macarons in an airtight container in the refrigerator for up to 5 days. Any longer, and the shells can start to get a bit too soft. Always bring them to room temperature for about 15-20 minutes before serving for the best flavor and texture experience.
Freezing:
Macarons freeze beautifully! You can freeze unfilled shells or fully assembled macarons. For shells: Place cooled, unfilled shells in an airtight container, separated by parchment paper, and freeze for up to a month. Thaw at room temperature, then fill. For assembled macarons: Place them in an airtight container, ensuring they don’t get squashed, and freeze for up to a month. Thaw in the refrigerator overnight, then bring to room temperature before serving.
Bringing to Room Temperature:
This really is important! Cold macarons don’t have the same nuanced flavor or desirable texture. Let them sit out for 15-20 minutes before indulging. The shells will become tender, and the filling will be wonderfully creamy.
Remember, macarons are a treat. Savor each delicate, flavorful bite you’ve worked so hard to create! They make wonderful gifts, too, if you can bear to part with them.
French Macarons with Vanilla Bean Buttercream
Master the art of French macarons with this detailed guide, yielding delicate shells with chewy centers and a luscious vanilla bean buttercream.
📝 Ingredients
👩🍳 Instructions
- 1Sift almond flour and 120g confectioners' sugar together twice through a fine-mesh sieve into a large bowl. Set aside.
- 2In the clean, dry bowl of a stand mixer, whisk egg whites, pinch of salt, and cream of tartar on medium-low until frothy.
- 3Gradually increase speed to medium. Once soft peaks form, slowly add 80g granulated sugar, 1 tbsp at a time. Increase speed to medium-high and whip until stiff, glossy peaks form (8-10 minutes). Add gel food coloring, if using, in the last minute.
- 4Add one-third of the sifted dry ingredients to the meringue. Gently fold using a rubber spatula. Add remaining dry ingredients in two more additions, folding after each, until batter reaches the 'lava' or 'ribbon' stage – it should fall in a thick, continuous ribbon and slowly reincorporate.
- 5Transfer batter to a piping bag fitted with a round tip (Wilton 1A or Ateco 805). Pipe 1.5-inch circles onto baking sheets lined with silicone mats or parchment paper.
- 6Firmly tap baking sheets against the counter 3-4 times to release air bubbles. Pop any visible bubbles with a toothpick.
- 7Let piped macarons rest at room temperature for 30-60 minutes, or until a dry 'skin' forms and they are no longer sticky to the touch.
- 8Preheat oven to 300°F (150°C). Bake one sheet at a time for 12-15 minutes, or until 'feet' have formed and shells are firm and don't wobble. Do not open the oven door during the first 10 minutes.
- 9Remove from oven and let cool completely on the baking sheet before attempting to remove. If they stick, they need another minute or two of baking.
- 10For the filling: In a mixing bowl, beat softened butter until light and fluffy. Gradually add 240g sifted confectioners' sugar, beating until incorporated. Add vanilla extract/paste, pinch of salt, and 1 tbsp heavy cream. Beat until smooth and creamy. Add more cream if needed for desired consistency.
- 11Match similarly sized cooled macaron shells. Pipe or spread buttercream onto the flat side of one shell and gently sandwich with a matching shell.
- 12Store assembled macarons in an airtight container in the refrigerator for at least 12-24 hours to 'mature' before serving for optimal texture. Bring to room temperature before enjoying.
💡 Notes
Ensure all equipment is grease-free for best meringue results. Measure ingredients by weight for accuracy. Do not rush the drying time – it's crucial for feet formation. Oven temperatures can vary, so an oven thermometer is highly recommended.



