


Have you ever wondered what makes some cakes so incredibly tender and light, while others turn out dense and chewy? The answer often lies in a fundamental baking technique that, once mastered, will revolutionize your homemade treats: learning how to cream butter and sugar. It’s more than just mixing; it’s an aeration process that traps tiny pockets of air, creating that beautiful structure we all crave.
For years, I’d just toss butter and sugar into a bowl, give it a whirl, and call it a day. My cookies were good, my cakes were fine, but they never had that professional bakery-quality lift. It wasn’t until a seasoned baker friend watched me in action, gently shaking her head, that I realized I was missing the crucial nuances.
This method, often called the creaming method, is a cornerstone for countless recipes, from delicate pound cakes to chewy chocolate chip cookies. It’s about building a foundation of texture, and it’s surprisingly simple once you understand the “why” behind each step. Let’s break it down so you can unlock a new level of baking success!

What Exactly is Creaming and Why Does it Matter?
When you cream butter and sugar, you’re not just combining ingredients; you’re incorporating air. The sharp edges of the sugar crystals cut into the softened butter, creating tiny air pockets. As you continue to beat, these pockets expand, making the mixture lighter, fluffier, and paler in color. This trapped air is what gives baked goods their tender crumb and lovely volume.
Think of it like building a microscopic internal scaffolding for your cake or cookie. Without sufficient air, the structure collapses, leading to a denser result. It’s truly the secret sauce for that melt-in-your-mouth texture.
The Science Behind the Swirl
Beyond the physical aeration, creaming also helps to evenly distribute the sugar throughout the butter. This ensures consistent sweetness in every bite and helps to prevent sugar crystals from remaining undissolved, which can lead to a gritty texture. It’s a dual-purpose technique that impacts both the texture and the flavor of your final product.
The Essential Ingredients for Perfect Creaming
While the technique is key, starting with the right ingredients at the correct temperature is paramount. Don’t underestimate the power of thoughtful preparation here.

Butter: The Temperature is Everything
You’ll want unsalted butter for most baking recipes, as it gives you control over the salt content. The absolute most critical factor, however, is its temperature. It needs to be “room temperature” – but what does that *really* mean?
- Perfectly Softened: It should be pliable enough to leave a slight indentation when you gently press it with your finger, but not greasy or melted. If it’s too cold, the sugar won’t be able to cut into it effectively, and you’ll end up with a lumpy, dense mixture. If it’s too warm or melted, the air pockets will collapse, leading to a greasy result.
- The Finger Test: Press your finger into the butter. If it leaves a slight indent without your finger sinking all the way through or feeling greasy, it’s just right.
Allowing butter to come to room temperature can take anywhere from 30 minutes to an hour on the counter, depending on your kitchen’s ambient temperature. Plan ahead!
Sugar: Granulated is Your Best Friend
For creaming, granulated sugar (regular white sugar) is typically used. Its crystal structure is perfectly designed to create those air pockets. Finer sugars, like caster sugar, can also work well, sometimes even leading to a slightly finer crumb. Powdered sugar, however, is generally not suitable for creaming as its fine texture won’t create the same aeration.
Your Step-by-Step Guide to the Creaming Method
Let’s get down to the nitty-gritty. This is where the magic truly happens. Pay attention to the visual cues – they’ll tell you exactly when your butter and sugar are perfectly creamed.
Step 1: Get Your Butter Ready
First, make sure your butter is at that ideal room temperature. Cut it into smaller pieces, about 1-inch cubes, to help it warm evenly and make it easier for your mixer to handle. Place the softened butter into the bowl of your stand mixer fitted with the paddle attachment, or into a large mixing bowl if using a hand mixer.
Step 2: Start Whipping the Butter Solo
Before adding the sugar, beat the butter on medium-low speed for about 30 seconds to 1 minute. This helps to make it uniformly smooth and introduces a little initial air. You’ll notice it becoming slightly paler and fluffier.
Step 3: Introduce the Sugar Gradually
With the mixer still running on low, slowly add the granulated sugar to the butter, a little at a time. This prevents a sugar cloud explosion in your kitchen and ensures it incorporates evenly. Once all the sugar is in, increase the speed to medium.

Step 4: Cream Until Light and Fluffy
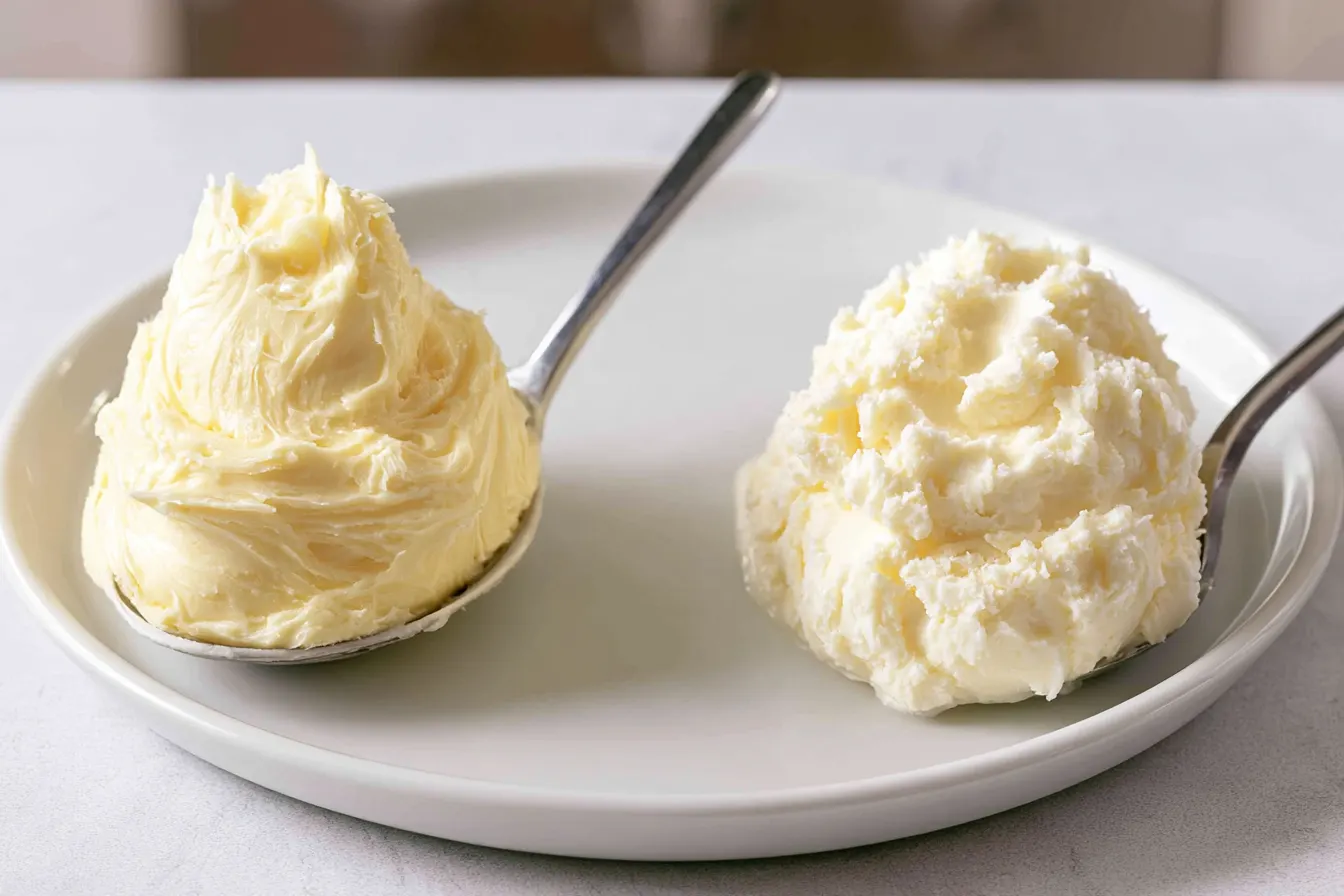
Now, let the mixer do its work. Continue beating the butter and sugar on medium speed for 3 to 7 minutes. This is the crucial stage where you’re building volume and incorporating air. You’ll see a dramatic transformation:
- The mixture will become significantly lighter in color, shifting from yellow to a pale ivory or even white.
- It will increase in volume, looking noticeably fluffier and airy.
- The texture will change from dense and sandy to light and cloud-like.
Tip: Don’t rush this step! This is where the foundation for a tender crumb is built. If your mixture still looks dense or yellow, keep creaming. It’s better to over-cream slightly than under-cream.
Step 5: Scrape Down the Bowl
Periodically, every minute or two, stop the mixer and use a rubber spatula to scrape down the sides and bottom of the bowl. This ensures that all the butter and sugar are thoroughly mixed and creamed, preventing uncreamed pockets that can lead to an inconsistent texture in your final bake. Pay special attention to the bottom of the bowl where butter can sometimes stick.
Step 6: Ready for the Next Step!
Once your butter and sugar are light, fluffy, and pale, you’re ready to proceed with adding eggs (one at a time, mixing well after each) and then your dry and wet ingredients according to your recipe. The beautifully creamed base will ensure your final product has that perfect texture.
Common Creaming Mistakes and How to Fix Them
Even with the best intentions, things can go awry. Here are a few common issues and how to troubleshoot them.
Mistake 1: Butter is Too Cold
The Problem: Your butter is hard, and the mixture looks lumpy, not smooth. The sugar isn’t dissolving or mixing in effectively.
The Fix: If you’ve just started, remove a small amount of butter and microwave it for 5-10 seconds until very slightly softened (not melted!), then add it back and continue beating. Or, simply be patient and let the mixer work longer. On a very cold day, a warm kitchen can help; some bakers even place their mixing bowl over a very slight warm water bath (don’t let it touch the water!).
Mistake 2: Butter is Too Warm or Melted
The Problem: The mixture looks greasy, shiny, and flat. It won’t get light and fluffy, and the sugar might dissolve too quickly without creating air pockets.
The Fix: This one is harder to salvage. If it’s only slightly too soft, you can try refrigerating the bowl with the butter and sugar for 10-15 minutes, then re-beating. If it’s truly melted and greasy, it’s best to start over. Melted butter simply won’t hold air effectively.
Mistake 3: Not Creaming Long Enough
The Problem: Your mixture still looks yellowish and dense, not pale and voluminous.
The Fix: Keep beating! This is the most common mistake. Often, home bakers stop too soon. Go for the full 5-7 minutes, checking for those visual cues of lightness and pallor. The longer you cream (within reason), the more air you incorporate.
Mistake 4: Not Scraping the Bowl
The Problem: You end up with streaks of uncreamed butter or sugar in your final batter, leading to an inconsistent texture.
The Fix: Make it a habit to scrape down the bowl frequently. Especially important are the bottom and sides, where ingredients can cling and avoid the main action of the paddle.
Frequently Asked Questions About Creaming
Can I cream butter and sugar by hand?
Absolutely! It will require more elbow grease and take longer, but it’s totally doable. Use a sturdy wooden spoon or a strong whisk and a large bowl. You’ll still be looking for those visual cues of lightness and pale color, but expect to beat for 10-15 minutes or even more.
Does the type of mixer matter for creaming?
A stand mixer with a paddle attachment is ideal for creaming as it provides consistent, powerful beating. A hand mixer also works very well. Both will give you excellent results, with a stand mixer being slightly less labor-intensive.
Can I use brown sugar for creaming?
Brown sugar can be creamed, especially in recipes like certain cookies. However, because it contains molasses, it’s naturally softer and moister than granulated sugar. It won’t create quite the same crisp, airy structure as granulated sugar, but it will still incorporate air and contribute to a tender crumb.
What happens if I over-cream butter and sugar?
While it’s harder to over-cream than under-cream, if you beat for an excessively long time (e.g., 15-20 minutes for a typical batch), the butter can start to warm up too much, and the air pockets might collapse. The mixture could also become somewhat grainy. However, for most home baking, it’s unlikely you’ll hit this point before the mixture is perfectly aerated.
Are there any recipes where I *shouldn’t* cream butter and sugar?
Yes! Not all recipes use the creaming method. For instance, some cakes use the reverse creaming method (where dry ingredients are mixed with butter first), and others use the muffin method (wet and dry ingredients mixed separately then combined). Recipes for oil-based cakes or certain types of cookies (like shortbread, which relies on minimal aeration for its dense, crumbly texture) often skip the intense creaming step.
Embrace the Creaming Method for Better Bakes
Mastering how to cream butter and sugar isn’t just another step in a recipe; it’s a foundational skill that will significantly elevate your baking. It’s the difference between a good cake and a truly exceptional one, a fine cookie and a perfect one. Pay attention to your ingredients’ temperature, be patient, and watch for those visual cues. You’ll soon be turning out treats that are beautifully light, tender, and utterly delicious. Happy baking!

Perfectly Creamed Butter and Sugar Base
Master the essential creaming method for light, fluffy baked goods with this detailed guide.
📝 Ingredients
👩🍳 Instructions
- 1Ensure your butter is at proper room temperature. It should be pliable but not greasy or melted. Cut it into 1-inch cubes for easier creaming.
- 2Place the softened butter into the bowl of a stand mixer fitted with the paddle attachment (or a large bowl if using a hand mixer). Beat the butter on medium-low speed for 30 seconds to 1 minute until it's uniformly smooth and slightly lighter in color.
- 3With the mixer still running on low speed, gradually add the granulated sugar to the butter, a little at a time, until all the sugar is incorporated. Increase the speed to medium.
- 4Continue to beat the butter and sugar on medium speed for 3 to 7 minutes. During this time, the mixture will undergo a significant transformation: it will become noticeably lighter in color (pale ivory to white), increase in volume, and become fluffy and airy. It should look like whipped clouds.
- 5Periodically, stop the mixer and use a rubber spatula to scrape down the sides and bottom of the bowl. This ensures all the butter and sugar are thoroughly mixed and creamed.
- 6Once the mixture is light, fluffy, and pale, it's perfectly creamed and ready to be used as a base for your favorite cakes, cookies, and other baked goods.
💡 Notes
Always use unsalted butter for better control over the final salt content. The temperature of the butter is the single most critical factor for successful creaming. Don't rush the creaming process; this step is vital for the texture of your finished bake.



